Installation Time
(approx) 3 Hours
Difficulty Level:
Light to Moderate mechanical skill required.
Installation Guides
FREE 1 to 3-Day Delivery on Orders $119+ Details
$347.99
FREE Shipping Market Price $406.99 You Save 14% ($59.00) Up to 10% off for Military & First Responders! See DetailsAdd Local Shop Installation
Saved - View your saved items
We're sorry. We couldn't save this product at this time.
or use
Hey, what's up guys, I'm Ryan from ExtremeTerrain and today I'm here the Smittybilt OEM replacement top with tinted windows fitting your 2007 to 2009 four-door Wrangler. This is for the JKU owner looking to replace that old worn-out top with an OEM style top not only increasing visibility but getting rid of some of that road noise. Whether your top is torn, stretched or you just have scratched windows, this is an affordable and easy to install replacement. The heavy duty top material provides OEM quality and the new windows provide clarity and privacy with the DOT approved 31% tint. This is made from marine grade vinyl coated fabric and it's sealed to ensure that no water gets in your Jeep and that it will last you for years. The wick stop threads prevent leaking around the stitch holes and the self-correcting zippers make it very easy to get the windows on and off. Now this comes as a complete kit with both side windows and the rear window and is a direct replacement if you have the factory frame. This is gonna be your most affordable option on the site and a great buy at around $300. And not only that but it has great reviews from happy customers. As far as install goes, I'm gonna give this a two out of three wrenches on the difficulty meter, since you can install this in about three hours using basic hand tools. Now with that being said, let's hop into our install. To begin this installation we'll need to remove the soft top material since we're gonna do this with a frame on there. We're gonna start by removing the rear windows and a few screws out of the rear bow assembly. So to remove these side windows you're just gonna peel back this Velcro and unzip this. And you'll need to open your door, that way we can slide it out of our door surround and our tub edge. Do the same thing for the other window. So next step we're gonna remove our rear window, so we're going to open our tailgate and grab our zipper from this side and go all the way around and unzip it. So next we're gonna take a Phillips head screwdriver and remove the four screws from this rear bow assembly. So while we're back here we're gonna just pull this back of the soft top out of that edge. And you're gonna do the same thing the other side. So next we're gonna go to this other bow assembly, the second one in from the back, and we're gonna remove those four screws with a Philips head screwdriver. So next we're going to remove these edges out of our door surround. You can do that by just pulling down and pulling out. We're gonna do the same thing on the other side. So now we're going to disconnect the front of our top, pulling that edging out of our door surround and then we're gonna unlatch our header from our windshield channel. So, I'm pull our visor down, pull that aside and release our latches. Same thing for the other side. So next we're gonna flip this soft top backwards, so we can access the screws underneath and then we'll flip it back. So with this flipped back we're gonna remove two screws from either side with a Philips head screwdriver, then we can flip it back, flip the material over and remove the rest of the screws. So we're gonna take this whole assembly, we're gonna flip it back up, then we're gonna take all the material and flip that over onto the hood. So you're gonna pull these edges out and then we're going to flip this material forward. Now you're gonna have two rows of screws that are going all the way down. We're gonna use a Phillips head screwdriver to take those out. I recommend using a drill because it's gonna be much faster. So removing all those screws is gonna allow us to separate the header channel. So we're gonna pull this top section off and then we can remove our fabric. Then we'll pull these pieces of tape off as well. So the same way that we took the old one off we're gonna put the new one on. So you're gonna lay this upside down and drag this front edge up. Now there's gonna be a notch in the fabric here on the new top and there's a notch in the header channel. We're gonna line both of those up and then we're gonna use tape, we're gonna tape this edge down to our header channel. This is gonna keep it in place while we put that other plastic section of the header channel on. So, let's get out our tape. All right, so now that we have all that tape down, we're ready to put this plastic section on. So we're going to pull this up a little bit, make sure that this edge stays in place and then we're gonna need to get our edges inside of here and then this whole thing wrapped around and then we'll put our screws in. So we're gonna pull this fabric up here like this and then we're gonna tuck this channel, this plastic section down in there. When you're getting this top section on, you wanna make sure that that edge stays in there and that that tape holds. And then we're gonna get these corners to seat inside of this top piece and then once all that's taken care of we can go ahead and put all these screws back in. So when you're ready to put all these screws in you can get them pretty close with a power tool but I would recommend hand tightening them with a screwdriver, that way you're not gonna strip out the holes in the plastic. So now that we have the header secured and bolted down, we're gonna take all the material, flip it all the way back and then we're going to flip this back and get the four screws in. So after we have this all flipped back, we're gonna take this plastic edging and we're gonna flip that over and then we'll install those two screws. So we're gonna slide this back and make this front edge nice and tight. Then, gonna use a Philips head screwdriver to reinstall those screws. So while we have this rearmost bow out in the open since Smittybilt provides us with new straps, we're gonna go ahead and pull these old ones off and stick the new ones on. So to attach this rearmost bow you're gonna have these flaps on the inside, these flaps are gonna wrap around from the backside and then we're gonna install the screws that we took out. So we're gonna lift this up and this is going to go in each of these corners. So we're just gonna set that on top like that. Then we'll crawl up here and get these screws installed. So we're gonna to center this top on this bar the best we can. And then we're gonna start with these two middle ones. This flap is gonna to wrap around the backside and then we're gonna poke a hole through here, get our screw started and then we're gonna screw it into our bow. So for this second bow in, you're gonna have this flap hanging down from the soft top material. This is gonna go on the front side of the bow facing the front seats and we're gonna start with the middle and work our way out with these Phillips head screws. So with all those screws installed, the next thing we're gonna do is we're gonna flip this Sunrider closed. So now that we have this closed, the first thing we're gonna do is we're gonna close our latches. After you have those front latches shut, we're going to tuck our edges into our door surround. We're gonna do the same thing on the other side. So we're gonna go to the back of the top and you're gonna pull down firmly on here and we'll get these edges seated in the tub. Then we'll do the same thing on the other side. So at this point in time you're done installing the top section, we can start with the windows. So we're gonna start with this side window. We're gonna get this zipper started up top a few inches and then we'll get this seam in our door surround. So once you get that front seam in and this bottom seam started, we can zip our window up the rest of the way and then we'll finish getting this [SP]. After we're done that you're gonna go ahead, push all this Velcro down, make a real nice seal. Then you can shut your door. Then we're gonna do the same thing for the other side. You wanna get that zipper started a few inches and then we're going to get this door section seated in the door surround. Might need to disconnect the rear to allow this to travel forward a little bit and then we can get this all the way in because this material is pretty tight. Now this bottom edge is gonna go in to the tub so you're just gonna press it up against that, press down and we'll just go along and do that for the rest of it. So after you get the two side windows in we're gonna put the rear window in. Now we're gonna start on this side, the driver side where the zippers are. You're gonna have this little edge, this is just gonna slide into those zippers and then we'll zip it up all the way around. So the last step is to install the tailgate bar. So you're gonna take both of the zippers and just zip them up a little bit and we're gonna take our rear window and we're gonna slide this bar off of there, and then we're going to slide this bar on in the same way. So there's this little channel here with a plastic piece sewn into it and we're just gonna slip the bar onto that and then slide it all the way down. Once you slide that all the way down, this is gonna go inside here into our tailgate bar retainers. Then we can zip these the rest of the way up and hook our flaps back in here. So once you get this top fully installed, you're gonna wanna sit it in the sun and allow it to stretch a little bit before you remove the windows. However that wraps up my review and install. For more videos like this, check us out at extremeterrain.com.
Subscribe to our YouTube Channel
Features, Description, Reviews, Q&A, Specs & Installation
Brand | Smittybilt |
Soft Top Type | Replacement Top |
Soft Top Color | Black |
Soft Top Fabric Material | Polymer Cloth |
Soft Top Window Color | Tinted |
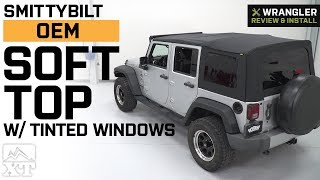
Replace Your Old Top. Over time, your soft top will deteriorate and depending on the stress you placed on it, it may even be tattered. If so, it is time for a new Smittybilt OEM Replacement Top w/ Tinted Windows. The replacement top comes with tinted windows that are made from quality materials and they allow you to open up the Jeep when you want. The OEM replacement top itself will maintain that standard, off the factory line look you desire.
Wick Stop Threads. The Smittybilt OEM Replacement Top features a special wick stop thread to prevent leaking around the stitch holes. All seams have been heat selaed and reinforced for maximum protection.
No Leaks. The Smittybilt OEM Replacement Top w/ Tinted Windows is made with you in mind. It comes sealed to ensure no water gets into your Jeep and it is made from a marine grade vinyl coated fabric that will provide you with many years of use. You will find that this replacement top does not rip, or tear and the windows are made from DOT approved plastic and tinted to 31 percent. All of the zippers are sealed and treated to ensure that you can use them without worry that they will break.
Moderately Difficult. Installation of the Smittybilt OEM Replacement Top w/ Tinted Windows is considered to be moderately difficult and you will find that the total time to install is about three hours. All of the hardware you need is included and you will find that this kit is designed to replace your soft top only.
Warranty. 3-Year Warranty.
OE Soft Top Hardware Required. For installation of this Soft Top, you will require the original factory soft top hardware. If you have misplaced or damaged your OE hardware you will require the following Mopar Hardware - 55395757AC, 55397074AB, 55397075AB, 55395761AB, 55395760AB.
Application. This Smittybilt replacement soft top is designed for 2007-2009 Jeep Wrangler JK 4-door models. This soft top does not include the soft top bow assembly. Intended to be used with existing soft top bow assembly.
Fitment:
DetailsSmittybilt 9080235
CA Residents: WARNING: Cancer and Reproductive Harm - www.P65Warnings.ca.gov
Installation Info
Installation Time
(approx) 3 Hours
Difficulty Level:
Light to Moderate mechanical skill required.
Installation Guides
What's in the Box
10 More Questions
Requires Use of Factory Soft-Top Hardware.