Talk to a Wrangler Sales Tech
1-877-870-8556
M-F 8:30A-11P, Sat-Sun 8:30A-9P
Logo Image
$20K Sweeps! 10 Chances to Win! Enter Daily >

Barricade Trail Force HD Front Bumper with LED Lights (87-06 Jeep Wrangler YJ & TJ)

Item J102910
Verify parts fit and get product recommendations.
Wrangler Sales Techs: Connect Now M-F 8:30A-11P, Sat-Sun 8:30A-9P
$0.00
Our Price

$349.99 (each)

FREE Shipping Market Price $401.99 You Save 13% ($52.00) Up to 10% off for Military & First Responders! See Details

Will this fit your Vehicle?

Select a different vehicle Help?
Update or Change Vehicle
Ship to: Ashburn - 20149
Sorry, please enter a valid US or CA postal code
We're sorry, zip can't be updated at this time.
Recommended Install Shops
How It Works
Install Shops are available near Ashburn - 20149

Add Local Shop Installation

Total cost of service $399.00
    Create a list
    Add to New List

    Saved - View your saved items

    We're sorry. We couldn't save this product at this time.

    or use

      Video Review & Installation

      Hey, guys, today I'm here with the Barricade Trail Force HD Front Bumper with LED Lights fitting all 1987 to 2006 YJ and TJ Wranglers. So, adding a front bumper to your Wrangler can add a number of different benefits including utility, strength and protection as well as aesthetic. So, this Barricade front bumper is gonna do all of that at a very affordable price point for everything that it brings to the table. So, this is gonna offer recovery points, a winch plate and full front end protection with uncompromised approach angles. So, as you can tell on the side, these are angled up and that's gonna be for those YJ and TJ owners that are looking to up their tire size and not necessarily compromise those approach angles on the trail. So, this is also gonna be for those YJ and TJ owners that are looking for some more solid protection than their factory from bumper wasn't able to give them with a bigger build as well as a bull bar up top. Now, this is also gonna come with some light mounting options and what I do like about this in comparison to some other choices on the site is this isgoing to come up with LED lights integrated into the front bumper. And it's also going to have a wiring harness making it very easy to install this front bumper and wire up those lights. So, this is gonna be for those YJ and TJ owners that are looking for a little bit of extra lighting out of the front of their rig for those dark back roads and dark trails. So, like I mentioned before, this is gonna be very affordable for what this brings to the table at roughly $400. Now, like I said, this is going to come with a number of different benefits. And in comparison to some other choices, this is gonna bring a lot to the table including that utility, the extra visibility, and the overall build. Now, some other options are usually gonna have a more simplistic design, they may not come with the auxiliary lighting or they may just be for a tubular design that's really not going to incorporate all of the utilities that this gives. Now, on the other hand, more expensive choices are usually just going to be a little bit more heavy-duty as far as the build goes. Or they may be different finishes or premium name brands but in my personal opinion, I think this does a really good job at bringing a lot to the table. It brings all of that utility and a lot of extra style to the front of your rig, and it definitely gets the job done for about $400. So, install's gonna be pretty easy, it's gonna be a one out of three wrenches on the difficulty meter. There's very minimal wiring with this, like I said, there is a wiring harness. So, you're gonna need about an hour's worth of time and a couple of basic hand tools. So, speaking of the install, let's jump into that now. The tools that I used for this install were an impact wrench, a 19-millimeter open-ended or box wrench and a 19-millimeter ratcheting wrench, 3/8-inch drive and quarter-inch drive ratchet, a 10-millimeter and 11-millimeter deep socket, a 10-millimeter deep socket, a 19-millimeter shallow socket, and a flathead screwdriver. So, our first step to taking off our factory front bumper is gonna be to remove our sway bar cover. Now, you're gonna need a 10-millimeter socket and we're gonna remove the two bolts on either side that are holding the cover on. So, after the two bolts on the front are removed there are gonna be two on the back so you can remove those with the same 10-millimeter socket. After those four bolts are removed, we can peel up our sway bar end link cover. So, after our sway bar cover is off we need to remove the two bolts on the top and the one bolt on the bottom of either side of our front bumper. Now, our hardware was replaced so I'm gonna be using a 19-millimeter socket, however these should be T55 Torx. So, after the two on top are removed we can remove the one on the bottom, then the same thing for the other side. After that last bolt is removed, we can remove the whole front bumper. So, before we go ahead and install our new front bumper, I wanted to tell you guys a little bit more about it and all the benefits that you're gonna see out of this that you're not seeing with your factory front bumper. So, as you can tell the factory front bumper is pretty plain, you have some basic thin steel in the middle and then you're gonna have some plastic end caps on the outsides. Now, that is going to provide you some decent front end protection however, it's not going to compare to this Barricade front bumper that we have here. So, it's made of a thick steel material, has a nice texture black powder coat finish on top of it, that is going to protect the steel underneath but it's also going to do a great job at creating a very aggressive and off-road look. Now, on the topic of protection, you are getting a bull bar up top here that's going to give you some grille protection. And then you're also getting a couple of different benefits out of this, it's going to add some utility as well as style to your Wrangler. So, you have two welded D-ring mounts on the front, perfect for recovery as safe and efficient recovery point. You're also getting a winch plate that has a standard bolt pattern in the middle. And then you're getting two light mounting tabs right on top of that bull bar which is going to give you the option to add any accessory lighting down the road. Now, on the topic of lighting, this does come with two LED fog lights on the side, which in my personal opinion is something that I really like about this front bumper. Now, in comparison to your factory front bumper, obviously, it doesn't come with it. But in comparison to even some other aftermarket front bumpers on the site, this is gonna be one of the options that does integrate lighting and that's perfect for some extra visibility while you're out on the street or even on dark trails. So, I personally think this is going to be a big upgrade in style, function as well as utility in comparison to your factory front bumper. So, enough for me, let's go ahead and install our new front bumper. So, what we can do is mount up our front bumper, slide it on to our frame rails and then we can line up the two holes at the top and one underneath on either side and grab our hardware and secure it down. So, after the front bumper is on and lined up, what we can do is take our provided hardware, the bolt, flat washer and lock washer and thread that into the factory hole in the frame. So, after the two on top are on we can thread in the one down at the bottom, and we don't wanna tighten anything down just yet, we wanna get the other side in then we can go back and tighten them down. So, we can thread in the hardware on the other side. So, once you have all of your hardware in we can go ahead and tighten it down. Now, on the other side I used an open-ended wrench and what that's gonna do is just speed the process up. Now, on the bottom, we can use that 19-millimeter socket and then we can wire up our lightning. So, what we're gonna do next is wire up or lighting so what we have to do is pop our hood.So, our next step is to take our wiring harness and get our two leads and feed them behind the grille, underneath the grille and to our front bumper light. So, what I'm gonna do is just take these and feed them on down so we can grab them from underneath. So, while we're here, what we can do is just plug them in, there is gonna be a little seal, you wanna make sure that it's seated, this is gonna prevent any water or dust from getting in the connector. All right, and then our longer lead is gonna go to the driver side. We can tuck that underneath and then we can head back up into the engine bay and connect this to the battery. All right. So, what we can do is connect both of our positive leads from our switch as well as our inline fuse to our positive terminal. I'm using that 11-millimeter socket in order to take this off and we really don't have to take the whole nut off right here, what we can do is just loosen it up and these terminals are open-ended or these connectors are open-ended so we can just sandwich them right in between. So, after those are both on there, we can just tighten that back up with that 11-millimeter socket. All right. So, after those are tightened up, what we can do is take our negative lead and put that on our negative terminal. We're gonna have another negative lean but we're gonna connect it to a ground over on the other side. So, we're gonna do the same thing, this has an open connector, going to place it on the terminal and tighten that down. Then we can grab the rest of our switch wires and put them over on the other side of our engine bay and connect those and run those through the firewall. So, now we're over on the other side of the engine bay, we do need to ground out this one, that negative wire. So, what I'm gonna do is just ground that out on one metal bracket over on the driver side. So, I'm gonna grab a 10-millimeter socket and just loosen up that bolt so we can put that eyelet underneath. So, this is gonna depend on where you're grounding it out. However, I just picked this metal bracket and tightened it up with my 10-millimeter deep socket. Now we can send our wiring harness through our firewall and hook up our switch. So, what I'm gonna do is just pull back on this grommet here and wiggle our switch wire through so we can access our cab area. So, after you plug it in, what you can do is just mount it up in any location that you feel like and then you can just zip tie these wires and clean them up. So, after that's finished, then you're all set to go. So that's gonna wrap it up for my review and install. Make sure you like and subscribe and for more video and products like this always keep it right here at extremeterrain.com.

      Product Information

      Features, Description, Reviews, Q&A, Specs & Installation

      Features & Specs

      • Heavy Duty Front Bumper
      • 5/32" Steel Construction
      • 2" x 0.120" Tubing
      • LED Accent Lighting
      • High Strength, D-Ring Mounts w/ 9,500 lb Pull Capacity
      • 2-3/4 Inch D-Ring Pins
      • Built-In Winch Plate for up to 12,000 lb Winch
      • Two Stage Textured Black Powdercoat Finish
      • Weight: 64 lbs
      • Fits 1987-2006 Jeep Wrangler YJ & TJ Models

      Description

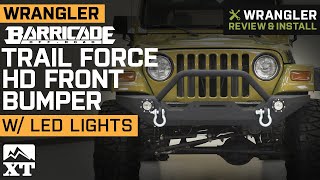
      Perfect For Off-Road Use. Featuring two high strength D-Ring mounts, an integrated 10x4.5" winch mount that is capable of supporting a 12,000 lb. winch, and two built in LED fog lights, the Barricade Off-Road Trail Force HD Front Bumper is perfect for off-road use. Each bumper comes equipped with two 3/4 inch pin d-rings able to handle a load of 9,500lbs making them perfect for recovery.

      LED Accent Lighting. This Barricade Off-Road Trail Force HD Front Bumper features built in LED lighting in both factory sized fog light housings for impressive styling. These LED accents not only look great, but also help you "see and be seen" even on the darkest trails to provide additional safety.

      Heavy Duty Construction. Manufactured from 5/32" mild steel plating and 2"x0.120" tubing this Barricade Off-Road Trail Force HD Front Bumper is completed in a two stage finish using epoxy pre-coating and high-grade textured black powder coating for long lasting durability. The D-Ring mounts are welded both inside and outside for extra strength.

      Easy, Bolt-on Installation. Barricade Off-Road Front Bumpers are engineered to be a direct bolt-on upgrade using just basic hand tools, so there is no drilling or cutting required for a clean straight forward installation.

      Application. This Barricade Off-Road Rock Crawler Front Bumper with built-in 10x4.5" winch plate is specifically designed for use on 1987-1995 YJ and 1997-2006 TJ Jeep Wranglers.  Direct bolt on for TJ models; Drilling may be required on some YJ applications.

      Freight Notes. Freight items can only be shipped within the continental 48 states, no expedited methods. What is freight shipping? Your Answers are Right Here!.

      Barricade Off-Road

      Fitment:

      Details

      Barricade J102910

      CA Residents: WARNING: Cancer and Reproductive Harm - www.P65Warnings.ca.gov

      Installation & What's in the Box

      4.5

      Customer Reviews (500+)

        Questions & Answers

        10 More Questions

        Will It Fit My Wrangler

        • tj Rubicon 2 Door - 03, 04, 05, 06
        • tj Rubicon Unlimited 2 Door - 05, 06
        • tj Wrangler 2 Door - 97, 98, 99, 00, 01, 02, 03, 04, 05, 06
        • tj Wrangler Unlimited 2 Door - 04, 05, 06
        • yj Wrangler 2 Door - 87, 88, 89, 90, 91, 92, 93, 94, 95

        • Not compatible with Steel cable winches as roller fairlead will not clear LED lights

            Related Wrangler Categories