FREE 2 or 3-Day Delivery on Orders $119+ Details

Talk to a Wrangler Enthusiast
1-877-870-8556
M-F 8:30A-11P, Sat-Sun 8:30A-9P
Logo Image
Win $3,000 in Store Credit! Enter Daily >

Bestop Trektop NX Soft Top; Black Twill (18-23 Jeep Wrangler JL 4-Door)

Item J130621-JL
Call a Wrangler Enthusiast at 1-877-870-8556
M-F 8:30A-11P, Sat-Sun 8:30A-9P
$0.00
Our Price

$1,499.99 (kit)

FREE Shipping Market Price $1,664.99 You Save 10% ($165.00)

Open Box from $899.99

Will this fit your Vehicle?

Select a different vehicle Help?
Update or Change Vehicle
Ship to: Ashburn - 20149
Sorry, please enter a valid US or CA postal code
We're sorry, zip can't be updated at this time.
Recommended Install Shops
How It Works

Add Local Shop Installation

Install Shops are available near Ashburn - 20149
Total cost of service $499.00
    Create a list
    Add to New List

    Saved - View your saved items

    We're sorry. We couldn't save this product at this time.

    or use

      Video Review & Installation

      Hey, guys. Today I'm here with the Bestop Trektop NX Soft Top in Black Twill fitting all 2018 and newer four-door JL Wranglers. So this is going to be for the JL owner who is looking for a premium soft top that is complete. It comes with everything that you need while also being very functional and very easy to use. So even though you may have a soft top on your Wrangler, this is going to be a perfect upgrade. If you're looking for a more premium fabric, maybe you have damaged your fabric while you were out on the trail or it's starting to fade and you're looking for something to replace that factory soft top, this is going to be a perfect upgrade. Now, this is also perfect for those hard top owners that are looking to make the switch to a soft top maybe for those warmer months and they're looking for something that is going to be a bit more premium than the average soft top, they're not looking for a factory top, they're looking for something that has more functional features and a little bit more flexibility than their hard top is able to provide.Now, like I said, this is going to have very functional features. This is gonna come with a Sunrider feature in the front, that is cable-assisted, so all you have to do is unhook two latches and you easily have that open-air driving experience. This is also going to have very minimal zippers on the windows, so you only have two zippers overall in this whole soft top, which is going make it very easy to take off those with those windows and turn this into a bikini top. So the main feature about this is gonna be that premium black twill material which is the same material that you would see on a luxury convertible top, so you can tell that is made with quality. So that twill material is going to help you out with some insulation as well as drowning out some of that road noise around you a little bit better than that black diamond vinyl material would. This is not only just going to help out with that, but it's gonna be wrinkle-free and have that deep tone of black that makes it look a little bit more premium and look a little sleeker than that black diamond may look on your Wrangler. Not to mention, adding to that style, you also are getting tinted windows that are 18% and DOT-approved and that fastback look that's gonna add a little bit of an aggressive note to your Wrangler. Now, with all of that being said, this is gonna be roughly $1,300 and in my personal opinion, with all of the functionality as well as the quality that went into this soft top, I think that this is definitely worth that price point. Now, in comparison to the other soft top that we have available on the page, that more cost-effective choice is going to be a black diamond vinyl material and that's why this is going to be a little bit more expensive, it's because it has that twill material that offers a couple of different benefits and a longer lifespan over that black diamond. Now, overall, I think, again, this is definitely worth that price point. It's very functional, it's very easy to use, and it's very easy to install. So install's gonna be a two out of three wrenches on the difficulty meter, taking you about two hours to get the job done with some basic hand tools. So speaking of the install, let's jump into that now. The tools that I used for my install were an impact wrench, a 3/8-inch drive ratchet, a 13-millimeter open-ended wrench, an 8-millimeter rationing wrench, a T8 Torx bit, a T45 and a T40 torque socket, a 5-millimeter, and 4-millimeter Allen socket, and a 4-millimeter and 3-millimeter Allen key.So the first step is to put together our door surround. So your rear door surrounds are going to be in two pieces and you're gonna be provided with some spring clips as well as some bolts and we are going to put those together. So this bottom piece is going to insert up here, but we have to put on our spring clip first. So we're actually going to install it upside down so the threads are gonna be facing the top of our door surround. We're just gonna clip those into place and we can insert the bottom part of our door surround, grab our button head bolt, and thread that in. So you're gonna need a 4-millimeter Allen key for this. So once you have those threaded in, if you have a 4-millimeter Allen socket, you can go ahead and use that. So once those are tightened down, then we can move on to our backplating that's gonna go on the bottom and the top part of our rear door surrounds. So I'm gonna start at the top of our door surround. We're gonna get our backplating without the Bestop symbol on it, put that into place over those bolt holes and then we're gonna take our small Torx head screws with a T8 Torx bit and thread those into place. So the holes aren't gonna be threaded, you do have to apply pressure to get them to thread in themselves. So once you're finished at the top, we can move to the bottom of our door surround and grab our branded backplate. So these are gonna be side-specific, so just making sure it's in the right direction. We can do the same thing that we did for the top.So our last thing that we have to do with our door surrounds is add our bow bracket. Now, this is going to have a little tab down at the bottom and then two holes up at the top that are gonna be flat. We are going to make sure that the bracket's facing the inside of our door surround then we can grab our button head bolts and thread those into the door surround. And we can use that same 4-millimeter Allen key to tighten those down. I'm using my Allen socket, you can just use an Allen key if you need to. After that bracket is on, we can repeat that same exact process for the other side.So the last thing that we have to do on the table before we can head over to the Jeep is just install our bow pivot brackets on our bow assembly number two. Now, this is going to be the bow assembly that has the arms connected to it and we just have to make sure that these bow pivot brackets are on the end of here before we go ahead and install it on the Jeep, so you are gonna need your plastic bushings as well as the hardware that's provided and we can go ahead and install those. So what we're gonna do is take our plastic bushing, put it in the inside of our bow assembly number two and we're gonna sandwich that in between the bracket and the bow assembly then we're gonna take our bolt with our flat washer, put that through. We can take our plastic bushing, put that on the other side, making sure that that tapered part is facing in then we can grab our second flat washer and then our nylon lock nut. So after that's put together, we can grab an 8-millimeter wrench. I have a ratcheting wrench here just to make it a little bit easier, and then a 3-millimeter Allen key and we can just go ahead and tighten that down. After that's tightened up, we can repeat that same process on the other side. So once those two larger brackets are on bow number two assembly, then we can head over to the Jeep and start installing all of our hardware. So now that we're over at the Jeep, we can install our door surrounds. Now, I am going to start at the front. You're gonna wanna make sure that the Bestop symbol is down, that this is going to be facing up and then the clamp that is going to have a hinge on it is gonna be on the underside of your sports bar or your roll bar. So we're gonna take our longer T40 Torx bolts and put them through your sports bar and thread them up into the top of your door surround. So because all of the gaskets and the seals are new, it's going to be a little bit difficult to get them in the first time. But once everything's started to thread, you can take a T40 Torx bit, I'm using a torque socket, and we're just gonna thread those the rest of the way in. So after the front is installed, we can move to the back. So the rear door surround's gonna be the same thing as the front. You do have these tabs here that need to go in the top of your sports bar and this is going to line up with that front door surround and kind of sandwich it in between the sports bar and the front one. It's gonna sit right on the back of your... So you can feel that it's set in place. Then we can put down our hinges and put in the same style bolt as the front and thread those in. So once those are threaded, we can tighten them down with that same T40 Torx bit. Now we can take our provided T40 Torx bolt and attach that through the door surround into the body of the Jeep and then take our T40 Torx bit and tighten that down. So once that's tightened down and in place, we can do the same exact thing on the other side. So our next step is to attach our tailgate bar retainers. Now, they are gonna be side-specific, but you really can't mess it up because they only will fit on one side. So we're gonna take our factory style bolt. This is gonna be your T45 bolt and we're gonna thread that into the body of the Jeep. And once that is threaded in, we can take our T45 Torx bit and tighten that down. We can do the same thing on the other side. So now that we're in the back of the Jeep, we can start to attach our bow assemblies. Now, we're going to attach to the rear assembly and this is going to be the one with the snap buttons and then the reinforced bar on the side. So we're gonna take our button head bolt, our flat washer, and our nylon lock nut, and put that through our door surround on either side. So making sure that the bolts are in on the other side, they don't have to be secured, you're gonna take a 13-millimeter wrench and a 5-millimeter Allen key, I'm using an Allen socket, I'm gonna go ahead and tighten those down. Then we can secure it on the other sideSo what we're gonna do is just move forward to our next bow assembly. This is going to thread into the top of your rear door surround brackets and we're going to be on the rear bracket of that rear door surround. So we are going to thread in our flat washer and our button head bolt in the back mount and then for the front one, you're gonna grab your mesh panel. This is gonna attach on both sides, but we're gonna sandwich this in between our bow and our bracket. Now, we're not gonna tighten that down just yet. We need to make sure that the other side is attached with this mesh before we go ahead and tighten everything down. So what we can do now is just go ahead and tighten those down. I'm gonna be using a 4-millimeter Allen socket. And then the same thing on the other side. All right, now we can head up to our front-rear bow assembly bracket. So now we're up at our front-most bow. This is the one that we had on the table originally that we put these brackets on. So we're going to do the same thing that we did with the middle bow and sandwich that mesh panel in between and thread those same button head bolts and the flat washer into the door surround bracket. Now, again, we just don't wanna tighten this down right away, we wanna make sure that we have both of those in on each side. And after that, we can just tighten them down, same 4-millimeter Allen. All right. Now we can head back to the table and put together our fabric.So now that we have everything installed on our Wrangler, we're moving back to the table and we're going to install our bow link assemblies as well as our bow pivot brackets onto our side bows that are attached to the header that's attached to our fabric. So we're gonna start with the bow pivot brackets and that's gonna essentially be the same thing that we installed on our other bows, but they are going to be the smaller bracket with the smaller tab between the two. All right, so just like our other both pivot brackets, we're gonna put our bolt, our flat washer on the outside, our bushing on the inside. And we can put that through our side bow, then another plastic bushing, then our last flat washer, and then our nylon lock nut. Then we can tighten that down with the same 3-millimeter Allen key that we use before and our 8-millimeter wrench. All right. So once that pivot bracket is installed, we can grab our bow link assembly and essentially install it the same way except for a little farther the side bow. So we can put this through first, put our plastic bushing on. Put on our side bow. So we're gonna essentially install that the same. So you wanna put your bolt through with your flat washer, your plastic bushing in between the side bow and your link assembly, then another plastic bushing, then a flat washer, and then the nylon lock nut. Now, for this, since you don't have the bracket in the way, you can use the ratcheting side of the wrench or you can use an 8-millimeter deep socket and a ratchet for this side. All right, now we can do the same thing on the other side. So what you're gonna do now is grab a friend and we're gonna lay the header over our Jeep and make sure that the fabric is laying over our windshield as well as our hood and then we can go ahead and attach all of our bow assemblies. So now with the fabric on top of the Jeep and our brackets sitting on top of our doors around brackets, we can go ahead and install those with the same button head bolts and flat washers. All right, so once those are threaded in, we can take our 4-millimeter Allen key and tighten those into the bracket. So after those are tightened to the bracket, we can attach our bow link assembly to our bow that is attached to our front-rear door surround bracket and we're gonna do the same thing. So we are going to use our bolt and our flat washer as well as our plastic bushings. So once this is completely secured, it will sit flush with the door surround, but right now since we are working on it, it's going to be raised up a little bit. So now we can tighten this down with our 8-millimeter ratcheting wrench and our 3-millimeter Allen key. And once that's good and snug, we can move over to the other side. So now we can do the same thing on the other side, starting with our bow pivot bracket. Tighten that down with the 4-millimeter Allen. Then we can move back to our link assembly.So after everything is attached on our bows, we can start to flip our fabric backwards. So because the Sunrider feature or this top is spring-assisted, we do need to attach that spring at the back on the back of our rear door surround. But in order to give us some slack to do that, we will have to open up our Sunrider feature. Now, because we already attached all the hardware, it will go back exactly how it does when you open this up, but it will be a little bit harder to do just because you don't have that spring assist there to help you. So now what we can do is move back and grab our cable here and we are going to insert it in this hole over on the side of our rear door surround. All right. So now that that's hooked in, we can do the other side as well. So while we have slack in that Sunrider feature, we're also going to attach the rear of our fabric. So that is going to have snaps in it and we are just going to wrap it around from the front and snap it into place. So what we need to do is kind of snake this through underneath, pull it up, and just snap it into place. So it's actually gonna go underneath this bar and then snap up top. So it's a lot easier when you have slack in that Sundrider and then one to put that sun rider forward and latch it at the end, it's going to sit very taut. So once those are all snapped in, we can move on to the middle bows and those are just gonna be secured with Velcro. So what I like to do is just start in the middle, we'll wrap the hard part of the Velcro around, then loop the soft part on top of it, and then we can just work our way to the outsides. And this is also very easy to go back and adjust at the end. Now we can take our Velcro that was provided in the kit and we can that too at the rearmost bow. So this is going to be the smaller part of the rear bow and we're just going to wrap that around and that's what this big piece of Velcro is going to stick to. So we're gonna do that for each of the four sections. So you wanna try to center it, about three and a half inches on either side. And then that will secure down and you just wanna pull it as tight as possible considering you still have slack in the front there. So what we're gonna do is close up our Sunrider feature and Velcro our last bow and then we can move on to our windows. So I did flip the Sunrider forward, however, I didn't take secure it down. We still want a little bit of slack in there just so we can secure this Velcro. So now we can work on our quarter windows before we head to our rear window. So you have a channel up at the top that we're going to slip into the channel that is on the soft top fabric up at the top. So once that's slipped into place, we wanna make sure that this is pulled all the way front and is sitting completely in that channel. And there is gonna be a hook on the inside that's gonna go on the back of that bow. So once that's clipped into place, we can pull this as far forward as we can. And then this window stiffener, this plastic piece is gonna go in the inside of the door surround, so we're gonna try to tuck that in as best as we can for right now. And then we can head to the back corner where we can attach our button on our tailgate retainer. So now we can take this nylon strap with these snap buckle and buckle that into the back of our tailgate bar retainer. And then what we can do from there is take these window stiffeners down at the bottom, these are gonna be our plastic tabs, and we can secure them up around the body, the belt rail retainer of our body on our Wrangler. All right, so they are gonna be pretty stiff, but once you have the back one, you will be able to get the side ones in. So once that's in place, we can work on the other quarter window and then move to the rear. So we can do the same thing for the other side. So these retainers at the front and at the bottom may have to come out a little bit again when we attach our rear window, but for right now, just to make sure that everything's attached, we can put those in. So if you are in a warmer climate, you may be able to get away with the whole retainer at the bottom and on the door surround attached while attaching the rear window. However, we are in a cooler climate so it may not work out in our favor. So now we can install our rear window just like our quarter windows did with the C-channel up at the top, making sure that the Bestop symbol is down on the left-hand side. Now we wanna make sure our zippers are up at the top and we can go ahead and zipper the one side in place about two inches down and then on the other side, we're gonna have to stretch it a little bit. But once you get that zipper in, we can start to zipper down our rear window. Usually easiest when you give it a little tug on both sides, but I still have the sides of the quarter window installed, so this should install pretty easily. So now we can install our tailgate bar after our rear window is installed, making sure that the rivets are facing upward and the bow is facing out with the seal at the bottom. That is also going to slide into a C-channel at the bottom of your rear window. All right. Then once she's centered, then you can go ahead and roll this down. It's gonna put some tension on the back window, but we can pop that into our tailgate retainers and then finish up with our zippers. There's also gonna be a little tab you can tuck underneath your tailgate bar retainer. All right, so we can close up our tailgate and we wanna make sure that up top, the top is secured down with the Velcro. All right. So on either side, you're gonna have couple strips. Wanna make sure everything's tucked and good. It will kind of lay into place itself. And then we can close up our doors and head to the cab. So all you have to do is grab this Bestop latch, pull that forward, hook that underneath, and push up on the latch.So that's gonna wrap it up for my review and install. Make sure you like and subscribe. And for more videos and products like this, always keep it right here at extremeterrain.com.

      Product Information

      Features, Description, Reviews, Q&A, Specs & Installation

      Features & Specs

      • Should Be Installed at a Temperature Above 72°F Since Fabric May Contract an Inch or More at Colder Temperature
      • Shipping Can Cause Contraction or Wrinkling, but Will Resolve Itself a Few Days After Installation
      • Versatile Soft Top
      • Fastback Styling
      • Open-Air Option With the Sunrider™ Sunroof
      • Comes in an Elegant and Smooth Black Twill
      • Durable 30-Ounce, Triple-Layer, Wrinkle-Free Fabric
      • Top Arch Bars Made of Extruded Aluminum
      • Sunrider Assembly With High-Strength Steel and Tough Thermoplastic Polymer
      • With 18% Tinted, DOT-Approved 40-Mil Windows
      • Superior Cold Weather Performance
      • Removable Side and Rear Windows
      • Zipperless Technology Combined With Durable Zippers
      • Improved Fabric Install and Tensioning System
      • Includes Tailgate Bar and Clips for Easy Tailgate Opening
      • Bolt-On Installation
      • Backed by a Limited Lifetime Warranty
      • Fits All 2018-2023 Jeep Wrangler JL 4-Door Models

      Description

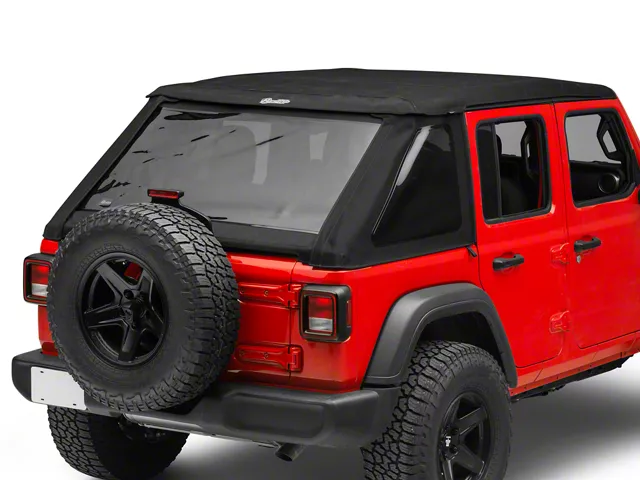
      Fresh Air, Enhanced Style, and Reliable Protection. Equip your 4-door Jeep with this Trektop NX Black Twill Soft Top from Bestop for dual-purpose utility and styling. This Trektop NX provides you with an open-air experience, as well as a fully-enclosed protection as needed. It also uses the tailgate bar and clips to facilitate a hassle-free opening of the tailgate. Furthermore, the side and rear windows can be removed to give you a bikini design, while the flip-back Sunrider lets the sunshine in for a more exciting outdoor adventure.

      Improved Warm and Cold Weather Performance. The Trektop NX Soft Top provides a softer touch and better insulation for a more comfortable ride under cold weather conditions, thanks to the triple-layer twill fabric. On the other hand, the 18%-tinted, DOT-approved 40-mil windows serve as effective shields to filter the extreme sun and keep the interior cooler during warmer outdoor settings.

      Lasting Durability. Bestop ensures that the Trektop NX is composed of high-quality parts that can handle your Jeep’s lifestyle. The 30-ounce twill fabric provides a refined, no-wrinkle appeal and withstands harsh outdoor elements. The Sunrider assembly is made of UV-resistant thermoplastic polymer and corrosion-resistant steel. The entire soft top assembly boasts of lightweight materials that also help in improving fuel efficiency.

      Bolt-On Installation. Designed for a bolt-on installation, the Trektop NX Soft Top uses factory-style door surrounds. The moderately easy installation process completes in a couple of hours.

      Lifetime Warranty. A limited lifetime warranty is provided by Bestop for this Trektop NX Black Twill Soft Top that covers factory defects in materials and workmanship. Some exclusions may apply; please check the terms and conditions for full details.

      Application. Bestop designed the Trektop NX Black Twill Soft Top for all 2018-2023 Jeep Wrangler JL 4-door models.

      Installation Note.This soft top should be installed at a temperature of 72°F since the fabric may contract an inch or more at colder temperatures. The top will contract and wrinkle during shipping, but have no fear. A few days after installation, the fabric should look fine.

      Fitment:

      Details

      Bestop 56863-17

      CA Residents: WARNING: Cancer and Reproductive Harm - www.P65Warnings.ca.gov

      Installation & What's in the Box

      Installation Info

      What's in the Box

      • (1) Fabric Top
      • (1) Driver Side Window
      • (1) Passenger Side Window
      • (1) Rear Window
      • (2) Front Door Surrounds
      • (2) Rear Door Surrounds
      • (1) Front Top Arch
      • (1) Rear Top Arch
      • (2) Side Bows
      • (1) Middle Bow
      • (1) Rear Bow
      • (1) Tailgate Mounts
      • (1) Tailgate Bar
      • (1) Web Strap With Snap Hook
      • Foams and Seals
      • Brackets
      • Installation Hardware
      4.5

      Customer Reviews (500+)

        Questions & Answers

        10 More Questions

        Will It Fit My Wrangler

        • JL Rubicon 4 Door - 18, 19, 20, 21, 22, 23
        • JL Wrangler 4 Door - 18, 19, 20, 21, 22, 23