Installation Time
(approx) 3 Hours
Difficulty Level:
Simple installation for anyone.
FREE 2 or 3-Day Delivery on Orders $119+ Details
$299.99 (each)
FREE Shipping Market Price $323.99 You Save 7% ($24.00)Saved - View your saved items
We're sorry. We couldn't save this product at this time.
or use
Hey, guys. So, today we're checking out the Lange Originals Crank Hoist-A-Top, fitting all 2018 and newer four door JL Wranglers. So, as you guys probably already know, the hardtop is not the easiest thing to take off your Jeep, but, taking off the top is a part of that open-air driving experience that the Jeep is all about. And the hardtop is big, and awkward, and heavy, and you usually always need someone else to help you take it off. Now, with this system behind me, this is going to create a very easy solution to taking off the hardtop by yourself while also storing it in your garage in the air. Now, this system by Lange is going to include all of the necessary components in order to help you take off the hardtop on your Wrangler very easily and store it away. Now, this is going to consist of a crank system and a pulley system as you can see behind me, and it's also going to have a frame here to hook around the hardtop, secure it down to the frame, lift it up off the Wrangler, and also store the top as well as the T-tops. Now, that's what I particularly like about this option is the fact that not only are you going to be able to store the big and bulky part of your hardtop, but this will also have a spot for those freedom panels as well. Now, this is going to have a lot of little details that really make it its own, and it's going to prove the quality in this product. Now, you're getting hooks on either side. They're going to have a rubber coating. You're getting foam bumpers all the way around the frame to ensure that there's no damage to your hardtop and the finish on your hardtop, and you're also going to get a smart hook for the back. Now, what I really like about that is the fact that that's going to hook the back of the hardtop and you'll be able to close the rear glass, so you don't have to worry about the rear glass, and that's something that's big with the hardtop. They do tend to break if you don't pay attention to them. And with that smart hook, that's going to keep it in place and keep everything safe.Now, I would like to mention that you will need at least a 7-foot ceiling in order to install this with room underneath this in order to park your Wrangler and remove your hardtop. So, I would keep that in mind while you are shopping around for hoist systems. Now, that being said, this is going to come in at roughly $250, putting this in the middle ground as far as products like this are concerned. Now, I really like this because, again, it's in the middle ground. It's going to have some of those bells and whistles, but not necessarily all of them if you don't need all of those extras. So, this is going to come with the frame system and the extra storage, but it is still going to have a manual crank. Some other options will have a power crank, and those are usually a little bit more expensive. And then, on the other hand, some of the less expensive choices are not going to have a full-frame system. They may just have straps in order to keep the hardtop secured to the cable system, or they may not have a crank at all and may use ratchet straps. So, it really comes down to your budget and what you're looking for, but I personally think, if you're not looking for all of the bells and whistles, you're not looking for a powered option, but you definitely want something that's going to have a lot of details and quality in the design, then this is going to be a great choice to take a look into.So, install is going to be a one out of three wrenches on the difficulty meter. This actually is very easy to install. It is just going to take you a little bit of time. So, you're just going to need some pretty basic hand tools and about three to three and a half hours worth of your time to get this thing installed. So, speaking of that install, let me run you through that as well as a demo of the hoist.The tools that I used for my install were an impact wrench, a dead blow, a tape measure, a 17-millimeter wrench, a 3/8 and 1/4-inch drive ratchet, a flathead screwdriver, a marker, a 19, 17, 14, and 8-millimeter socket, two 3-inch extensions, a 1/8, and 1/4-inch drill bit, a drill, and you'll also need a ladder and a set of gloves. So, to kick off this install, I'm going to start on the table. Now, we have to prep our pulleys as well as our crank unit in order to be installed on our wall and our ceiling. Now, as you can tell behind me, I'm going to use this structure as a representation of a standard garage. So, what you're going to need for this part is a 17-millimeter socket and a wrench, and you're also going to need a flathead screwdriver. Now, in order to mount these up, we do have to kind of disassemble them to make sure that they are installed properly. At the end of the day, this is going to carry a hardtop, so we want to make sure that everything is fully secure. So, what we're going to do first is start with our pulleys. I'm just going to take a flathead screwdriver. These are designed to take apart. There is going to be a spring clip on just one side on all of these pulleys, and this is just going to act as a pin. So, what I'm going to do is just take this flathead screwdriver. You could also use a pair of spring clips if you have them. We're just going to back this off, then we can slide our pin out and our pulleys to this side. So, now that those are disassembled, we'll be able to mount them up to our two by fours or two by sixes, whatever that you're using in just a minute, but we also want to disassemble our crank unit. Now, we're taking off the gear system here in the pulley part, so I'm going to use a 17-millimeter wrench and socket to do that. So, now we can go ahead and head over to our wall to mount up our crank unit. What we're gonna do now is mount up our crank unit. Now, this is going to be mounted 50 inches above the ground, roughly 50 inches here. Now, I have already installed a two by four. I would recommend using a two by six because it is a little bit wider. Now, obviously, my studs are visible, but you will need to use a stud finder in your garage in order to do this.Now, it is going to vary depending on your frame system in your garage. As you can see here, our center stud is roughly in the center of this structure for representation. So, what I'm going to do is widen these holes. I've had screws here in order to hold this plank to this center stud here. They do line up with our crank system. I did measure them out previously. So, I'm going to take a 1/4-inch drill bit and widen those holes, making sure that the pilot holes are there so when we put in the lag bolts our wood isn't split and everything is secure. So, now that the holes are widened, what we can do is line up our crank, take our lag bolt, our flat washer, and a 14-millimeter socket. Start to thread that in. Now, you want to make sure that it's going through the crank, through the plank, and into the stud. And before we go ahead and tighten that all the way up, we are going to get that bottom lag bolt installed as well. Want to make sure that it's square and level. I'm also using an extension. That's going to clear this bar here. So, now we can mount up our double pulley. Now, this is going to be mounted directly above our crank unit. Now, you can mount the plank on the wall or on the ceiling. It doesn't matter. You just want to make sure that it is in line for when we put the gear system and the pulley system back into our crank unit. So, what I'm going to do is just line this up square in center, making sure that it's even. I'm going to mark the hole and mark the mounting locations for our pilot holes, then what we can do is drill our pilot holes. I'm going to use an 1/8-inch drill bit for that.After your pilot holes are drilled, what we can do is take an 8-millimeter socket and the provided screws for our pulley system. These are going to be the smaller 8-millimeter screws. The other screws that are in the kit, those are for the planks. So, I already have used my own hardware in order to mount up these planks, these two by fours, but you will have some provided in the kit for these two by fours or two by sixes, depending on what you're using. So, now that we're done with our double pulley, we can move up to our first single pulley. Now, this plank that I've installed, this is going to measure from the distance of the back of the wall to where you plan to park your Jeep to lift the top off your Wrangler. Now, essentially, this line is going to line up with the back of your Wrangler and that back window. So, we're going to mount this up directly in line with our double pulley there. I'm going to measure out the center, mark, drill a pilot hole, and then install it. Now, I already have a screw here that marks the center for me on this stud, so just like I did with the back, I'm going to make sure that this pulley is aligned, and then we can line this up with the center. We can mark our holes. Next, we can take our 1/8-inch drill bit and drill pilot holes. Next, we're going to take our mount and our screws, line that up with our 8-millimeter socket. We can tighten that up. Now we can work on our second single pulley system.Now, I have this plank, or two by four, or two by six, whatever you're using, mounted up already onto our ceiling. Now, this is going to be mounted 32 inches back from the first two by four or two by six, so you want to measure that correctly. This is going to keep the cable the correct length and keep the hardtop even when you're lifting it off of your Wrangler. So, for this pulley, we're not going to mount it up center. We do need to make sure that it is a little bit offset so the cables aren't touching each other. What we're going to do is measure this out a 1/2-inch to the left of center and mount it up there. Now, it is going to depend on your board where you measure this out. I have a 50-inch two by four here. It may depend on your studs in your garage depending on your framing. So, what I'm going to do is just measure this out. Obviously, I have a 50-inch board, so what I'm going to do is actually measure out to 25 and a half. What you're gonna do is just take a straight edge and make sure that that line is going all the way from the front to the back so we know where to mount up our pulley. This point, what we can do is take our pulley, your marker or our pencil, line this up with the center line, and start marking and drilling holes. So, now that our pulley and our crank is mounted up to our wall, what we can do is start to reinstall those parts that we took apart a little bit earlier. So, first, I'm going to start with our crank unit. We're going to make sure that that pin is in there. We're going to align it inside our mount here, and then we can secure it down with the bolts and the lock nut that was previously installed. So, we can take that 17-millimeter wrench and socket and just tighten that up. And obviously, still want to make sure that this turns left and right as it should, and then we can install our pulleys. So now we can install our actual pulleys on our mount the same way that they came off. So, we can put our pulleys in, take our pin, put that through, and then we're going to have to put that C-clip back on. Now, you can use a pair of needle-nose pliers. I'm just going to set this on here inside that ridge, push that down, and then I'm just going to take flathead. You can also take a pair of needle-nose pliers, but, I just like to give it a good push and it'll snap right into place. Then we can do the same thing with our single pulley here.So, with this kit, you're going to get 43 feet of cable line. That's going to work with our pulley system and essentially hold our top when we take it off our Wrangler. Now, you have to measure this out. One side of the line is going to be three feet longer than the other side, so you're going to measure out 23 feet and 20 feet. Now, the 23-foot line, that's going to go to our front pulley, and the 20-foot one is going to go to the middle pulley. Now, what we're going to do is thread this through our crank system. We're going to have a couple of holes here. You want to make sure that this is lined up so you do have to turn the crank to line this up and make sure it's pretty level. I made a mark in the center, and then I also made a mark just to make sure that I know which side is the longer side. It's a little bit easier when you add some tape. I also recommend you have a pair of gloves to work with this cable so you don't get any metal splinters. So, what I'm going to do is take the long side and thread it through that middle hole here, and then pull to the center line. You also want to make sure that there's no kinks in the line, right? Then making sure that the longer side is going to sit on the left side of our pulley or our crank. What I'm going to do is just take that line again, making sure that it's center and then loop it through the bottom.Now we're going to take our short side. This seems a little bit confusing, but, take the short side. We're going to thread that through in that bottom hole, so it's going to essentially loop through both and make sure that the cable is on and secured on to that crank. So, we'll take the shorter line, put that through the bottom behind the longer line, and then we can pull this through, trying to tighten it down as much as we can. Again, you want to make sure that nothing is crimped. I want to make sure that that top one is center. It's essentially going to go through like that, and you have a lot of line there and you're looking at it. It is a little bit confusing, but you want to make sure that it is crossed. What we can do now is take our pulleys, making sure that they're separate. I did lay them out to make sure that they're not crossing over and getting tangled. We're going to put both of these with the double pulley, the shorter one through the middle pulley, and the longer line through the end pulley. So, I'm just going to lay this longer line here, which is going to be the one on our left. We're going to work on the single one for now since we are closest. So, we're going to hook that through the back, making sure that we're keeping that line in that pulley channel, and then through this center one. So, we can take our longer line and do the same exact thing, but this is going through the rearmost pulley. Again, just want to make sure that they are not crimped and touching each other. So, as you can see, this is why we offset that front pulley there is because we don't want this cable to rub on the center pulley here.Now that we have our pulley system and our crank mounted up, what we can do is work on building our frame. So, this is what is going to attach to your top and essentially lift it off your Wrangler. So, we're going to start with putting on the foam pieces onto each of our side arms. They're going to mount up on either side, and then we're also going to have an extension down at the bottom. So you're going to get three of these smaller support arms, and we're going to thread or just push two of these foam bumpers onto each of these arms. Now, these are going to make sure that the metal frame is not touching your top and reduce any scratching or damage. We can adjust these in just a minute, but what we can do now is actually attach them to our center support. Now, because we are working with a four-door here, we're going to use this outer support, and that's just going to lock into place just like that. Same thing for the other side. So, as you guys saw in the package, you are going to get some white foam. This is actually going to act as the bumper. This is going to do the same thing, preventing any damage from the top, and it's also going to hold the freedom panels if you choose to put these on top of the frame and store them on top of your actual hardtop when it's hanging from this system.So, first, we are going to take this and slide this on to this main support here, slide it all the way back. Then we can take our middle arm or our extension down at the bottom and slide that in. Now, you are going to have a couple of holes down here. Since we are working with the four-door, again, we are going to place it in this back hole. Now, it is a little bit...It may look a little bit backwards, but this front one is for the two-door. So, on either side of these front arms, we are going to install our hooks with that rubber coating. So, we're just going to place it through there, just like that, making sure that we place our grommet strap right on top. We want to make sure that this is installed, then we can take our nylon lock nut and thread that down. Now, you don't necessarily have to tighten this all the way down. You just want to make sure that a couple of the threads from the hook are pushing through the nut so that nylon is going to keep it in place. So, I'm going to take a 14-millimeter socket, hold this hook still, and just tighten that up a bit. I also would just recommend using a hand ratchet if you are going to use an impact it can heat up and essentially melt that nylon. You don't want to do that. That's what's going to keep this hook in place. All right. Now, there's a couple of threads through, we can do the same thing on the other side.What we're gonna do now is install our smart hook. This is going to hook into the back of the rear glass. Make sure it's kept closed, and it's also just going to hold and support the back of the hardtop. We're just going to do the same thing like we did with the other hooks. Take that nylon lock nut, thread that on, and tighten that up a little bit. Now we can go ahead and just put in our end caps. I'm just going to use a mallet. Now we can install our foam on the back. There's going to be a center slot for the bar itself, and then there's going to be a couple of keyholes so we can place them together and the foam will stay secure. Now that our frame system is all together, we can attach it to our cables. So, you're going to get a couple of channels here that are going to go around and kind of secure that cable, and we're going to get a couple of cable ties to make sure that they are staying together. So, what I'm going to do is loop this through, loop our cable through, and pull it back about four to five inches, then we can take one of our U-bolts or our little clamps here for our cable. Now we'll be able to go back and adjust these in just a second. I'm going to take an 8-millimeter socket and kind of snug that up. Just make sure the cable is not moving a whole lot. Then we can do the same thing just down at the bottom. Again, I'm using that 8-millimeter socket to snug them up. I'm going to grab this channel here, move this clamp down as far as I can to make sure it stays in there, and I'll actually tighten this one up. After the top and bottom clamp are secure, we can put one right in the middle. So, now we can do the same for the back cable. Now, we're going to be using this rearmost mounting hole here. Again, I'll loop this through. I'm actually going to just measure this out so we're pretty even with the front one. We're going to have to adjust this at some point, just because we want to make sure that everything is even, but we can go ahead and attach our clamps.So, at this point, what we can do, since our frame is attached, is just start to wind it up. I like to use a 19-millimeter socket and my impact wrench before I adjust the handle, just because this has a very low gear ratio so it does take a while to hand crank, especially with all of this excess line that we have right now since we just installed it. So, in order to wind it up a little bit quicker, I just add a impact and my 19-millimeter socket. I also keep a little bit of pressure, a little bit of load on the line here. You may want to grab a glove in order to do that, and you also want to make sure that your lines are not crossed. So now that a lot of our excess cable is pulled up, we can add the handle. It's a little bit easier to crank it with the handle once there's load on it, so once we get the hardtop on here, it'll look a little bit easier to crank this. So, what I'm going to do, there is a washer that's going to keep that handle in place. It's going to keep it from spinning around. We can take the nylon lock nut and that 19-millimeter socket that we were using to crank it before. Just tighten that up.So, once that's on there, instead of hitting with the impact, we can tighten it up with the handle. And again, it doesn't look like it's moving much, but once you have load on it, it will move. So, sometimes it is a little bit easier to take that back smart hook for the back of the back glass, hook that on to the hardtop first, and shut it in the back glass rather than having it still attached to the frame. Just makes it a little bit easier and it's very easy to take off. Then we can go ahead and close this up, and reattach the back glass hook. What we can do is just drop this down a little bit farther so we can resecure our rear glass hook. All right. Now we can attach our hook and just give it a good tighten. What we can do now is open up our back door and hook one of our hooks around there, and then do the same thing on the other side. So, we're going to kind of give a good push, make sure this stays in place, then head over to the other side. So now that we have our Hoist-A-Top assembled on our Wrangler, what we can do is attach our T-tops up top. Now, I don't have a lot of room in here, so I'm going to have somebody hand me the T-top, but you're going to want your bungee cords. So, at this point, you can take one of your T-tops. I'm going to lay this out. Now, you may need to move this foam forward just a hair, slide into here like that.So, that's going to wrap it up for my review and install. Make sure you like and subscribe, and for more videos and products like this, always keep it right here at extremeterrain.com.
Subscribe to our YouTube Channel
Features, Description, Reviews, Q&A, Specs & Installation
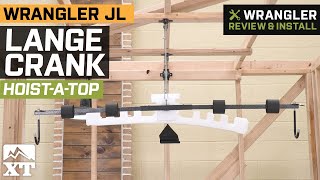
Top-Notch Function. Using Lange's Crank Hoist-A-Top means that you'll never have to worry about straining your back muscles or dropping your Jeep Wrangler JLs top when you want to remove it in good weather. Instead, this Hoist-A-Top allows for quick and easy removal and storage so you can remove the top on your own in minutes and leave it stored at ceiling level in your garage or carport.
Smart Hook. Featuring a rear smart hook for easy lifting and storing, this Hoist-A-Top offers dramatically improved balance and takes up less storage space than ever before so that your top remains securely out of the way. It also comes with a balance blade, which supports any top with a well-balanced steel frame while providing easy storage for freedom top pieces.
Maximum Durability. Created with rubber coated hooks and foam-covered hardware, this Hoist-A-Top protects your top's finish while its strong powder coated steel frame attaches to your Jeep's top without drilling for maximum strength and convenience. The Hoist-A-Top also comes with a hand crank that can be operated by just one person while the winch in the ceiling does all the work.
Straight forward Installation. This Hoist-A-Top can be secure in just 3 hours. Light mechanical skills are required, but all instructions are included.
Limited 1-Year Warranty. To protect against defects, this top is backed by a 1-year limited warranty. Some limitations apply, so see the full warranty for details.
Application. Lange's Crank Hoist-A-Top perfectly fits all 2018-2023 Jeep Wrangler JLs with 4 doors.
Fitment:
Lange Originals 014-920
CA Residents: WARNING: Cancer and Reproductive Harm - www.P65Warnings.ca.gov
Installation Info
Installation Time
(approx) 3 Hours
Difficulty Level:
Simple installation for anyone.
What's in the Box
10 More Questions