FREE 2 or 3-Day Delivery on 10,000+ Items. Details

Talk to a Wrangler Enthusiast
1-877-870-8556
M-F 8:30A-11P, Sat-Sun 8:30A-9P
Logo Image
$12k Summer Sweepstakes! Enter Daily >

Smittybilt XRC Gen2 Rear Bumper (18-23 Jeep Wrangler JL)

Item J126722-JL
Call a Wrangler Enthusiast at 1-877-870-8556
M-F 8:30A-11P, Sat-Sun 8:30A-9P
$0.00
Our Price

$741.47 (each)

FREE Shipping + $40.00 Oversized Item Fee Market Price $844.99 You Save 12% ($103.52)

Will this fit your Vehicle?

Select a different vehicle Help?
Update or Change Vehicle
Out of Stock

Ship to: Ashburn - 20149
Sorry, please enter a valid US or CA postal code
We're sorry, zip can't be updated at this time.
    Create a list
    Add to New List

    Saved - View your saved items

    We're sorry. We couldn't save this product at this time.

    or use

      Video Review & Installation

      Hey, guys. Today I'm here with the Smittybilt XRC Gen2 Rear Bumper, fitting all 2018 and newer JL Wranglers. So, if you're looking for a fully capable and fully functional rear bumper to compliment the rear end of your Wrangler, this option by Smittybilt is gonna be a perfect one to take a look into. This is gonna come with a number of different benefits offering all of that functionality that I just mentioned. So, with this, you are getting a couple of recovery points including a tow hitch, you are getting integrated jack mounts, and, not to mention, some very aggressive styling. It's gonna match with any heavy-duty front bumper or any heavy-duty armor that you pair with it. So this is gonna be roughly $700 making this a more expensive option. However, this does come with a lot of features and a lot of functionality with it. So it does fit very well in that price range when you take a deeper look into it. So, other less expensive options on the page are usually gonna be for more basic bumpers. They are gonna have some of those standard features, but they're not necessarily going to include a full relocation bracket, they may not include these slip pads on the side, or integrated jack mounts. So I definitely think, if you're looking for something that has all the bells and whistles and you're not necessarily concerned about a budget-friendly option, then this is a good choice to take a look into. So, install is gonna be a two out of three wrenches on the difficulty meter, you are gonna need about two hours worth of your time with some basic hand tools. So, speaking of the install, let's jump into that now. The tools that I used for my install were a half-inch drive, 3/8th-inch drive, and 1/4-inch drive ratchet, 3-inch extension, a 21, 19, 18, 16, 10, and 8-millimeter socket, a 5/32nd-inch Allen key, a Philips head screwdriver, an 8-millimeter wrench, trim removal tool, and an impact wrench.So, to kick off this install, you're gonna need an 8-millimeter socket and a ratchet and we're gonna head inside our rear wheel well to take off some trim pieces. So, what we need to do is take off this lower trim piece inside our wheel well so we can access our rear bumper bolts. You're gonna need an 8-millimeter socket and we can remove the three bolts that are holding in this trim piece. You're gonna have one towards the outside, and then you're gonna have two on the inside. So, after all three of those are removed, we can slide out this trim piece. And, as you can see, we can access our rear bumper. So you're also gonna do that on the other side. So, now, with the 16-millimeter socket and a 3-inch extension, I'm gonna take off these two bolts that are on the inside of the bracket that are connected to our bumper and not the bolts that are connected to our frame. We'll go ahead and remove those after our bumper is off. But first, we wanna disconnect our bumper fully. Now we can repeat that same process on the other side.So now we can take off the two bolts on the primary bracket that's holding on our bumper. It's going to be the same 16-millimeter socket. I wouldn't recommend an extension here because you're not gonna have a lot of room. Also, it's gonna be a little bit difficult to see, but there is going to be a bolt right above this bottom bolt. Then you go ahead and remove those. So, while we're over here, we can also disconnect our harness before we fully remove our bumper. So you're gonna need a trim removal tool. So, this is gonna be a little bit difficult to see. You do have a harness that's connected to the body of the Jeep and to the bumper, this is gonna be for the lights on your rear bumper. So, what we're gonna do is just take a trim removal tool and remove that harness from the body. So, once that harness is off of there, we can disconnect this clip. So now our bumper is free from this harness that was connected to our body. Now we can go to the other side and take off the other primary bracket bolts. So, with our 16-millimeter socket, we can remove this primary bracket.So, now that everything is disconnected, we can fully remove our rear bumper. So now, in order to fully install our new rear bumper, we do have to remove these brackets. So, I'm gonna be using a 16-millimeter socket to remove our secondary bracket from our frame. Now, this is a lot easier to do with the bumper off of the Jeep, and that's why I took the bumper off first. So, after this bracket is off, we can move to our tow hook and our primary bracket. I'm gonna be using a 21-millimeter socket in order to remove those four bolts that are holding in the bracket and our tow hook. So you're gonna have two on the side and then you're gonna have two on the bottom. Then you can repeat that process on the other side.So, on your passenger side, you're only gonna have two bolts since we only have one tow hook. So, before I go ahead and install this, I did wanna show you guys, side-by-side next to your stock bumper, to show you all the benefits that you're gonna get out of the new XRC Gen2 rear bumper. So, right off the bat, you can tell that it is the similar length to your factory rear bumper, it is gonna have these wraparound sides. However, these sides are going to be angled up for better departure angles and better clearance off-road. Now, this is also gonna be a lot more durable, made of 3/16-inch cold rolled steel in comparison to your factory plastic that's not gonna be able to take a hit on the trail, and it's also gonna be protected by a black textured powder coat finish. So, that's gonna give a more aggressive look than the factory plastic, but it's also gonna protect that steel underneath from any rust or corrosion.Now, you do also have a ton of little goodies on this new rear bumper in comparison to your factory one that are gonna benefit you while you're off-road as well as just benefit you at all times. Now, first off, you do have a couple of recovery points, you have two D-ring mounts on either side, you're also gonna have a tow hitch in the middle that's also gonna have integrated jack points. Now, you are getting PP and TPO slip strips on the outside, which is something that you don't see out of a lot of rear bumpers. This is gonna help with extra damage protection while you're out on the trail. So, what I do also like about this rear bumper is that you're also getting 6-inch LED strips, you're gonna get two on each side. This is gonna help you out with some rear visibility. Whenever you need it, you can wire them into your factory reverse lights, or you can use the supplied switch that is with the wiring harness here and everything is plug-and-play. So this is also going to come with the option to swap over your factory backup sensors which is a bonus there for you guys that have that option on your Wrangler. Now, it also is just gonna look a lot more aggressive than the factory plastic and you do even get some plating up top for some extra styling. So, enough about these two side-by-side, let's go and bolt up our new one.So, before I go ahead and show you how this bumper is installed, we do need to install our LED lights. You're gonna be provided two 6-inch LEDs for either side of your bumper, and you're also gonna have brackets that are going to hold up your LEDs. We're gonna go ahead and install them on the lower portion on the middle of our bumper. So let's go ahead and do that now. You're gonna need a 10-millimeter socket and a ratchet. So, in order to install our lights, we do need to remove our posts on the back here. You're gonna need a 10-millimeter deep socket. We're gonna go ahead and remove those from the light body. So, once those are removed, we can place the light through our U-bracket here and reinstall our post through our bracket. So, once those are on there, we can take our flat washer and our nylon lock nuts and thread those on. Then making sure our flat washers are on the outside of our bumper post, we can install our U-bracket. So, the U-bracket is going to go on the inside of the bumper bracket but the flat washers are gonna go on the outside. And what I do like about this, in comparison to the JK model of the XRC Gen2 rear bumper, is that you're able to angle these and they are on the bottom here instead of the top. So, what we're gonna go ahead and do is just tighten those down, making sure that they're angled properly. So we're going to evenly tighten those down with the same 10-millimeter socket. So, after our one light is on, you can repeat that process on the other side.Now, if you ever need to go ahead and adjust these, all you have to do is loosen these nuts on the outside here, angle wherever you need your light to go, and then just re-tighten them down. Once those are tight and snugged up, we can go ahead and install our rear bumper. So, I would like to mention, if you do have an oversized tire, it is gonna be a little bit tricky to get this on here as it is very heavy. So, now I'm going to have a friend help me mount this up and we're gonna use our factory hardware to mount this to the outside of our frame board. So, what we're gonna do now is attach our bumper to the middle of our frame. You're going to get four long bolts. These are gonna go through the frame and through the bumper. You may have to actually lift the bumper in order to get that through. Looks like everything is good on the other side, and then you are gonna get a welded nut plate for either side. We are going to stick that up behind the bumper and then you're gonna thread that in through the welded nut plate. I'm gonna repeat that process for the other one. So, once you have both of those threaded in, you can do the same thing on the other side.So, with the help of a friend, you may want to push the bumper up and tightened down one bolt to make sure that it stays in place and is level. So, once you have it level, as you can tell, I tightened down one bolt, we're just gonna go tighten down the rest of them. I'm using an 18-millimeter socket and a 3/8ths-inch drive ratchet in order to do that. So, once you have your frame bolts tightened down, we can move to the outer side of the frame and tighten down our factory hardware. So now, with our 21-millimeter socket, we can go ahead and tighten up these outer factory bolts. Same thing on the other side. What we're gonna do now is start at our engine bay and work our wiring back so we can wire up our LED lights in our bumper. Now, I'm going to start with our leads here. I am going to connect our negative lead to our negative battery terminal. I'm using a 10-millimeter socket in order to remove this accessory bolt here. All right. Then we can move to the power. You will have to, if you are using Smittybilt's wiring harness, you will have to add a terminal connector. So, I'm just going to take one of the accessory nuts off and then go ahead and connect our positive wire.So, now we can put our cover back on and move towards that side. We are going to pull our wiring through our firewall. You'll also be provided with zip ties to clean up all of this. So, what I'm gonna do is grab a flathead screwdriver. There will be an access port over on the side of your master cylinder. I'm just gonna pop this trim piece off. So, once you have that plastic piece next to your master cylinder off, we can feed all of our wires through there. So, just as a visual, this is what it's gonna look like. Now, what you can do is disconnect your actual leads to your lights from your wiring harness. We can put the light leads aside, so you're not putting a bunch of wires through this, and you can disconnect it on the other side. It's gonna make it a little bit easier. So, after you've run all of your wires into your cab area through your firewall, we can come back to the tailgate here. I've opened up our little compartment and we are gonna go through our drain plug right above our exhaust. That's gonna be the most accessible place. So, there are a ton of different ways that you can wire this up. However, this is the easiest way that we have found. So, what I'm gonna do is just take off our storage compartment here. This is just gonna be this trim piece. I'm gonna put that aside. And then you'll see your drain plug down in the compartment there where your jack would be. So, what we can do is take a flathead screwdriver and just pop out our drain plug here, put that aside, and we can route our wires down through our drain plug.So, after we have those through our drain plug, we can go ahead and clip them into our lights. So, now we can just plug in our leads. So, after those are connected, you can go back and clean everything up. You are provided with zip ties like I said, again, however, those should be wired up. You definitely wanna keep that away from your exhaust there. So I would zip tie those as soon as possible. So, now that we're finished with the bumper wiring, I'm gonna throw our tire back on here and we are going to bolt up our license plate relocation bracket. So, what you're gonna wanna do is install your bottom lug nut and then Smittybilt will provide you with two top lug nuts to bolt up your relocation bracket. So, what we're gonna do now is install our top lug nuts. And, as you can tell, these have a thread on the lug nut stud portion, but they also have a thread on the front, that's what we're gonna bolt into. So, once those are threaded on, we can take a 19-millimeter socket and go ahead and tighten those up. After those are on there, we can take our new bracket and our provided hardware and we're gonna thread that into our new lug nuts. Then we can take a 21-millimeter socket and tighten those down.Now, with our provided hardware, we can set our primary bracket on top and secure that down. So, this is gonna be the two smaller stainless button head bolts. Now we can take a 5/32nd-inch Allen key and tighten those down. Those are gonna thread into this bracket down here. So, Smittybilt is also gonna provide you with a license plate light since it is mandatory in all states that you have one. So you will be able to wire this into your factory wiring harness down where we disconnected it before. Also gonna come with provided hardware. So you can grab an 8-millimeter wrench or an 8-millimeter socket and a Phillips head screwdriver and you can tighten that down.So, that's gonna wrap it up from my review and install. Make sure you like and subscribe. And for more videos like this, always keep it right here at extremeterrain.com.

      Product Information

      Features, Description, Reviews, Q&A, Specs & Installation

      Features & Specs

      • Full-Width Rear Bumper
      • Features 3/16-Inch Cold Rolled Steel Construction
      • Black Powder-Coat Finish
      • Max Solid D-Ring and Jack Point Mounts
      • Light Mount Tabs for 9-Inch-Diameter Lights Included
      • Provides Additional Damage Protection via PP+TPO Slip Strips
      • Limited 5-Year Warranty on Finish
      • Fits All 2018-2023 Jeep Wrangler JL Models

      Description

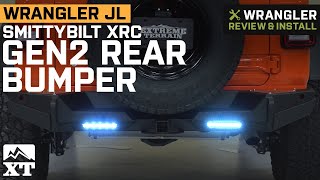
      The Rear Bumper Your Wrangler Needs. For superior and stylish rear end protection, you will never go wrong with the XRC Gen2 Rear Bumper from Smittybilt. This rear bumper delivers impressive protection against off-road obstacles and rough terrain. Keep yourself and your Jeep Wrangler safe during long off-road excursions with a rear bumper that provides impeccable style and unparalleled damage resistance, no matter where you go.

      Customizable Setup. Any avid off-road explorer will love the fact that the XRC Gen2 Rear Bumper accommodates all the important add-ons for your Wrangler. In addition to having light mounting tabs that fits lights 9 inches in diameter, the rear bumper also provides adequate space for jack point and D-ring mounting.

      Tough, Rugged Look.  This rear bumper from Smittybilt doesn’t just look tough -- it actually is. On top of its 3/16-inch cold rolled steel construction, it also features extra protection in the form of its PP+TPO slip strips. Factor in the black powder-coat finish, and you’ll get a rear bumper that not only gets the job done, but also keeps your Wrangler stylish.

      Limited 5-Year Warranty on Finish. For a period of 5 years, Smittybilt will cover this bumper’s finish under its standard warranty. For more details on warranty terms and conditions, you may contact the manufacturer through their official website.

      Application. The Smittybilt XRC Gen2 Rear Bumper is designed to fit 2018-2023 Jeep Wrangler JL models.

      Freight Notes. Freight items can only be shipped within the continental 48 states, no expedited methods. What is freight shipping? Your Answers are Right Here!.

      Fitment:

      Smittybilt 77858

      CA Residents: WARNING: Cancer and Reproductive Harm - www.P65Warnings.ca.gov

      Installation & What's in the Box

      Installation Info

      What's in the Box

      • (1) Rear Bumper
      • (1) License Plate Mounting Bracket
      • (2) Cube Light Mounts
      • Installation Hardware
      4.7

      Customer Reviews (453)

        Questions & Answers

        10 More Questions