Talk to a Wrangler Sales Tech
1-877-870-8556
M-F 8:30A-11P, Sat-Sun 8:30A-9P
Logo Image
$20K Sweeps! 10 Chances to Win! Enter Daily >

Rough Country 4-Inch X-Series Lift Kit with Shocks (97-06 Jeep Wrangler TJ)

Item J10483
Verify parts fit and get product recommendations.
Wrangler Sales Techs: Connect Now M-F 8:30A-11P, Sat-Sun 8:30A-9P
$0.00
Our Price

$1,299.95

FREE Shipping Market Price $1,494.99 You Save 13% ($195.04) Up to 10% off for Military & First Responders! See Details

Will this fit your Vehicle?

Select a different vehicle Help?
Update or Change Vehicle
Ship to: Ashburn - 20149
Sorry, please enter a valid US or CA postal code
We're sorry, zip can't be updated at this time.
    Create a list
    Add to New List

    Saved - View your saved items

    We're sorry. We couldn't save this product at this time.

      Product Videos

      Hey, guys. So today I'm here with the Rough Country X-Series 4-inch Lift Kit with Shocks, fitting all 1997 to 2006 TJ Wranglers. So if you're looking to get your TJ ready to conquer those trails, you're looking for an all-inclusive lift kit, but you're also looking to stay on a budget, this X-Series lift hit by Rough Country is gonna be a really good option to take a look at. Now, picking out a lift hit 10 be a little bit tricky. There's a lot of choices on the page and there's a lot going on with your suspension and you definitely wanna get some good performance while maintaining some decent drivability. This 4-inch lift kit is going to do just that while offering you good flex off-road. It's gonna offer you good dampening with these shocks and it is gonna keep that decent drivability that you may be looking to keep.So what I do really like about this kit is that you're getting all the necessary components to accommodate or that 4 inches of lift. And what I do really like out of this kit is all eight control arms are included. Now, when you lift your Jeep, you are going to pull your axles in, you're gonna create some hard angles and what those control arms are gonna do for you is flatten out that plane and continue to give you good performance and good driveability. So as far as tires go, this is going to accommodate up to a 33-inch tire. Now, this tire is gonna fit very comfortably. You're still gonna get a decent amount of wheel well room for up travel off-road and it's gonna look very solid on your Wrangler. Now, going down to 31s, they are going to look a bit small. However, you still are getting that decent amount of up travel out of that. And as for 35s, you will be able to fit those on here. However, you will get a little bit of rubbing and you're not gonna get a lot of up travel out of those.So as far as price goes, guys, this is gonna be roughly $1,100, making this very affordable for an all-inclusive kit. Now, once you go up in price, you are gonna be seeing some different kinds of lift kits. You may start to see long arm kits. You may see more inclusive kits that incorporate belly pans or both track bars or they may be made by premium brands. However, I do really like how Rough Country set this up. I like that it is at a very affordable price for a very inclusive lift kit that is gonna last you a very long time.So install is gonna be a three out of three wrenches on the difficulty meter because this is a pretty in-depth lift kit. Now, if you are looking to do this in your driveway at home, this should take you about a day. We are gonna need some specialty tools to get the job done. So speaking of the install, let's jump into that now.The tools that I used for my install were an electric impact, a drill, PB B'laster, an assortment of ratchets, an assortment of sockets and impact sockets, couple swivel sockets, an assortment of open-ended wrenches as well as ratcheting wrenches, T40 Torx bit, a breaker bar, an assortment of pry bars an assortment of screwdrivers, a pair of pliers, needle nose pliers, vise grips, Channellocks, an adjustable wrench, a 33-millimeter socket, an assortment of extensions, a Pitman arm puller, air ratchets, a cutoff wheel, an assortment of drill bits, an assortment of hammers, and a marker and a tape measure.So to kick off our install, we need to get our Jeep up in the air. Now, if you are doing this on a jack and jack stands, you will need to chock the rear wheels because we'll be starting in the front. So just jack up the front but if you have a lift, let's get it up on the lift. So once you have your Jeep up in the air, we're gonna go ahead and take off our tires. I'm gonna be using a 19-millimeter deep socket.So before we go ahead and break any bolts, I would recommend to hit everything with a PB B'laster or a WD-40, some type of penetrator, and then we are going to support our axle with some pole jacks. So after our axle is supported, we can go ahead and remove our track bar.So before we do our track bar, we wanna open up some more room to get to that castle nut there. So we are going to disconnect our sway bar links. These are a quick disconnect system, so I'm just going to push this sway bar link off of the fin here and then we can drop it down after we do the other side. We can drop it down and remove this top bracket. It's kind of giving me some issues. We're not reusing these, so I'm just going to hammer them off. There we go. So for this quick disconnect system, just gonna pull this pin. After that's off, should be able to push it off, but it seems a little seized. So, unfortunately, the bolts on our sway bar disconnects have rounded out. Now, they are a Torx bit. I would be mindful of this. If you have stock sway bar disconnects, the top bolt is going to be a T55 Torx bit, but for this, we have a new U-bracket here so, unfortunately, we are not able to get this off how we want it, so we are gonna have to cut this U-bracket in order to get the sway bar disconnects off. You probably won't have to do this at home, but I'm gonna take a cutoff wheel and cut our U-bracket.So now we need to remove this pin for the quick disconnect system that was already installed on this Jeep. I'm gonna be using a 19-millimeter wrench on this side and a small screwdriver. I did have to crack it loose with a pair Channellocks here as well as that 19-millimeter wrench here. But once you have it cracked loose, it should come off pretty easy. And that is just a bolt that inserts in that pin there. Now, if you have the stock links, this is not gonna be the case. You will have a bolt and a nut on either side so it should be a little bit easier for you. Now you can do the same thing on the other side. After those are out of the way, we can move on to our track bar.So we're gonna start by removing the bottom track bar bolt. The upper track bar bolt has a couple of things in the way. I would like to get the spring out of the way in order to get that castle nut off. So we're gonna start down at the bottom because that's still gonna allow us to drop our axle. I'm gonna be using a 15-millimeter deep socket. All right. And our axle is shifted and disconnected from there. So now I'm gonna use a 13-millimeter socket and 13-millimeter wrench, as well as a small extension and we're gonna remove the two bolts that are holding in the bottom of our front shock. After that, we can move to the top shock bolt. So what we need to do is take off this top bolt. However, when we do spin that, our whole shaft spins. So what I did, I just took a pair of Channellocks or vise grips, clamped them on up against our shock perch here and now we can take a 15-millimeter ratcheting wrench or a 15-millimeter wrench and take off this top nut. These can be a pain, so I recommend to hit this with a penetrator, again, just like everything else. You won't need this factory hardware, but we're still going to remove it. It should have a cup washer, a bushing, as well as that nut. Okay, now we can do the other side. All right. Now we can drop our axle and take out of our shocks. But being mindful of our shocks, we're just going to start to lower our axle down a little bit so we can wedge them out. So before we move on, I just wanted to make sure that we do mark our cam bolts. If you have an eccentric [SP] cam bolt on your lower control arm, you will want to mark it. I'm gonna mark it on both sides on each lower control arm, just making sure that everything is going to line up at the end.So next we're going to disconnect the top of our drag link because we will have to change our Pitman arm. I'm gonna use a pair of needle nose pliers to remove our cotter pin. Now we're gonna use a 19-millimeter wrench in order to remove our castle nuts. Now we have to disconnect the drag link from our Pitman arm. I'm going to use two hammers in order to do that. You can use a pickle fork in order to get this off of here, but you will have to replace this boot, so I definitely do not recommend that. So you can just use two hammers here and shock [inaudible 00:09:30].Now we're gonna go ahead and start dropping our axle to get our springs out. It's a little sideways, but that's okay. That's because our track bar is still connected, but we need to get this spring out in order to get to this castle nut. So we're gonna do that first. So we're jumping around a bit, but now that we have our spring out, we can access this castle nut in order to drop the rest of our axle down. So we will take our needle nose pliers again and just remove that cotter pin. So I'm gonna take a 19-millimeter socket and go ahead and remove that castle nut. So we are going to use a hammer to get the ball joint out of our mount here. And we can fully remove our track bar. But what we can do at this point is install our track bar drop bracket. So we will have to drill two holes on our frame here, but first we're going to install this to make sure that we have everything lined up before we drill. So I'm gonna be using a 19-millimeter socket to go ahead and tighten this down, then we're gonna switch over to a 19-millimeter wrench just so our socket and ratchet doesn't get stuck in the mount here. Now we're gonna go ahead and mark and drill holes. I'm just using a sharpie to mark our frame here. Then we're gonna go back with a center punch and start our drilling. Now I'm gonna take a center punch and mark where I wanna drill. Then we're gonna start our drilling. I'm gonna drill a pilot hole first after I get two more apple boxes. So I'm gonna take a 7/32-inch drill bit to drill out a pilot hole. There we go.So what I've done is taken those two pilot holes and widened them up while our bracket is still on here. Now we can go ahead and remove the bracket so we can widen up the holes just a little bit more so we can fit in our crush sleeves. So I'm gonna be using that same at 19-millimeter socket to go ahead and remove this bracket. Now what we're gonna do is tap in our sleeve into the frame using hammer after we've widened that hole. So before we widen up the top hole, what I'm gonna do is place our bolt that has to go through our frame in here to keep this sleeve in place. So being mindful of our sleeves, we're gonna go ahead and reinstall our bracket. Before we tighten that down all the way, we are gonna re-install those bolts. So what we can do is continue to tighten this down now that our bolts are through our frame. So now on the other side of the frame, we're going to put our flat washer as well as our nut on the back of both of those bolts. Now we can go ahead and tighten those down on our frame using a 19-millimeter socket and 19-millimeter wrench. Same for the top, although you may not have a whole ton of room because your steering column is there.So now we're gonna remove our Pitman arm. I would like to mention that you will need to mark where this is and the orientation of your old Pitman arm because when we put on your drop Pitman arm, you want to make sure that it's in the same place. Then we can take a 33-millimeter socket and remove this nut. So after that is removed, we're gonna go grab our Pitman arm pulling tool and go ahead and remove our Pitman arm. So first we need to get our Pitman arm puller in the stud here on our gearbox. So we're just going to tighten this up and make sure it gets into position so it's held there so when we impact it, it will stay in place. So now I'm gonna take a 20-millimeter socket and we're gonna tighten down our Pitman arm puller tool. I also have a hammer here to tap the Pitman arm to help release it. Just be mindful because there are bearings in the Pitman arm and you are getting your gearbox. Definitely don't wanna mess that up. That is an expensive fix. All right. So now that our Pitman arm is off, we can go ahead and install our new one. So this will go on the same way that your original Pitman arm came off. There will be notches so you really can't put it on wrong. So after that is in place, we're gonna grab our lock washer and nut. Go ahead and thread that on. We can go ahead and tighten that down with our 33-millimeter socket then.So now we're gonna start to remove and replace the control arms. It's very important that you do these one at a time. I'm gonna start with the lower driver side control arm. I'm gonna be using a 19-millimeter socket and 19-millimeter wrench to crack this bolt free and then we can move on the top. So I'm reusing my adjustable wrench set to 21 millimeters and a 21-millimeter socket to remove this upper lower control arm bolt. Now we can fully remove our control arm and move over to the table so we can measure out our new one.So now that we have our stock lower control arm out of the rear, we do have to adjust our new control arms for our pre-alignment measurement. Now, I did wanna show you guys side by side, the differences, the benefits of what you're getting out of your new control arms rather than your stock. So first off, these are fully adjustable. They are single adjustable, so you will have to take them off of your Wrangler in order to adjust them. But just having them adjustable is a benefit enough. These are going to help re-center your axle, these are going to help out your caster and correct all those angles which are very, very important. These will also have a spherical joint up top and a fixed joint down at the bottom instead of having two fixed joints similar to your stock control arm. This is gonna give you 35 degrees of pivot for your lower control arms which is gonna be very helpful out on the trail while you're flexing your Wrangler out. And as for the upper control arms, those are gonna give you up to 20 degrees of pivot. These are also greasable for maintenance over time and they are rebuildable if one ever goes bad on you.So now that we have our stock control arm out, we do need to measure out our new control arm since they are adjustable. So for our pre-alignment measurement, we're going to set our new control arm to 3/8-inch longer than our stock control arm. So measuring our stock control arm from center to center, we should get about 15 and 7/8. So moving over to the new control arm, we should measure this out to 16 and a 1/4. So it looks like we are a little bit too high on that. I would recommend to anti-seize your control arm before actually threading in this portion of your control arm and then we can set it to the proper pre-alignment lanes. Now, a good way to keep these center, make sure that you're going from eye to eye, be just to put your bolts through here, making sure that these are centered and then we can go back and measure. Looks like they're actually too short now. We're about an inch and a 1/4. Now we can move this aside and tighten down our jam nut. Now, for the second front lower control arm, that is gonna be the same measurement, so you can use this as a guide and then we move to the rear. It will depend on your transfer case. So if you have an SYE or a longer driveshaft, you will have to set these to a 1/4-inch longer and not a 3/8-inch longer, but if you have the stock driveshaft, which I would not recommend, you will have to set this two 3/8-inch longer.So now we can install our new control arm on our frame first. We're going to insert that bolt through using our factory hardware, making sure that our grease fitting is facing down and the offset of the bottom portion is also facing downward. So what we can do is now put the bottom bolt through. Now, you will need to lower down your axle in order to get that bolt hole lined up because you are extending the axle forward. Now, we're not gonna tighten down our bolts just yet. We wanna make sure the Jeep is on its own weight and the axle is sitting centered for it to be tightened down. Now I'm gonna raise the axle just a little bit. Try to push our axle forward. So now we're gonna go ahead and stay on the same side, but remove the upper control arm on the driver side. I'm gonna be using a 17-millimeter socket and 1/2-inch drive ratchet. In order to remove this top bolt. You may not have the same hardware, it may be a 21. You also have a flag nut on the other side so you won't have to worry about a wrench, you just need a socket. You may have to tinker with the axle to take pressure off the bolt. And just use a small pry bar to help get that out. Now we can move on to the lower bolt. Now, with a 17-millimeter wrench and 17-millimeter socket, we can remove this bottom bolt.So for our front control arms, we will need to measure our pre-alignment measurement to 1/4 of an inch longer than our stock control arm. So right now we have from eye to eye, 15 and 1 6/8-inch. Now, from eye to eye here, we're going to add that 1/4-inch, so it's gonna come out to 15 and 5/16 of an inch. So it looks like we're at 15-1/2. We're gonna tighten this up just a little bit. And we're gonna need to be at 15 and 5/16 of an inch. Once you are there, you can take an adjustable wrench and tighten down this jam nut. Right. And then we can do the same thing for the other control arm. I actually have it here and pre-set. So we can go ahead and tighten that one down as well. Now we can install these on our Wrangler.So I'm gonna start the opposite of our lower control arm. Start with the bottom. There we go. You can tighten that down hand-tight in just a second. And now we line up our upper. So you may have to, again, tinker with the height of your axle, but we are going to install this bolt, making sure that our flag nut is on the other side. Now, again, guys, we're not gonna tighten anything down just yet. I wanna snug up this nut just so the weight of Jeep doesn't kick it off but we will have to tighten everything down at the end. But once you have your bolts in on one side, we can do the same thing on the other side.So our next steps in this process is going to be to get our springs in as well as get our shocks in, then we can move along. Now, while we have our stock components out and before we put our new ones in, I wanted to show you guys side by side like I normally do and give you guys a little bit of a comparison. Now, starting off with our coils, this is where you're gonna get your height. Obviously, from the front you could tell that they are a lot taller and that's what's gonna give you this lift on your Wrangler. I do also like that they keep a progressive rate. So this is gonna still keep a comfortable ride just like your Wrangler right now. It's gonna give you a little bit of cushion rather than a stiffer spring rate and they also just look a lot better than the stock.Now, moving over to our shocks, there are two types of stocks to consider. You have a hydraulic shock, which is going to be more fluid-like. It's gonna be comfortable, it's gonna be what's in your Wrangler right now, and that's what gives you that daily driving comfortability. However, moving over to our new shocks, this is gonna be a N3 by Rough Country. This is gonna be at gas charged, so it's gonna be a little bit stiffer, but it's gonna give you some better performance and resist shock fade over time, which is cavitation or foaming forming inside of the shock when it's worked really hard. So speaking of that, this has 10-stage variable valving for that performance on-road as well as off-road, giving you that little bit of stiffness but still keeping some good comfortability. And it also has a 54-millimeter shock body to disperse all of that heat faster. So as we all know, our springs create that energy and our shocks are dispersing all that energy through heat. So this is going to disperse that heat a lot faster and resist that shock fade that I was talking about. So enough about our stock components and our new components, let's get our new ones in.So now we have to put in our springs. Now we wanna get our axle as low as possible, but it is fighting us a little bit since these springs are very tall. Now, what I'm gonna do is remove the rear bolt on our lower control arm. That's gonna give us a little bit more drop so we can get our spring in. So now that our springs are in, what we're gonna do is just reconnect our control arm here. And, again, we are not gonna tighten this down until the weight of the Jeep is on the axle. I'm gonna snug that up so it stays in place. Now we can move on to installing our shocks.So, now we can install our shocks. Now these will be a little bit longer to accommodate for that lift, so we will have to press them just a bit to get them seated. So after they are seated, take our lower shock hardware from the factory, go ahead and secure those down. We're gonna leave alone the top stud till we get the bottom secured. I'm gonna use that bolt and nut as well as these two flat washers. Now we can just tighten those down with our 13-millimeter socket and 13-millimeter wrench. Now, as you can tell on this top shock stud, I did put the cup washer, bushing and then we are going to do the same thing for the top but reverse, for the bushing first and then the cup washer, then we can take our bolt or our nut, thread that onto the top of our shock. Go ahead and take a 19/16th wrench and tighten that down. So the shaft will need to stay still. Again, you can grab pair of vise grips to hold it still. So make sure you don't overtighten this stud. You wanna make sure that the bushing is slightly bulging but you don't want it to be going over your cup washers. Just wanna make sure that it's good and tight. Our bushings are slightly bulging. We can take off our vise grips and move to the other side.So now we're gonna move on to connecting our quick disconnect system. After that, we can move on to the track bar and the drag link, but we need to pre-measure our sway bar end links to 11 and a 1/4 inches. So you are provided a jam nut. I also put anti-seize inside of here just to make sure if we ever get lifted in the future or you ever take off the lift, you can adjust them with no problem. Just gonna thread that on for the time being. Gonna take a quick measure. From center to center, it looks like we need to loosen this one up just a bit more, just a 1/4 inch. That one's too tight. All right. That one is set. We can tighten down our jam nut to keep that in place. Now we can use this as a reference or a guide. Now, those look even, but let's double-check. While we're here, we wanna make sure that our jam nut is tightened down so our sway bar link is not going anywhere. I'll just grab the adjustable wrench and we can tighten that. Gonna make sure that these are straight.So now we're going to install our quick disconnect hardware for our sway bar end links. We do have at this bracket that is very similar to our U-joint before where our stud is gonna go. So we're going to thread that into our sway bar here. Now, we're gonna tighten this down in just a second, but we wanna make sure that this stays straight. So what I'm gonna do is grab a screwdriver and then we can take a 9/16th-inch wrench, you can also take a socket, and we're gonna go ahead and tighten that down. Now we're gonna take our bottom post. This is where the bottom sleeve is gonna go on here and then we can take the quick disconnect pin and insert that to keep the bottom sway bar end link on there. So we are going to insert that with the bolt hole facing the front as well as the rear. We're gonna make sure that pin is very easily accessible, then we can take the flat washer as well as the nylon lock nut and go ahead and do the same thing with another screwdriver. We're gonna take a screwdriver as well as a 19-millimeter socket. We're gonna do the same thing that we did with the upper hardware. Keep that in place, tighten that down with a 19-millimeter socket.So now we need to install our bracket here. This is gonna be for our quick storage, so once you quickly disconnect on the trail, you'll be able to store your sway bar end link up here and out of the way with your pin. So we're gonna remove these two 10-millimeter bolts with a 10-millimeter socket that's holding in our plastic trim piece and sandwich our bracket in between. Now you have a couple of holes, so depending on the size of the link, may depend. You may need to measure, but we're just moving it as far back as possible for the moment. Then we can tighten those down with a 10-millimeter socket. And now we are ready to install our sway bar link.So right now we're going to attach the top portion of our sway bar end link. Now, we will go back and attach the bottom, but I wanna get all of the hardware and everything on the other side finished before we go ahead and do that. So once that is threaded on, we can use a 15-millimeter wrench to hold this stud still and then a 15-millimeter socket to tighten down that nut. And then it should just slide right onto the pin. But we wanna keep this disconnected for now and we'll move over to the other side. Now we can go ahead and connect these and attach our pin. So once it's on there, gonna take our pin, make it a little bit easier.So now we are onto our track bar. Now, this will have to be measured out to 33 and a 1/2 inches from center to center. So it looks like we are actually are there, 33 and a 1/2 from eye to eye. Now, we may need to tighten this up a little bit. All you gotta do is just twist your collar here. I did put a little bit of anti-seize again just to make sure everything is smooth. All right. Back to 33 and a 1/2, once you are at 33 and a 1/2, we can take these clamps, bring them over or collar as far out as possible where they're still on this collar. Take a 17-millimeter socket and we can go ahead and tighten those down. Now, I'm not gonna tighten these down all the way because I would like to have these in an accessible location when we do take this over and install it on our Wrangler for future reference. We also wanna make sure that both of our ends are lining up. All right. So now we can go and install this on our Wrangler.So before we can install our track bar, we wanna make sure that this sagging steering system is out of the way. So what I'm gonna do is just reconnect our drag link onto our Pitman arm and attach that castle nut up top. So now we're gonna tighten that down and put a little bit of pressure on our stud so we can line up the hole for our cotter pin and once our cotter pin is in, we can take a pair of pliers and just bend that back. Now we can install our track bar. So once we have our track bar lined up, I did take a dead blow to the other side just to line that up easily. Then we can install our bolt that is provided to us by Rough Country. Then we can attach our flange nut on the other side with our flat washer that's provided to us as well. Now, with a 19-millimeter socket and 19-millimeter wrench, we're gonna tighten that down.So just like our control arms, we are gonna save our track bar for last, so once we get the Jeep down on its own weight we'll be able to shimmy the steering wheel and be able to line that bolt up a lot better than we will in air considering the axle has already shifted since we disconnected it before. But anyway, we can move to the rear and start disassembling that.So now that we're in the rear, we supported our axle and we're gonna start by taking off our sway bar end links. I'm gonna be using an 18-millimeter wrench for the outside as well as a 15-millimeter socket to remove this nut. Right, now we can remove the top bolt. It has a flag nut on the back. I'm gonna be using an 18-millimeter socket to remove that. There goes our flag nut and our sway bar link. So I'm gonna be using an 18-millimeter swivel for the top since we don't have a lot of room since our exhaust is here. There's our flag nut and our bolt. Now we can start to remove our rear shocks. Now we're gonna start with the bottom bolt. It's gonna be a 19-millimeter socket, 19-millimeter wrench to remove that. You might have to put a little bit of pressure on the axle in order to wiggle that out. So now I'm gonna use a 13-millimeter swivel socket as well as a pretty long extension to reach our upper bolts. Now, these can be a bit tricky. You may wanna use a little bit of heat. Just be careful because you have your gas tank right here. But you are going to remove those. Now, there is one on the other side as well, may be pretty difficult to see since they are in a hidden location. So for the outer one, as you can see, I used a standard 13-millimeter shallow socket and now our shock is fully removed and we can do the same thing on the other side.So in order to drop our axle, we do need to remove our track bar. We will also be adding a track bar bracket on here shortly, but I'm gonna use a 3/4-inch wrench to remove this bolt. You can also use a 19. You can also use a socket. However, we don't have a lot of room with our gap. So there is not a flag nut on the other side of this bolt because there was previously a track bar relocation bracket here as you can tell by the bolt hole down here that was previously drilled. So once you lower your axle and stock control arms, it's gonna roll the axle forward and pull it back. So you may get a little bit of clearance out of that for this bolt. This bolt is just being not the kindest.So after we have our track bar disconnected, we can start to lower our axle and it's gonna give us enough droop to get our springs out and after that, we can start on our control arms. Just be careful, you have a lot of lines back here so keep an eye on those. Also, your track bar is gonna try to shimmy out. That's okay. We do actually need it out of this bracket in order to put the relocation bracket on. All right. So this is low enough where we can take our spring out. We may need to drop it a little bit lower to get our new spring in, but that's okay. We can tackle that when we get to it. So now we're going to start to remove our control arms and replace them one by one. I'm gonna start with the passenger side lower control arm. Gonna be using an adjustable wrench. If you have a 21-millimeter wrench, you can use that on the nut back here. And then we can use a 21-millimeter socket for the other side. Now we can do the same thing with the bottom bolt using this same adjustable wrench or 21-millimeter wrench and 21-millimeter socket.We do need to set the pre-alignment measurement. So the new control arm will have to be 3/8-inch longer than our stock control arm. So we have measured our stock control arm. It looks to be center to center 15 and 7/8, so it will be 15...or 16 and a 1/4 on our new control arm. Now, it may differ. It most likely will not for yours, but after we have that pre-measurement alignment, you also wanna make sure that your grease fitting is at the bottom so it's easily accessible. You wanna make sure that your offset is at the bottom as well. But after we have that all finished, we do need to tighten down this jam nut. I'm gonna be using a 1 and 7/8-inch wrench. You most likely will not have this in your toolbox, so you may need a large adjustable wrench or crescent wrench. Tighten that jam nut down, then we'll be able to install this on our Wrangler.So now we can install our passenger side lower control arm, making sure our grease fitting is facing down. I'm gonna start at the top because our spherical joint will give us a little bit of an issue if we don't. And we will be able to pivot the bottom one to be able to get into the mount as to where the opposite would not. So because we can start with the top joint, we have some pivot room, so that's gonna be able to help us align our lower control arm. So I did have to tinker a bit with the axle height. But once you figure that out, we'll be able to get that bolt through. So, again, just like the front, we're not gonna tighten anything down on our control arms just because we need the Jeep on its own weight in order to do so. So we're just gonna move our way into the passenger side upper control arm using a 15-millimeter ratcheting wrench, we're gonna remove the top bolt. Has a flag nut on the back just like our fronts. Now, your exhaust is gonna be right here, so it might be a little bit tricky and if you push up on the control arm, should be able to get that out. I'm just using a small pry bar to get that out. There's not a lot of room. So with that same 15-millimeter socket and a 15-millimeter wrench, we can remove the upper passenger side control arm. So your e-brake is gonna have a stud. It should have a nut on the back of it. However, ours is not there, it will be bolted to your upper control arm mount. You will need to remove that in order to remove your upper control arm.So you're gonna start with the upper bolt, since this is gonna be the trickiest one to access. So once that's through, we can attach our flag nut on the other side. And if you wanna get it started, we can grab your 15-millimeter ratcheting wrench and go ahead and tighten that down. Now, we're not gonna tighten it down all the way. We're just gonna get our flag nut started. Now we can move on to the bottom. Again, you're gonna have to tinker with the axle here, get this lined up. All right. Now we can lower this back down and put in our springs. So now that our axle is completely lowered, we can install our spring.So because our axle has shifted, we do need to put on some shock adapter brackets. Now, you are going to be able to bolt this up right to the back. There is going to be a little hole there and we are going to thread that on with the provided bolt and the provided a nylon lock nut and then we can go ahead and tighten that down with a 13-millimeter wrench and a 13-millimeter socket. So before we go ahead and tighten this back bolt down all the way, I do want to make sure that our bolts on the factory bracket that's attached to our axle and our new bracket are all lining up. So you will have a metal crush sleeve that we're gonna put in the middle here. We're gonna hold that in place for the time being and then we're going to stick our provided bolt and the provided flat washer through and then attach our flat washer and flange nut. Then we can go back and tighten down that bracket using that 13-millimeter socket and wrench. Now we can tighten down our bracket and install our shock.So what I did was attach the bolt that is closest to the frame and we're just going to hook our shock tooth on that so we can access the easier accessible one and thread that in. So once they're both in there, we can take our 13-millimeter socket and our extension and tighten those down. So now we can tinker with our axle height to get our bolt through the bottom here. So once that's through, we can attach our factory hardware, our flat washer, and our factory nut, and tighten them down with a 19-millimeter socket and 19-millimeter wrench. I'm gonna do the same thing on the other side.Now we can install our rear track bar relocation bracket. You're gonna have two of the smaller bolts to hold it in place. One is gonna be at the top, so we're going to install that up there. Now, we already have a hole drilled out for ours at the bottom, but I will explain that in just a second. So we're gonna get our flat washer on there. This is gonna be tricky because it is in that location where that captured nut was. So after we have that top bolt in, we can line up down at the bottom. We actually wanna get our factory bolt in first. That's gonna give you a good starting point to mark and drill. Now, we already have a hole there, but you wanna get that factory bolt in. Now, this should be a T55 Torx bolt with a flag nut on the other side. However, we have established that this used to have a relocation bracket so we are using this bolt that came with our Jeep here. So now after our factory bolt is in, our back 5/16-inch bolt is in, you will use this as a guide to drill a 5/16-inch hole. We already have one there, so we are going to put our hardware through. You can attach your flat washer and the nut. So now we can tighten all of these down with a 13-millimeter wrench and a 13-millimeter socket. Once we get back to here, we will need a 19-millimeter wrench and 19-millimeter socket. So after you have pressed your sleeves into your sway bar end link bushings, we can take the provided new bolt and a flat washer on the bolt head and then we can take our factory flag nut and install that in the factory location. Then we can leave that alone just for a second and get our bottom bolt in. It's gonna be the same provided hardware with the flat washer, so we can do the same for the bottom. Now, I wanna get both sway bars on before we go ahead and tighten everything down. Gonna do the other side. So now with a 17-millimeter wrench and 17-millimeter socket, we can tighten those down. Now, with a 17-millimeter socket and a ratchet, we can tighten down our top one.So now we can go ahead and replace our brake lines. Make sure you have a catch can ready. You're gonna need a 17-millimeter wrench and an 11-millimeter wrench and I would recommend to soak these in PB B'laster or a penetrator. So we're just going to disconnect our hard line from our soft line here. Being very careful we do not strip the hard line. And we will also have a replacement bracket for our frame as well. Now, we can remove this bottom brake line using a 15-millimeter socket. So with both of our copper washers, we can reinstall our banjo bolt. Snug that up with a 15-millimeter socket. Now we can remove our bracket. Using a T40 Torx bit, we are going to remove this bolt holding on our previous bracket. Now we can replace that bracket with our new bracket and we can tighten that down with the same T40 Torx bit. So now we can tighten up our brake line using that same 17-millimeter wrench and 11-millimeter wrench. All right. So once that's snug, we can put in our clip or just give her a little tap there. And she's on.Now we can install our new soft line, making sure our new copper washers are installed. You're gonna tighten up that banjo bolt with our 15-millimeter socket. Now we can remove our bracket using that T40 Torx bit. Now with our factory bolt, we can reinstall that with our new bracket. Now we can tighten down our soft line to our hard line with a 17-millimeter wrench and an 11-millimeter wrench. So now in the rear, we can use an 11-millimeter wrench to disconnect both of our hard lines on our breather here. So with a 9/16-inch socket we're gonna remove the bolt that's holding on our breather. Now we can remove our junction, put that aside, grab our new one with our breather installed. You just have to thread that into our axle. Tighten that down with a 9/16-inch socket that we originally were using. Then we can install our hard lines into our junction. And we can start to tighten down our hard lines into our junction using that 11-millimeter wrench. And once those are snugged up, we can go back with our 9/16-inch deep socket, tighten that down. So we can attach our soft line up at the top at our hard line. So we can attach our soft line to our hard line and tighten that down with our 11-millimeter wrench.So the next couple of steps are gonna involve the Jeep needing to be on its own weight. We have to get our track bars reconnected as well as tighten down all of our control arms. So we're gonna throw our tires back on. So what we're gonna do now is attach our front track bar. Now, as you can see, it's not lining up that well, but if you have somebody in the driver seat shimmying the wheel back and forth, you will be able to line that hole up. So now we're gonna go ahead and tighten this down once the wheel is centered with a 17-millimeter socket. So once that's all tightened up, we can move to our rear track bar.So once you put the Jeep down on its own weight, the rear track bar should line up. Now, if it's not lining up, you can put it back up in the air, grab a ratchet strap, and hook it to the frame and try to pull the axle over. And that's usually how I do it. But I wanted to show you guys here. So ours did line up. We put our bolt through already. As you can tell, your gas tank is right here, so it may be a little bit tricky. Now we can go ahead and tighten that up with a 3 1/4-inch ratcheting wrench and an 18-millimeter wrench. So after you have both of your track bars in, you just wanna remember to tighten down all of your control arms as well as grease all of your control arms. You will need to bleed all of your brake lines and you will need an alignment.So that wraps it up from my review and install. Make sure you like and subscribe. And for more videos like this, keep it right here at extremeterrain.com.

      Product Information

      Features, Description, Reviews, Q&A, Specs & Installation
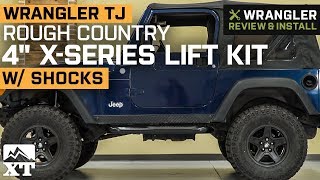
      Features & Specs

      • 4 Inch Suspension Lift
      • Includes X-Flex Control Arms
      • All Joints are Fully Rebuildable
      • Shock Options Available
      • Increased Ground Clearance
      • 100% Bolt on
      • Quick Disconnects
      • Fits 1997-2006 Jeep Wrangler TJ Models

      Description

      Excellent Ground Clearance for Off-Roading. Gain an increase in ground clearance while leveling the front of your Wrangler TJ with the Rough Country 4 in. X-Series Lift Kit with Shocks. This kit is the best equipment available on the market for off-road action. The kit features an upgraded forged adjustable track bar that's constructed out of forged steel for optimized performance.

      What's in the Kit. The kit includes front and rear lifted coil springs, adjustable control arms and stainless steel brake lines, coil correction plates, sway bar links, quick disconnects and an adjustable track bar. Made of heavy-duty materials, each component in the kit can withstand the impacts of rough, off-road use.

      Fitment. This jeep suspension lift kit is designed for 1997-2006 Jeep Wrangler TJ models.

      Freight Notes. Freight items can only be shipped within the continental 48 states, no expedited methods. What is freight shipping? Your Answers are Right Here!.

      Freight Notes. Freight items can only be shipped within the continental 48 states, no expedited methods.

      Fitment:

      Details

      Rough Country 66130

      CA Residents: WARNING: Cancer and Reproductive Harm - www.P65Warnings.ca.gov

      Installation & What's in the Box

      Installation Info

      What's in the Box

      • Lifted Coil Springs
      • Shocks
      • Upper Adjustable Control Arms
      • Lower Adjustable Control Arms
      • Pitman Arm
      • Sway-Bar Quick Disconnects
      • Forged Adjustable Track Bar
      • Track Bar Drop Bracket
      • Stainless Steel Brake Lines
      • Lower Shock Brackets
      • Hardware

      4.7

      Customer Reviews (500+)

        Questions & Answers

        10 More Questions

        Will It Fit My Wrangler

        • TJ Rubicon 2 Door - 03, 04, 05, 06
        • TJ Rubicon Unlimited 2 Door - 05, 06
        • TJ Wrangler 2 Door - 97, 98, 99, 00, 01, 02, 03, 04, 05, 06
        • TJ Wrangler Unlimited 2 Door - 04, 05, 06

            Related Wrangler Categories