Talk to a Wrangler Sales Tech
1-877-870-8556
M-F 8:30A-11P, Sat-Sun 8:30A-9P
Logo Image
$20K Sweeps! 10 Chances to Win! Enter Daily >

High Performance Direct Fit Onboard Air System (07-24 Jeep Wrangler JK & JL 4-Door)

Item J108773
Verify parts fit and get product recommendations.
Wrangler Sales Techs: Connect Now M-F 8:30A-11P, Sat-Sun 8:30A-9P
$0.00
On Sale

$959.49 (kit)

FREE Shipping Market Price $1,173.99 You Save 18% ($214.50) Up to 10% off for Military & First Responders! See Details

Will this fit your Vehicle?

Select a different vehicle Help?
Update or Change Vehicle
Ship to: Ashburn - 20149
Sorry, please enter a valid US or CA postal code
We're sorry, zip can't be updated at this time.
    Create a list
    Add to New List

    Saved - View your saved items

    We're sorry. We couldn't save this product at this time.

    or use

      Video Review & Installation

      This Kleinn bolt-on onboard air system is for those of you that have a four-door 2007 to 2018 JK that are looking for a very complete onboard air system. This is going to come with everything you need to run a set of lockers, to air up tires, to run air tools, to run your Kleinn air horn setup. Whatever you might need, this is gonna give it to you and this is going to give you all of the brackets to get everything bolted up very, very cleanly, which is nice as well. Some of the other kits are a universal fit. You have to figure out where you're gonna mount everything, drill some holes. This comes with all of the mounting and this is vehicle-specific.This is going to install pretty easily into your Jeep. I'm gonna give it a two out of three wrenches. There's a little bit of wiring and a little bit of plumbing to do. It's nothing all that out there. Most of you are gonna be able to tackle this in your driveway, but we'll talk a little bit more about that installation in just a second.This kit here is going to be a little bit more expensive than some of the others that you're going to find out there. It is all-inclusive. It has a lot of great, high-quality components in it. And again, it is vehicle-specific. So I do think you're getting a lot for your money. But if you're on a budget, one of the other options might be a little bit better for you. But if you have a little bit of higher budget and you're looking for something quality, this is a great choice.So let's talk about what's included in this kit. As you can see down here, this is part of the bracket that comes with this lift kit. I've said a couple times now, this is vehicle-specific. This comes with everything that you need to get this mounted up on your Jeep so the tank and the compressor are both going to get mounted on the underside of your Wrangler and they do come with all the brackets and all the hardware that you need to get them mounted in that location. You're, of course, going to have your tank. This is a 2.8-gallon tank and you're going to have your compressor. Now, when you're looking at a compressor for filling up tires, what you really want is something that pushes a lot of CFM or cubic feet per minute. This is going to be a two CFM compressor. So it does move a good bit of air. There are some others out there that are gonna push a little bit more than that, but this is going to move a good amount of air. And you're also going to have your reserve of 2.8 gallons of air so even if this isn't going to be moving quite as quickly, you do have that reserve, which can be very helpful.Now, the other big benefit to this compressor here is that it's designed to be 100% duty cycle at 100 PSI. So, as long as you're only running 100 PSI in this tank at the time, this can be running all the time. This isn't something where you're going to have to let it stop and cool off at any particular time. Now, if you climb much over 100 pounds, you're gonna wanna give this thing a little bit of a break. But for the most part, this is gonna be a workhorse. This is really going to just run for you.You are going to get a couple of different accessories along with your setup here. So you have this convenient carrying case for your coiled air lines. So that's gonna be great for airing up those tires. You're also going to get actual air up gauge here. So this is an inflator/deflator that has a gauge on it that will tell you exactly what pressure you're up to in your tires. So that's very nice as well.As you might be able to see, all of these little red things here, these are just plugs on the bungs on this tank and there are a ton of different bungs. So, no matter how you have this thing installed in your Jeep, no matter how many other air accessories you wanna run, you're going to have plenty of taps for your system. Now, as I said, this does come with all the wiring that you need to get it set up. So this gets wired, not just to a switch, but it also is going to have a pressure switch so the compressor will fill up the tank to a set pressure and then turn itself off automatically. It does have a switch as well and then it's going to have all of the brackets and all the hardware that I mentioned also. Now, I'll have a member of our install team show you exactly how you get this bolted up.Man: First thing you're gonna wanna do is open your hood. Before you make any electrical connections, you're gonna wanna go ahead and remove the 30 amp fuse from your inline fuse that's gonna run from the battery to your compressor. Now that we have our fuse out, we're gonna go ahead and connect it to the positive battery terminal. Now that we have our wire connected to the positive terminal, we're gonna go ahead and run it across the firewall. Once it's ran across the firewall, we're gonna go ahead and run it through the provided quarter-inch wire loom. You're gonna have to make the decision if you wanna run your yellow wire from the ignition like the instructions say or you can run it to your fuse box as long as you find yourself a 12-volt source. I went ahead and found myself a 12-volt source using a test light. So that is where I will be wiring mine in.Once you've decided where you wanna connect your wire, you're gonna go ahead and put it through the loom just like you did with the red wire. I would recommend running it all the way through the loom so when you run it through your wheel well, it may be a little bit easier for you. Once you have your wire in your loom, you're gonna go ahead and route it down through your wheel well and underneath the vehicle. For those of you who will be running your yellow wire to the ignition and then back, this is how you're gonna do that.To get to your ignition wire, you're gonna wanna go ahead and pop out the panel by lightly pulling back and down. Once your panel is released, it is on a hinge, but you should put it on the floor. You're gonna wanna locate the pink wire and use the electrical connector that comes in the kit to connect the pink wire to the yellow wire.Now that we have our wires ran, we're gonna go ahead and lift the Jeep up and run the wire through the frame. You're gonna wanna tuck your wire up out of the way of the exhaust. Once you have your wire safely out of the way of the exhaust, you're gonna go ahead and run it through this square hole in your frame. Once you have your wire all the way through the frame, you're gonna go ahead in the back and pull it the rest of the way.Now, to mount the bracket, the first thing you're gonna wanna do is remove these two 5/8 bolts. Now that we have our two bolts out, we're gonna go ahead and move over to a table and assemble the bracket to the tank. All right, guys, now we're ready to mount our tank to our bracket. To do that, you're gonna wanna take your tank, place it on the bracket, but there's a few things you're gonna wanna look out for when doing that.Now, the first thing you're gonna make sure is on the table, when you're assembling, the drain plug is facing up. The next big thing you're gonna wanna look out for is that you have your tank oriented right. You want three plugs in the front and two plugs in the rear. The way to tell on the bracket, the two in the rear also match up with the two bolts you took out from your charcoal canister.Once you have your tank orientated correctly, you're gonna go ahead and take your rubber and put it on the tank strap. Once you have your rubber on, you may need to trim the end to match the end of the strap. Once you have your rubber on your strap, you're gonna go ahead and bend it to the contour of the tank. You're gonna do that by taking your bracket and securing it with one bolt and slowly creasing it over until you reach the other hole.Once you have your one strap secure, you're gonna go ahead and do the other side. Now that we have our tank secured to our bracket, we're gonna go ahead and install our fittings. You're gonna pull out the plastic plugs that come from the factory and go ahead and install a plug there and your coupler fitting. You're gonna wanna snug these up using a 14-millimeter wrench as well as a 19-millimeter wrench on your coupler.Next you're gonna wanna install your drain. Now that we have our drain installed, we're gonna go ahead and install the three on the side. The first one closest to the drain plug is going to be the compression fitting. The one in the middle will be your safety, and the one on the end will be the inlet tube coming off your compressor.Now that we have our side installed, we're gonna move on to the front portion of the tank, which will house the pressure sensor as well as two plugs. Now that we have our tank fully mounted to our brackets with all of our fittings in, we're gonna go ahead and mount the compressor to the compressor bracket that will eventually be connected to the tank. Now, the first thing you wanna do is decide what side you want your compressor on. You can either have it on the drain side or you can have it on your pressure sensor side. It does not matter. It is up to you. For our case, we are gonna put it on the drain side. So let's do this.Once you have your compressor on the studs, you're gonna go ahead and use the provided hardware to tighten it down. Once you have all four nuts on, you're gonna go ahead and attach the fitting. Now that we have the tank assembled as well as the compressor, we're gonna go ahead and install the tank and bracket on the vehicle. The first thing you're gonna wanna do is use the supplied hardware through the two holes in the tub.Now that we have our two bolts in, we're gonna go ahead and grab our tank and bracket as well as the two bolts we removed from the charcoal canister in the beginning. Then you can use the provided washer and nut on the bolt you put in earlier. Now that we have all four bolts installed, we're gonna go ahead and tighten them up.All right, guys, now that we have our tank fully mounted, we're gonna go ahead and start making our electrical connections. The first connection you're gonna wanna do is be taking your yellow wire, which is your 12-volt switch, and connecting it to one leg of the pressure switch. Now the other leg of the pressure sensor is going to get a spade connector, which will eventually connect to the relay. Now that we made a few of our electrical connections, we're gonna go ahead and mount the compressor to the bottom of the tank bracket. Once you have all six bolts in, you're gonna go ahead and tighten them up.All right, guys, now we're ready to wire up our relay. The wires that are gonna be ran to this are gonna be a ground, a power from battery, the hot wire from the compressor, as well as the pressure switch. Now, the relay is like your standard relay. You're gonna have specific pins for specific wires. Please refer to your installation guide for the proper wiring. Once you have all your wires ran to your relay, you're gonna wanna mount it in a safe, out-of-the-way location. That is up to your discretion where you would like to mount it. For us, we're gonna mount it right inside our skid plate.Once you decided where you would like to put your relay, you're gonna go ahead and use one of the provided self-tappers to secure it. Now that we have our hot side all good, we're gonna go ahead and do our negative side. Now, to do this, it's a lot like your relay. You can pretty much mount it wherever you want as long as you have a good contact. Now, to mount a ground, you're gonna wanna clean the paint off the frame or wherever you decide to mount it and then use one of the provided self-tappers. In our instance, we're gonna go right to the tub.Now that we've made all of our electrical connections, we're gonna go ahead and clean up the wiring and zip tie the main wire that's coming down from the battery out of the way. Now that we have our chassis grounds mounted, we're gonna go ahead and connect the compressor to the tank. Now, to do that, we left a port open on the tank itself. We're simply just gonna screw right into it.All right. Now that we have our compressor hooked up to our tank, we're gonna install our filter. Now, to install the filter, you're gonna use the supplied hose, connect it to the back of the compressor to the fitting we installed earlier and run it to the filter. Now you're gonna wanna mount this filter in a dry area away from any potential hazards.Now that we have everything connected to the underside of our Jeep, we're gonna go ahead back up to the engine bay and put the fuse in. You're gonna wanna twist the cap off of the inline fuse, put your fuse in, and tighten it back down. And with everything tightened up, that wraps up our review and install. You can check out more at extremeterrain.com.

      Product Information

      Features, Description, Reviews, Q&A, Specs & Installation

      Features

      • Onboard Air System
      • Air Tank Features a 2.8 Gallon Capacity
      • Includes Mounting Brackets for Each Application
      • Comes with Custom Built Loomed Wiring Harness with Relay
      • Includes Quick Disconnect Tire Inflator with Storage Bag
      • Designed to Be 100% Duty Cycle 150 psi Air Compressor
      • Ideal for Air Horns, Air Suspension, Air Tools, and Inflates Tires
      • Convenient Bolt-On Installation
      • Fit All 2007-2024 Jeep Wrangler JK and JL 4-Door Models

      Description

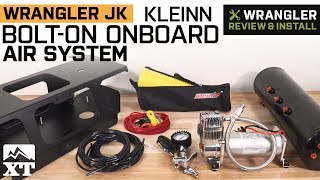
      Reliable Air Compressor. The Kleinn Bolt-On OnBoard Air System is a high-volume air compressor that conveniently mounts between the frame rails of your Jeep without sacrificing ground clearance. Its 2.8-gallon air tank lets you power your vehicle’s air horns, air tools, air lockers, and inflate a 37-inch tire. This is one of the most indispensable equipment you must have on your next off-road adventure.

      Durable and Waterproof. The Kleinn Onboard Air System is made to be extremely durable. Its compressor and tank are protected with a steel skid plate to help it withstand the brutal driving conditions on the trail. It’s also completely waterproof, so you can use it even under wet driving situations.

      Bolt-On Design. This onboard air compressor is designed to be easy to install with its 100% bolt-on design. Installation requires no drilling, cutting, welding, or any modification to your Jeep.

      1-Year Warranty. Kleinn guarantees that this onboard air compressor is free from any defects in material and workmanship with a 1-year warranty from the date of sale.

      Application. The Kleinn Bolt-On OnBoard Air System is engineered to be used on all 2007-2024 Jeep Wrangler JK and JL 4-Door models.

      Fitment:

      Details

      CA Residents: WARNING: Cancer and Reproductive Harm - www.P65Warnings.ca.gov

      Installation & What's in the Box

      Installation Info

      What's in the Box

      • (1) 12v Waterproof Onboard Air Compressor
      • (1) Remote Quick Connect Mount
      • (1) Tire Inflator with Gauge
      • (1) 30ft of Hose
      • (1) Storage Bag

      Tech Specs

      4.7

      Customer Reviews (3)

        Reviews of similar Accessories products have an average rating of 4.3 out of 5

          Questions & Answers

          10 More Questions

          Will It Fit My Wrangler

          • JK Rubicon 4 Door - 07, 08, 09, 10, 11, 12, 13, 14, 15, 16, 17, 18
          • JK Wrangler 4 Door - 07, 08, 09, 10, 11, 12, 13, 14, 15, 16, 17, 18

              Related Wrangler Categories