Installation Time
(approx) 2 Hours
Difficulty Level:
Light to Moderate mechanical skill required.
FREE 2 or 3-Day Delivery on Orders $119+ Details
$659.98 (pair)
FREE Shipping Market Price $758.98 You Save 13% ($99.00)Saved - View your saved items
We're sorry. We couldn't save this product at this time.
or use
Hey, guys. So, today, we're checking out the 9-inch RGB LED Headlights, fitting all 2018 and newer JL Wranglers. So, if you're not a fan of your factory headlights or you've busted one up on the trail and you're looking for an overall replacement, this option is going to be a great choice to take a look into. So this, as it says in the name, is going to feature multiple LEDs inside of the housing, which is going to drastically increase your lighting performance on the front end of your Wrangler. Now, those LEDs are going to have a couple of different patterns. You're going to have a low beam in the middle and then multiple LEDs around the outside for your high beam. Now, those are going to not only give you better driving visibility at night over your factory halogens, but they're also going to have a more uniform light pattern and be a lot higher on the color temperature scale, giving you a clean, bright, white light.Now, that's gonna be a big improvement over those factory halogens. And not only are you getting the lighting performance out of these lights, but you're also getting some durability as well. So, if you are taking your Jeep out on the trail a lot, and you're concerned about branches or brush hitting your headlights, you can be sure that these are going to have a durable enough build to hold up in the long run. So, with the lighting performance and the durability of these headlights, you're also getting a very stealthy aesthetic while the headlights are off. You have a black housing and the riveted accents, adding to a more aggressive look to the front end of your Wrangler. But these are also going to offer a little bit of customization. So, with these headlights, you will be able to download an app that you'll be able to control via your iPhone or your Android, and you'll be able to customize and change the colors of the LEDs inside these headlights. Now, not only are you going to be able to change the colors to match any other color aesthetic that you have going on with your Wrangler, but they will have multiple features so you can really customize it when your headlights are off. Perfect for you guys out there that again, want to create a custom look to your Wrangler and really make it stand out.With all that being said, these are going to be roughly $600. And in my personal opinion, I think that that's a very fair price for what you're getting out of the box. Now, these headlights are going to have a number of different features. Obviously, you are getting the LED technology, you're getting the stealthy black housing, and you're getting that customization. But these are also going to integrate turn signals into each of the headlights, which will add a little bit of safety and a little bit of style when you're driving on the road. Now, not a lot of other options on the page do have that, especially with the RGB included. And some other less expensive choices are usually going to have a xenon light instead of an LED, so they may have a more basic setup in comparison to something that's going to have a laundry list of features like these do.Now, if you don't need all of the bells and whistles, then those might be a good option. But if you're looking for some headlights that are going to offer you a great performance as far as lighting is concerned, and a very custom look and feel, this option is going to be a great choice to take a look into. As far as install goes, this is going to get a two out of three wrenches on the difficulty meter, however, it is a lighter two out of three. Mostly everything in this kit is plug and play. However, there is some very simple wiring that we'll have to take care of. But you're gonna need some very basic hand tools. So, speaking of that install, let's jump into that now.The tools that I used for my install were an impact wrench, a 12-millimeter socket, and a 10-millimeter socket, a 1/4-inch drive ratchet, a flat-head screwdriver, a pair of pliers, a trim removal tool, and a pair of wire cutters, strippers, and crimpers.So, our first step to this install is starting with our hood open and we're going to go ahead and take off our grille. Now, there's going to be a series of pop clips up on top that we have to remove. I'm going to use a flat-head screwdriver. You could also use a trim removal tool to do this. What we can do now is pull up on the top of the grille and unhook the two pins that are sitting on the support here. And then it's still gonna be secured down at the bottom with a couple of retainer clips, so we're just gonna give a good pull. And then once it's detached, we can move this out of the way and work on our headlights. Now that we have access to our headlights, we can remove the three bolts that are holding in the headlight housing. I'm gonna use a 10-millimeter socket in order to remove those.Make sure that you save these, because we will be reusing them. We can take out our headlight housing and disconnect it from the back here. I'm gonna just press down on this clip and pull back. Now we're ready to install our new headlight. So, with your new headlights, you're gonna have a number of wires right out of the box. Now, we are starting with the passenger side because that is going to have the most amount of wires, and be more or less the main headlight, and then we're going to attach our driver's side headlight to our existing wires over here. Now, our main control box, this is going to attach to our battery. We're going to do that in just a second, but one of these harnesses is going to attach to that RGB light control box. Then we have our two wires. One's going to connect to our driver's side light. Again, one is going to connect to our control box. And then we're going to have another wire here that's going to connect on the back of our headlight at the main harness, and tap into our daytime running light.So, first, what we're gonna do is run these wires behind. I'm just gonna pull them up here, put them out of the way, so we have room to mount this up. We can plug in our main harness. Make sure you hear a click. And then what we can do is grab...then we can grab our daytime running light wire, connect that, and then pull that up out of the way as well. There are little collars or sleeves on the harnesses, so you want to make sure that you secure those down or thread those in. That's gonna make sure everything is tight and sealed. Then we can line up our light with the pins, grab our factory hardware, and start to secure that down. Once all three are threaded in, we can tighten them up with a 10-millimeter socket.So, the two wires for our control box did not come with any leads, and we need to connect it to our battery, so I'm just taking some leads here, going to attach it to our control box wires, and just crimp these down. I would also recommend that you put a little bit of heat shrink on there as well. All right. So, what we can do now, after those leads are on, is prep this to be installed, so I just laid it here for a second. And then I'm going to grab a 12-millimeter socket. We can connect the power wire to one of our accessory leads over on positive side of our battery. Tighten that back up with a 12-millimeter socket. Then we're gonna take a 10-millimeter socket and do the same thing for the negative terminal.Now we're ready to attach this to one of the leads in the back of our headlights. You're also gonna get some 3M tape on the back. You can put this wherever you like. If you want to put it on the fuse box, on the body, you can really customize that to wherever you want to put that. But what we're gonna do now is take the male lead from the back of our headlight and plug that into our battery connector here. Now, there is going to be a little notch. You can line that up, and again, we're going to take this threaded collar, thread that in. Now, you are going to have a decent amount of wires left over, or the amount of wire, so I would recommend to clean this up after the fact, make sure that everything is out of the way, not touching anything hot. But once we are done with those wires, what we can do is attach this to our daytime running light.So, what we can do now is attach our wire for our daytime running light. Now, what I did was took off the inner fender well liner. Now, you don't necessarily have to do this. It just is a little bit easier, and I wanted to show you guys where this harness actually is on the inside of the fender. So, it's right up at the top. You can reach around your liner, or go underneath and reach it just fine, but I'm gonna take a trim removal tool and disconnect this from the fender, or the body of the Jeep, just so I can reach it a little bit better, then I'm going to disconnect the harness.All right. So, this is just gonna make it a little bit easier for me to attach, since I have the inner liner off, but now we can go ahead and attach our line or a vampire clip to our harness here. So, now we can attach our clip to our turn signal wiring harness for our fender light. So, I did test this out and it looks like the white wire with the green trace is our turn signal. I'm going to clamp this clip around here, take a pair of pliers, clamp it down around the wire there, making sure that we have good connection. Once that's secure, we can take the wire from our headlight, secure that down, plug our harness back in. Slip down that red locking tab. And place that back into secure spot up top.Before we install our driver's side headlight, I wanted to stop down and tell you guys a little bit more about this new headlight setup, and what benefits and features that you're going to get out of this that your factory headlight setup was unable to give you. Now, just as a little bit of an overview of our factory light, as you can tell, it's a pretty standard setup. So, you have that chrome reflector on the inside at that halogen bulb, a clear lens, and a standard plastic housing. Now, moving over to this new option, this is going to have a die cast aluminum housing and a polycarbonate lens, so it's going to be incredibly strong, and a lot stronger than the standard factory setup. You're also gonna get a riveted accent on the outside, which is going to give you some extra style. Now, these are gonna be IP67 rated, so they are going to be dustproof as well as waterproof, so you don't have to worry about the headlights or any water or dust getting inside. So if you're taking your Jeep out on the trail a lot and you have a lot of dust kicking up, or if you are doing any water forging, these headlights and the LEDs inside will be okay.Now, speaking of those LEDs, you're gonna get a multiple LED setup. So, as you can tell, you have a number of different LEDs integrated into the actual light. Now, a lot of those are going to be the high beam. There's going to be a strip in the middle that is going to be your low beam. And then you're going to have some lights up top as well as the bottom, and that is going to integrate into your turn signal, so you will get an amber turn signal out of these headlights, in addition to the actual headlight functions. Now, the LEDs themselves are going to be incredibly bright. An LED is going to be a lot cleaner and brighter of a light. It's going to have a more uniform light pattern, and it's just going to be a lot more modernized in color and in performance, in comparison to a halogen bulb. Now again, that is going to have a bright white light and a higher color temperature, as to where your factory light with that chrome reflector is going to have a lower color temperature, which is going to give it a more of a yellowish or amber hue in comparison to a white LED.Now, what I really like about this option is the fact that it's going to come with RGB technology. It is going to be customizable. You can change the color on these when the headlight is off. So, you will have an app on your Android or your iPhone that you'll be able to control the lights. It's gonna have a number of different modes, a number of different colors, and you can really customize it to your Jeep's color scheme, or really whatever you wanna do with this headlight. Everything is going to be completely plug and play. It is going to be a little bit smaller of a light, but the housing is going to be a direct fit. Everything, again, is plug and play, and you will get all of the adapters and everything that you need in order to install these, as you guys just saw before. So, what do you say we go ahead and install our second headlight?So, what we can do is basically the same process on the other side. However, it is gonna be a little bit different because we're going to have less wires, but we're going to start with taking off our factory headlight with that 10-millimeter socket. So, with our longer harness, what I'm going to do is just tuck that down, and pull that actually in front, because we're gonna connect it to the other side on the driver's side. Then we can attach our factory connector, make sure that clicks, then we can grab our turn signal harness, or our turn signal wire, and plug that into the headlight wire. All right. We're going to run this up behind real quick, just to make sure that it's out of the way, and accessible in a minute, for when we need it. Line this up with the alignment pins, grab our factory hardware, and secure that down.Now, you're also going to get washers if you do need to adjust the headlights. So, what we can do now is take the wire from our passenger side headlight and plug it into our driver's side. Again, there's going to be a little notch on the top. Make sure the pins are aligned. We can take that collar, thread that on, and secure it down. Now, you are going to have a decent amount of wiring left again, but you just want to make sure that you tie that up. You can use a couple zip ties, and we can actually secure it behind our bumper and behind our trim piece here. You just want to make sure that it's away from anything that's hot, because you don't want to melt those wires.So, on the driver's side, you are going to have a fuse box. This might not be true to some of the JLs, but on ours, there is a black fuse box here. What I'm going to do is pull this line up and out of the way so we're able to disconnect this. I'm going to take a 10-millimeter socket, and we're going to remove these two bolts that are holding in the fuse box. Then you can just kind of move this out of the way for the time being, put that behind there, and then we'll have access to our wiring harness here. So again, we're going to take the clip and plug that in or secure it down to the green wire, or the white wire with the green trace. So, once it's around the wire, we just want to clip it into place just like we did with the other side. We can tuck that away and pull our fuse box back, and secure that back into place. Gonna reuse those two 10-millimeter bolts. Tighten it down with a 10-millimeter socket. Last but not least, we can pop our grille back into place and re-secure it down, and close up our hood.That's going to wrap it up for my review and install. Make sure you like and subscribe. And for more videos and products just like this, always keep it right here at extremeterrain.com.
Subscribe to our YouTube Channel
Features, Description, Reviews, Q&A, Specs & Installation
Brand | Quake LED |
Headlight Type | Projector |
Headlight Housing Color | Black |
Headlight Lens Color | Clear |
Headlight Style | Aftermarket Style |
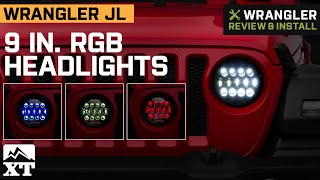
Improved Illumination and Appeal. Keeping your nighttime driving safe is crucial, especially when cruising under harsh weather conditions. Using the 9-Inch RGB LED Headlights on your Jeep Wrangler will make you see signs and obstacles better because of the brighter and longer reach. These headlights provide you with a safer driving environment and a bolder sporty appeal.
Bright and Evenly Dispersed. This pair of RGB LED Headlights utilizes advanced optics to produce bright, white light with low beam and high beam driving patterns. It features a bright white light with 6000K color temperature and an intense 1,500 lumens of output. In addition, the Bluetooth controlled RGB accents provide you with multiple lighting options for a distinctive off-road appeal.
High-Strength Construction. Built to match your Jeep’s rugged lifestyle, these RGB LED Headlights have heavy-duty die-cast aluminum enclosures. The shatterproof polycarbonate lens exhibits high strength to handle the physical impacts of various road hazards. Additionally, each light assembly is fully sealed for long-lasting functionality.
SAE and DOT-Compliant. These lights comply with the regulations on rigidity, performance, and safety standards of the U.S. Department of Transportation. They also meet the automotive standards for the manufacturing, testing, and design of lightings set forth by the SAE.
Bolt-On Installation. Designed for straightforward installation with no modification required, these light assemblies install in place of your original headlights. Each light comes in a precise fit that seamlessly matches your vehicle’s mounting locations.
Application. These 9-Inch RGB LED Headlights are specifically designed to fit 2018-2023 Jeep Wrangler JL models.
Please Note. The Entire Headlight Assembly is 9-Inches but the actual light portion is 7-Inches.
Fitment:
Quake LED QTE903
CA Residents: WARNING: Cancer and Reproductive Harm - www.P65Warnings.ca.gov
Installation Info
Installation Time
(approx) 2 Hours
Difficulty Level:
Light to Moderate mechanical skill required.
What's in the Box
10 More Questions