Talk to a Wrangler Sales Tech
1-877-870-8556
M-F 8:30A-11P, Sat-Sun 8:30A-9P
Logo Image
$20K Sweeps! 10 Chances to Win! Enter Daily >

Fuel Tank Skid Plate (97-06 Jeep Wrangler TJ)

Item J113453
Verify parts fit and get product recommendations.
Wrangler Sales Techs: Connect Now M-F 8:30A-11P, Sat-Sun 8:30A-9P
$0.00
Our Price

$209.99 (each)

FREE Shipping Market Price $242.99 You Save 14% ($33.00) Up to 10% off for Military & First Responders! See Details

Will this fit your Vehicle?

Select a different vehicle Help?
Update or Change Vehicle
Ship to: Ashburn - 20149
Sorry, please enter a valid US or CA postal code
We're sorry, zip can't be updated at this time.
    Create a list
    Add to New List

    Saved - View your saved items

    We're sorry. We couldn't save this product at this time.

    or use

      Product Videos

      0:00:01.170,0:00:06.450this fuel tank skid plate is for anyone0:00:03.360,0:00:08.460with a 1997 to 2006 TJ that need a0:00:06.450,0:00:10.259replacement for your fuel tank because0:00:08.460,0:00:12.599you guy they're crushed it off-road or0:00:10.259,0:00:14.730it's just rotting away especially if you0:00:12.599,0:00:16.980live where we do where they put a ton of0:00:14.730,0:00:18.480salt on the roads in the wintertime this0:00:16.980,0:00:20.040is gonna be a pretty easy part to0:00:18.480,0:00:22.320install we are gonna go two out of three0:00:20.040,0:00:24.060wrenches because the fuel tank skid0:00:22.320,0:00:25.740plate is also what holds the fuel tank0:00:24.060,0:00:27.480into the Jeep so when you're replacing0:00:25.740,0:00:28.530this you're dropping the fuel tank out0:00:27.480,0:00:31.140of the Jeep there are some connections0:00:28.530,0:00:32.759you have to disconnect both electrical0:00:31.140,0:00:34.380and plumbing so a little bit of work0:00:32.759,0:00:35.670involved there but it is pretty easy to0:00:34.380,0:00:37.920do when we're gonna show you how to do0:00:35.670,0:00:39.360it in just a second so like I said two0:00:37.920,0:00:41.700main reasons you're gonna be replacing0:00:39.360,0:00:44.100this if it is bent or broken from a0:00:41.700,0:00:46.530contact with a rock on the trail or0:00:44.100,0:00:47.790maybe even on the road or it's just0:00:46.530,0:00:49.320rotted away and this is gonna be a0:00:47.790,0:00:50.579really great replacement that's a little0:00:49.320,0:00:52.290bit less expensive than going directly0:00:50.579,0:00:53.940to the dealership and getting a0:00:52.290,0:00:55.470replacement from them of course anything0:00:53.940,0:00:57.329that comes out of a Mopar book box0:00:55.470,0:00:59.219usually comes with a little bit of a0:00:57.329,0:01:01.230premium where this is going to be a0:00:59.219,0:01:03.540little bit less expensive but still for0:01:01.230,0:01:05.940all intents and purposes be a factory0:01:03.540,0:01:07.770piece this is OEM style you're going to0:01:05.940,0:01:09.390be able to drop your oh ma0:01:07.770,0:01:11.610in there it's gonna go right up to all0:01:09.390,0:01:12.659of your factory mounting points so it's0:01:11.610,0:01:14.130just gonna be a little bit less0:01:12.659,0:01:15.630expensive but still a really nice0:01:14.130,0:01:17.820replacement that will bolt up pretty0:01:15.630,0:01:19.409easily one thing to note is that this is0:01:17.820,0:01:21.060just going to be the skid plate and this0:01:19.409,0:01:23.130does not come with the straps that hold0:01:21.060,0:01:24.900the fuel tank into the skid plate so if0:01:23.130,0:01:26.220you're looking for those as well they're0:01:24.900,0:01:27.750gonna be a separate piece we do offer0:01:26.220,0:01:29.939them but you'll want to make sure you0:01:27.750,0:01:31.650pick up those separately if your straps0:01:29.939,0:01:33.840are in good shape you can reuse them0:01:31.650,0:01:35.580with your new skid plate like I said a0:01:33.840,0:01:37.740little less expensive than going and0:01:35.580,0:01:38.909getting one of these directly from Mopar0:01:37.740,0:01:40.560this one comes in at right around two0:01:38.909,0:01:42.240hundred and seventy-five dollars I think0:01:40.560,0:01:43.470that's a pretty good deal for you you0:01:42.240,0:01:45.540might be able to find some that are a0:01:43.470,0:01:47.070little less expensive but they're not0:01:45.540,0:01:49.110going to be as thick of a material or0:01:47.070,0:01:50.490come with as nice of a finish on them0:01:49.110,0:01:52.470and that's pretty important not because0:01:50.490,0:01:54.299you see this very often but because you0:01:52.470,0:01:55.890want to make sure that this stays rust0:01:54.299,0:01:57.420free for a good long time so you want it0:01:55.890,0:01:58.829to have a really good coating on it and0:01:57.420,0:02:00.570again you do want it to be pretty thick0:01:58.829,0:02:02.490because this is a protective your fuel0:02:00.570,0:02:04.619tank when you are doing any sort of0:02:02.490,0:02:06.090off-roading so I think for the quality0:02:04.619,0:02:07.380of the product the price is really0:02:06.090,0:02:09.509fitting I think you're gonna get a0:02:07.380,0:02:10.500pretty good deal at right around 275 so0:02:09.509,0:02:11.610like we said we're gonna go two out of0:02:10.500,0:02:12.130three wrenches on this because of0:02:11.610,0:02:13.840everything0:02:12.130,0:02:15.370to get disconnected in order to get this0:02:13.840,0:02:16.330installed but let's show you how to get0:02:15.370,0:02:17.920it done right now0:02:16.330,0:02:19.540pools required for this installation are0:02:17.920,0:02:22.690going to be a Phillips head screwdriver0:02:19.540,0:02:25.660a pushpin removal tool 3/8 drive various0:02:22.690,0:02:29.140extensions 13 millimeter socket this is0:02:25.660,0:02:31.810a Philips head on a socket a 3/8 drive0:02:29.140,0:02:34.840impact is optional and a 19 millimeter0:02:31.810,0:02:36.340socket on my half inch from my lugs all0:02:34.840,0:02:38.620right so the first step into removing0:02:36.340,0:02:40.150your gas tank is to free up your filler0:02:38.620,0:02:43.270neck we're going to first remove our gas0:02:40.150,0:02:46.800cap and now we're going to remove all0:02:43.270,0:02:46.800eight of these Philips head screws0:03:00.140,0:03:03.710and pull this trim ring out and there's0:03:02.090,0:03:05.840your pillow neck all right now we're0:03:03.710,0:03:09.390going to remove our wheel as well as our0:03:05.840,0:03:12.560inner fender let's start with the wheel0:03:09.390,0:03:12.560[Music]0:03:22.940,0:03:26.230all right now we're going to remove our0:03:24.560,0:03:28.790inner fender well and there are a few0:03:26.230,0:03:30.200pushpins so I have a pushpin removal0:03:28.790,0:03:32.930tool here we're going to get underneath0:03:30.200,0:03:35.840and pry up you can see they are the0:03:32.930,0:03:38.290Christmas tree type give me two down0:03:35.840,0:03:38.290here0:03:47.049,0:03:54.040I'm gonna pass this upper lip here try0:03:50.510,0:04:03.860to fold down on it get it past our0:03:54.040,0:04:05.930fender flairs here alright as you can0:04:03.860,0:04:07.640see we have our fuel pump electrical0:04:05.930,0:04:08.269connection here we're going to unlock it0:04:07.640,0:04:10.069like that0:04:08.269,0:04:16.789and then pull on our electrical0:04:10.069,0:04:21.169connection and separate it now here are0:04:16.789,0:04:23.660our fuel supply and return your return0:04:21.169,0:04:24.889may have a hose clamp on it ours seems0:04:23.660,0:04:26.960to be missing it or it was never0:04:24.889,0:04:32.860reinstalled so we're just going to pull0:04:26.960,0:04:32.860back and get this return line freed up0:04:35.410,0:04:39.800let me get a screwdriver maybe I can0:04:37.850,0:04:41.750open it up a little bit alright so I'm0:04:39.800,0:04:48.500going to stick a screwdriver in between0:04:41.750,0:04:51.160the fuel line and that copper also twist0:04:48.500,0:04:51.160at the same time0:04:52.530,0:05:01.770just trying to get it past that barbed0:04:54.060,0:05:04.440fitting flared fitting at the end just0:05:01.770,0:05:07.230keep that away it doesn't that's not0:05:04.440,0:05:09.270gonna be leaking it's good I'm gonna0:05:07.230,0:05:11.100release our fuel line now all right so0:05:09.270,0:05:12.810this is our main fuel line here in this0:05:11.100,0:05:15.570clip we're going to squeeze and at the0:05:12.810,0:05:22.530same time push backwards on that black0:05:15.570,0:05:25.680fitting releasing our fuel line now I0:05:22.530,0:05:27.450did bring a rag into place here just to0:05:25.680,0:05:29.520absorb any of the tripping gas you can0:05:27.450,0:05:36.780see there I'm just gonna get that out of0:05:29.520,0:05:39.210mine all right so you can see I'm0:05:36.780,0:05:41.220bringing a transmission jack into place0:05:39.210,0:05:43.410and I have the vehicle on a lip if0:05:41.220,0:05:45.120you're doing this in your driveway you0:05:43.410,0:05:47.940can you can do it in a driveway with all0:05:45.120,0:05:49.770four wheels on you may have a little0:05:47.940,0:05:51.390tough time getting that tub out of there0:05:49.770,0:05:54.300that wheel well but then you can use0:05:51.390,0:05:56.460like a piece of wood with a regular jack0:05:54.300,0:05:58.290and then go run the length of this this0:05:56.460,0:06:00.200however has a nice flat surface so I'm0:05:58.290,0:06:01.340just going to bring it up into place and0:06:00.200,0:06:04.169[Music]0:06:01.340,0:06:07.740it's good right about there get a little0:06:04.169,0:06:10.380tension on it and then I have three0:06:07.740,0:06:12.5606-inch extensions probably don't need0:06:10.380,0:06:14.910that much so I'm gonna take one off0:06:12.560,0:06:16.169might get a little tight on the back0:06:14.910,0:06:18.660section but I have a 13 millimeter0:06:16.169,0:06:22.640socket I'm gonna start undoing the nuts0:06:18.660,0:06:22.640holding the skid plate in place0:06:33.199,0:06:38.150so now we're looking above the rear axle0:06:35.689,0:06:40.069this is your fit fling back here or your0:06:38.150,0:06:41.330panhard bar now we're going to remove0:06:40.069,0:06:45.580the two nuts over here and there's one0:06:41.330,0:06:45.580over here hidden behind our tailpipe0:06:57.540,0:07:01.780all right with those six nuts removed0:06:59.860,0:07:04.270our gas tank is now hanging up there0:07:01.780,0:07:06.610just by our Jack now I'm going to slowly0:07:04.270,0:07:09.040release the tension on this I'm going to0:07:06.610,0:07:12.340keep in mind that my pillar necks are0:07:09.040,0:07:15.479right over here by my frame rail so0:07:12.340,0:07:21.669there it goes it is free0:07:15.479,0:07:24.639bring it down a little bit more and I'm0:07:21.669,0:07:27.970going to try to position these filler0:07:24.639,0:07:33.780necks in a way if we can get this out as0:07:27.970,0:07:36.220one unit I still bring it down very slow0:07:33.780,0:07:38.050I'm gonna try to clear this exhaust and0:07:36.220,0:07:40.419then move the gas tank towards the0:07:38.050,0:07:43.979passenger side in order to clear that0:07:40.419,0:07:46.630filler neck so we're almost there0:07:43.979,0:07:48.310and this kind of goes without saying0:07:46.630,0:07:51.220you're gonna want to do this with the0:07:48.310,0:07:54.849least amount of fuel in your gas tank as0:07:51.220,0:07:58.330possible all right there we go gonna0:07:54.849,0:08:02.800lower this as low as I can go and get0:07:58.330,0:08:05.980that neck filler neck out of the frame0:08:02.800,0:08:05.980[Music]0:08:09.360,0:08:13.409and there's our fuel tank all right now0:08:11.639,0:08:16.020we're gonna go ahead and unstrap our gas0:08:13.409,0:08:17.819tank I have a 13 millimeter ratcheting0:08:16.020,0:08:22.009wrench and go ahead and loosen up two0:08:17.819,0:08:22.009nuts on the strap end0:08:29.060,0:08:35.350all right now we're gonna save this nut0:08:30.860,0:08:38.120and we're gonna be reusing these straps0:08:35.350,0:08:41.600and I'm gonna bring a power tool in get0:08:38.120,0:08:43.220this other strap off all right now we're0:08:41.600,0:08:45.350gonna go ahead and take the fuel tank0:08:43.220,0:08:46.700out of our old skid plate I'm gonna grab0:08:45.350,0:08:52.280the filler neck over here0:08:46.700,0:08:54.940on the other side just snake our straps0:08:52.280,0:08:54.940out of here0:09:04.690,0:09:09.260all right now we're gonna place our old0:09:06.920,0:09:10.930gas tank into our new skid plate I got0:09:09.260,0:09:17.350my buddy Ryan over here helping me out0:09:10.930,0:09:17.350go ahead and make our straps through0:09:19.600,0:09:23.920make sure the gas tank is sitting nicely0:09:31.230,0:09:35.209start a couple more threads down there0:09:37.489,0:09:42.619alright then we're gonna take our 13 and0:09:39.600,0:09:42.619tighten up these straps nurse0:09:46.700,0:09:50.450do it a little evenly0:09:58.750,0:10:04.279all right as you can see I now added a0:10:01.339,0:10:05.810strap to my trans jack that's because0:10:04.279,0:10:07.700I'm going to be maneuvering this thing0:10:05.810,0:10:09.830some pretty awkward ways to get this0:10:07.700,0:10:12.560fuel filler neck back between our tub0:10:09.830,0:10:16.130and that frame rail let's go ahead and0:10:12.560,0:10:21.950start jacking up on this moving it over0:10:16.130,0:10:25.339just a little bit all right so our0:10:21.950,0:10:28.220pillar neck is now through we move this0:10:25.339,0:10:33.380over a little bit more we should be0:10:28.220,0:10:34.760almost in line with our studs looks like0:10:33.380,0:10:39.500we got a little clearance issue with the0:10:34.760,0:10:43.970shock over here it's actually skid plate0:10:39.500,0:10:45.860needs to come over about three inches0:10:43.970,0:10:49.399all right so we're pretty close now0:10:45.860,0:10:53.740we're gonna finish that up start our0:10:49.399,0:10:58.120nuts make sure the back is in line as0:10:53.740,0:10:58.120well before we tighten everything down0:11:00.690,0:11:11.110all right so with all the nuts started0:11:02.680,0:11:12.700let's finish them up so now that your0:11:11.110,0:11:14.830fuel tank and skid plate have been0:11:12.700,0:11:22.380bolted up we're gonna reconnect our vent0:11:14.830,0:11:24.970and supply line and supply line here0:11:22.380,0:11:27.820it's going to make sure the clip gets0:11:24.970,0:11:30.940set in there like that and then we're0:11:27.820,0:11:33.970gonna push until it engages and lock in0:11:30.940,0:11:40.780place and lastly we're gonna reconnect0:11:33.970,0:11:44.800our fuel pump make sure this is locked0:11:40.780,0:11:47.530as well all right now we're gonna put0:11:44.800,0:11:50.040our trim piece back around our filler0:11:47.530,0:11:50.040neck here0:11:53.410,0:11:59.220put a couple screws in here to hold it0:11:56.100,0:11:59.220[Music]0:12:19.850,0:12:25.500put our gas cap back on alright now0:12:24.240,0:12:28.280we're going to put our wheelhouse liner0:12:25.500,0:12:28.280back in place0:12:30.990,0:12:37.520making sure that my holes line up0:12:33.649,0:12:37.520everything is in the right place0:12:42.220,0:12:46.290all right now we're going to reinstall0:12:43.389,0:12:46.290our wheel and tire0:13:05.350,0:13:09.709that's going to wrap up my install of0:13:07.700,0:13:11.630the crown automotive gas tank skid plate0:13:09.709,0:13:13.100for your Jeep TJ and for all things0:13:11.630,0:13:14.580Wrangler keep it here extreme terrain0:13:13.100,0:13:18.410calm0:13:14.580,0:13:20.470[Music]0:13:18.410,0:13:20.470you0:13:26.600,0:13:28.660you

      Product Information

      Features, Description, Reviews, Q&A, Specs & Installation
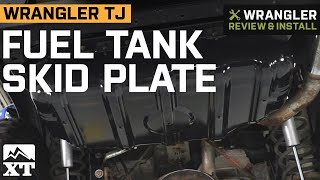
      Features

      • Fuel Tank Skid Plate for Superior Protection
      • HD Steel Construction
      • Size: 36 in. L x 22 in. W x 14 in. H
      • Black Finish
      • Sold Individually
      • Uses Existing Hardware
      • 12 Month/12,000 Mile Warranty
      • Easy Bolt-On Installation
      • Fits All 1997-2006 Jeep Wrangler TJ Models

      Description

      Offroad Protector. When you're offroading in your 1997-2006 Wrangler TJ, you can rest easier knowing you've got the undercarriage protection of this Fuel Tank Skid Plate. This easy-to-install skid plate protects the gas tank from rocks and other offroad obstacles with its ultra-strong steel construction, so now you can explore tougher terrain. Toss out the rusted or banged-up factory skid plate with this superior new one.

      Heavy Duty Steel. Manufacturer chooses to make this single gas tank skid plate from heavy duty steel so it provides better offroad protection from debris and rocks than the OEM one. The black finish provides rugged good looks.

      12 Months or 12,000 Miles. Manufacturer backs this heavy duty skid plate with a 12 month or 12,000 mile warranty from the date of purchase (whichever comes first). Please see the manufacturer's warranty page for full details of coverage and any exceptions.

      Bolts On. This Skid Plate Upgrade bolts on directly in place of the old one using the factory hangers and existing hardware for a simpler installation and a great fit. It measures 36 in. long, with a 22 in. width and 14 in. height.

      Application. This Fuel Tank Skid Plate is specifically designed to fit all 1997-2006 Jeep Wrangler TJ models.

      Fitment:

      Details

      CA Residents: WARNING: Cancer and Reproductive Harm - www.P65Warnings.ca.gov

      Installation & What's in the Box

      Installation Info

      What's in the Box

      • (1) Skid Plate

      Tech Specs

      4.6

      Customer Reviews (15)

        Questions & Answers

        10 More Questions

        Will It Fit My Wrangler

        • TJ Rubicon 2 Door - 03, 04, 05, 06
        • TJ Rubicon Unlimited 2 Door - 05, 06
        • TJ Wrangler 2 Door - 97, 98, 99, 00, 01, 02, 03, 04, 05, 06
        • TJ Wrangler Unlimited 2 Door - 04, 05, 06