Installation Time
(approx) 4 Hours
Difficulty Level:
Light to Moderate mechanical skill required.
FREE 2 or 3-Day Delivery on 10,000+ Items. Details
$2,399.99 (kit)
FREE ShippingSaved - View your saved items
We're sorry. We couldn't save this product at this time.
or use
Merideth: Hey, guys. So, today we're checking out the Bestop Supertop Ultra Soft Top in Black Twill, fitting all 2018 and newer 4-door JL Wranglers. So, if you're in search of a premium option for a soft top that will give you a ton of function, and last for years to come, this is a great choice to take a look at. Now, right off the bat, I wanna say that this is a complete soft top, so it comes with the fabric and the frame. So, if you're switching over from a hard top to a soft top, or you're looking to replace both the fabric and your factory frame, this will be for you. Now, getting into the details of the top, this will have a premium twill material, which will be 30 ounces in weight, and it's going to be triple-layered, for long-lasting durability, better insulation, and better noise dampening in comparison to some lighter weight fabrics. It will also have a super-deep black look to it, as you can see on the front here. That's gonna be the top of the top, which gives a very luxury appearance, while also resisting any wrinkling or fading from the sun, again, keeping it looking good for years to come.Now, this can also be configured in multiple different ways, having the ability to turn into a bikini or a safari-style top by just removing the windows. And it will also have a Sunrider feature, if you wanna pop that open for a more open-air experience. Now, the tinted rear windows are attached by channels and zippers, making the install and removing them incredibly easy. Now, the Sunrider feature will also have an assisted cable, making it super user-friendly, and the top, as you can see here, is going to have some mesh pockets, for a little bit of extra storage up front.Now, I would like to mention that this is not going to be completely convertible like your factory top, but again, this is going to give you the option to run it as a bikini top, and still give you that open-air experience, kinda giving you the best of both worlds. Now, when it comes to price, you can expect that a premium soft top is going to have a premium price point, and this will come in at roughly $2,300. Now, keep in mind that twill is the best of the best when it comes to materials, and it's also gonna be very functional as a top, as to where a lot of other less expensive choices may come with more of a factory-style fabric that is pretty much the standard, or will not come with a bikini top alternative. Not to mention, this will keep the back of the top squared off, and look like the factory one, so you can maximize the storage in your cargo area.A lot of other tops on the page, including Bestop options with these functions, including the bikini top alternative, will usually have a slant to the back of the top, and won't provide you as much vertical room in your cargo area. Now, overall, I think if you're willing to pay the extra cash for a premium soft top that's going to last and give you that luxury look and unique functionality in comparison to some other choices, then this top is gonna be for you. Now, because this is a pretty lengthy install, and you do have to install the frame as well as the fabric, I'm gonna give this a two out of three wrenches on the difficulty meter, taking about four hours to get the job done, but with some pretty basic hand tools. Now, one of our installers here is gonna walk you through that process, step by step. Let's go ahead and get into the install.Man: Tools required for this install include a trim removal tool, electric ratchet, 3/8 ratchet, 1/4 ratchet, 10-mil wrench, 4-mil Allen, Phillips head screwdriver, flathead screwdriver, T8, T20, T30, T40, and T50 Torx bits, and a 10-millimeter socket.What's up, guys. Today, we're gonna be installing a soft top on our 2018 Jeep Wrangler. The first step's gonna be to remove the stock hard top, so let's get right down to it. All right, so our first step's gonna be to remove these two top panels. So, it's gonna be four little clips on each side. Just gotta open it up. And now we can repeat the same thing on the other side, and then lift up from the top. So now with the clips undone, we can remove this top panel. And then we can do the same thing on the other side.So now that we have our two top panels out, our next step's gonna be removing these six T50 Torx bolts. It's gonna be three on each side, so let's get to it. So now, moving back to this hatch area, we're gonna have to remove this electrical connector and this washer fluid line. So we're just gonna push down on this red tab, and pull the connector out. And we have a nice little place here we can slide it into. And then same thing with the washer fluid. We're just gonna press in on this silver tab, pull that out, and we can lay this right in there as well.All right. So now that we've removed our three bolts and our connectors on this side, we can go over to the other side and do the same exact thing, and take out those three bolts. All right. So now that we have the back six bolts out, the last step is removing these two bolts on the top, so let's take these out and get this roof off. And now we can repeat this same process on the other side. All right. Now that we got all the bolts out, it's a good time to grab yourself a buddy and start lifting up.So, the first step of our install process is going to be connecting the upper rear door rail to our lower rear door rail. And that's gonna be done with the use of a U-clip and an M6x20. All right, so our first two clips are gonna go in here, and then we have our bolts, and we're gonna snug down using a 4-millimeter Allen wrench. All right. So now that we're done with the first side, we can start on the second one. So we'll just repeat that same exact process. And with that all done, we can move on to the next step.All right. So our next step is gonna be to install these grilles. We've got one that goes up top, one in the bottom, and we've got ten M3.5x6 screws for each side. All right. So, we'll start out by getting our bolts put in hand-tight, and then we'll come back around and tighten everything down once we're done. So, I'm using my T8 bit to screw these in. And then we'll repeat the same on the upper grille. All right. So now that we have the bottom grille done, we can go ahead and do the same thing for the top grille. So once again, I've got my T8 Torx bit, and screw these in. And now that we have both grilles hand-tight, we can go back again and snug everything down. All right. And now that we have this side all snugged down, we can go ahead and do the same thing on the other side.All right. So now our next step is gonna be to line up our door rail assembly and get it bolted in. All right. So our next step's gonna be to take our M8-1.25x20 bolt, with our M8 flat washer, and we're gonna put it right in this rail on the driver's side. So, our next step's gonna be to take our M8-1.25x80 bolts, and we're gonna put them through this tab, and up into the top. And just like this back bolt, we're gonna take our T40 bit on an electric ratchet, and tighten that down. All right. And now we can repeat that same process on the other side. All right. So now that we have those two installed, we can start working on our front rails. So, they're just gonna slide into the other side. We'll just line it up. And then we're using those same M8-1.25x80 screws. All right. So now that we have these down, we can torque all four bolts up top to spec, and then repeat the same process on the other side. All right. So our next step's gonna be to remove these little plastic trim pieces. It's just gonna be a clip up top, clip at the bottom. I'm gonna use my panel remover tool.All right. So now we can go ahead and install our sport bar mounting brackets. And then we have our two M8-1.25x28 bolts, thread right through. And then we can use our T40 bit on an electric ratchet, and tighten these down. And then we can repeat that same process on the other side. All right. Now that we have all of our bolts torqued down to the manufacturer's spec, we can go ahead and install our tailgate bar retainers. Just gonna slide over, and we have a bolt to hold it down. And once we get this all lined up, we can take our M8-1.25x35 bolt, thread it through the hole, and then, using a T50 bit on an electric ratchet, we can tighten that down. And then we'll repeat that same process on the other side. All right. So our next step is to get our lift assist assembly in. And we're gonna start out by attaching the strap to it. And then on the backside, we have this little hook, that's gonna slide into this groove here, and then we can get it all lined up and get our hardware through.All right. So now that we have our lift assist assembly installed, we can take our M6-1.0x20 bolt, and our M6 flange nut. And now I can take my T25 Torx bit on my electric ratchet, and a 10-millimeter wrench, and we can tighten those down. And now we can repeat the same process on the other side. All right. So now we can install our number six bar assembly. So, we have these little slits cut into both sides. It's gonna slide right over here. And then we'll use our T30 shoulder screws to screw it into place. And now I'll take my T30 Torx bit on an electric ratchet, and snug that bolt up. All right. So our next step is to attach our number five bow to our lift assist assembly. So, to do that, we're gonna be using our M6-1.0x30 bolt, and thread them through the second set of holes on the inside. And then now we can tighten those down using a T30 bit on our electric ratchet. And we'll do the same thing on the other side. All right. Now, the next step's gonna be to install our pivot brackets on the end of our number five bow. So we'll use those same M6-1.0x30 bolts, thread it through, tighten it down. Now we can repeat that same process on the other side.All right. So, next, we can take our sidebar assembly. This little roller's gonna slide into this channel along the side. All right. So, after we have that all lined up, we're gonna take our thin bushing and our thick bushing. Thin bushing is gonna go on the inside, and thick's gonna go on the outside. And then we can take our M8 shoulder screw, put it through that hole. And then I can take my 10-millimeter socket on my electric ratchet, and tighten that down. And then we can repeat that same exact process on the other side. All right. So now we can go ahead and install our end caps, and we'll do that with our M6-1.0x10 mil screws and a 4-millimeter Allen wrench. And we'll repeat that same process on the other side. All right. So now we can go ahead and install our number four bow. We'll be using our M6-1.0x25 bolts. All right. So now we can go ahead and tighten those down using our T30 bit on an electric ratchet. And then we can go ahead and repeat the process for the number three bar. Now we'll just repeat that exact same process one more time for this number two bar up front.All right. Our next step's gonna be to install these grommets into the inside holes here. And we'll do the same thing on the other side. All right. So now our next step's gonna be to remove these two T20 screws, but make sure to hold onto these because we'll be reinstalling them in a later step. And now we can repeat that same process on the other side. All right. So what we've done here is we've taken our soft top and laid it upside down over our windshield and our hood, and now we can go ahead and connect it in to our side bow assembly. All right. So now we can go ahead and take our M6-1.0x10 screws, and we're gonna get them about hand tight on both sides, and then come back and tighten them down fully. And now we can do the same thing on the other side, and then tighten everything down. All right. So now we can go ahead and pull the soft top over the car. So now our next step's going to be to replace those four Torx screws that we took out earlier. So, we can go ahead and pull the soft top up to about 45 degrees, and reinstall our screws. All right. And now we can repeat that same process on the other side.All right, so our next step's gonna be to install these little foam strips. These are gonna sit right in this ridge up here, and they're there to prevent vibrations coming from the soft top meeting the top of the car. For demonstration purposes, we won't be installing these, but it's a simple peel off, stick down, and then we'll do the same thing on the other side. All right. So our next step is to connect this cable to our number six bow. So, we have a barrel that will go on the inside here, and then a little screw that comes in on this side. All right. And now we can repeat that same process on the other side. All right. So our next step's gonna be to connect the soft top to the number six bow. So, to do that, we'll use nine of our machine screws, and we'll feed them through these holes, and screw it into the hole in the bar.Okay. So our next step is right here behind the rear door. We have this little tab here. We're gonna use those same machine screws from our last step to attach it to our number five bow underneath. So, we have these two screw holes up here on this number five bow. Now, fold this over and put our machine screws through it. All right. Now we can repeat that same process on the other side. All right. So, our next step's gonna be to secure these clips in the front. I'm just gonna simply hook that on, pull it closed. All right. So, our next step is to connect all of these bars to our soft top. So, we have these two Velcro strips on each side, and we'll just fold it over like so. And then we can repeat that process on the rest of the bars. All right. So, our next step's gonna be to install our quarter windows. So, first, we're gonna slide it onto this little channel, and then we'll tuck it up underneath, and then the sides, and then this little metal pin is gonna go into our grommet that we installed earlier, and then this little button's gonna clip in right to this piece here. All right. Now we can repeat that same process on the other side.All right. So, our next step's gonna be to install our rear window. So, it's gonna be the same process as the quarter windows. It's gonna slide right onto this rail right here. All right. So, now we can install our tailgate bar to our rear window. Same idea. Slides right over. All right. So, next, we have to slip our tailgate bar into our tailgate bar retainer. All right. And then next, we're gonna slide this little groove into this channel here, and this bottom one under this tailgate bar retainer. And now we can repeat that same process on the other side. All right. So, our last step is to fold down the cover and Velcro it to the sides, and then we're all done. And we can do that same thing on the other side now.Merideth: So, that is going to wrap it up for my review and the install of the Bestop Supertop Ultra Soft Top in Black Twill, fitting all 2018 and newer 4-Door JL Wranglers. For more videos and products just like this, remember to always keep it right here at extremeterrain.com.
Subscribe to our YouTube Channel
Features, Description, Reviews, Q&A, Specs & Installation
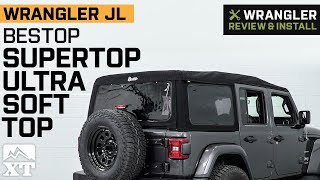
Functionality and Style. Enjoy the natural breeze without the harsh elements by installing a versatile top on your Wrangler JL. This Bestop Supertop Black Twill Ultra Soft Top provides the advantages of a fully enclosed Jeep top as well as the freedom of a safari-style bikini top in one convenient convertible package.
Conveniently Adjustable. This Supertop Black Twill Ultra Soft Top features a patented front lift assist that facilitates an easy, 1-person operation to open the front Sunrider feature and allows you to enjoy the fresh open air. It can also remain closed with the rear windows removed to experience the full-length bikini top feel. Moreover, the side windows feature channels and zippers for hassle-free removal and re-installation as needed.
Durable and Tough. Bestop manufactured this Supertop Black Twill Ultra Soft Top using premium 30-ounce, triple-layer black acrylic twill fabric for long-lasting durability. This wrinkle-free fabric can withstand extreme sun attacks and other outdoor elements. It also maintains its functional form under changing weather conditions for reliable outdoor protection.
Bolt-On Installation. This Supertop Black Twill Ultra Soft Top is designed for a bolt-on installation. The installation process completes with light to moderate mechanical skills required.
Limited Warranty. Bestop backs this Supertop Ultra Soft Top with a limited lifetime warranty that covers all manufacturing defects in materials and workmanship. This warranty is subject to the terms and conditions as indicated in the manufacturer’s full warranty policy.
Application. This Bestop Supertop Black Twill Ultra Soft Top is intended for use on 2018-2023 Jeep Wrangler JL 4-Door models.
Fitment:
Bestop 54725-17
CA Residents: WARNING: Cancer and Reproductive Harm - www.P65Warnings.ca.gov
Installation Info
Installation Time
(approx) 4 Hours
Difficulty Level:
Light to Moderate mechanical skill required.
What's in the Box
10 More Questions