Installation Time
(approx) 1 Hour
Difficulty Level:
Simple installation for anyone.
Installation Guides
FREE 2 or 3-Day Delivery on 10,000+ Items. Details
$1,139.98 (each)
FREE Shipping Market Price $1,310.99 You Save 13% ($171.01)Open Box from $683.99
Saved - View your saved items
We're sorry. We couldn't save this product at this time.
or use
Buy 2 or more Barricade items of $500+, Get $50
Hey, guys. Today, I'm here with the Barricade HD Rear Bumper and Tire Carrier fitting all 2018 and newer JL Wranglers. So if you're looking to upgrade to larger wheels and tires and you're looking for a heavy-duty rear bumper and tire carrier to accommodate that while also getting some functionality in the meantime, this option by Barricade is gonna be a great choice to take a look at.So with this bumper, you're getting a couple of recovery points for those sticky situations on the trail, making sure that you're prepared. You're also getting a two-inch hitch receiver, which will be able to do some small towing while also accommodating for any accessories that are mounted up to the hitch. And you're getting a heavy-duty construction to make sure that it's able to support the weight of up to a 35-inch tire and protect the rear end of your Wrangler.Now, what I really like about this is the fact that this is first of all gonna come with everything that you need to install it down to the extended wiring harness for the backup camera, all of the mounts for all of those factory features, and even down to the license plate light bulbs. This also will have the ability to mount up any additional lighting if you choose to do that in the future, helping you out with some visibility out of the rear end of your Wrangler.Now, with all of that being said, this is going to be roughly $800 for the kit, and I personally think that that's a really good price for what this combo brings to the table. Now, this is going to be a pretty average price point for a rear bumper and tire carrier, especially with this being a single action tire carrier.Other less expensive options are usually going to be a little bit more simplistic in how they're designed. They may be for a dual-action tire carrier, which essentially means that you have to open up the tire carrier first and then your tailgate to access your cargo area. With this, all you have to do is open up your tailgate and you have full access, making it very user-friendly and making it hassle-free. Now, this is also gonna come again with those light mounting options and everything that you need, which is a step up from those less expensive choices.Now, when comparing this to some more expensive choices on the page, this is not going to have every bell and whistle. This is definitely a high-quality system, but again, this is only able to mount up to a 35-inch tire. So if you are looking for something a little bit more heavy-duty, you may have to spend a little bit more. But if you're looking for something that is only going to have to carry up to a 35-inch tire while also being very functional and high-quality in the meantime, this is gonna be a really good choice.Now, install is gonna be a one out of three wrenches on the difficulty meter. I'd say you need about an hour to two hours to get the job done and some pretty basic hand tools. So, speaking of the install, let's jump into that now. The tools that I use for this install were a ball-peen hammer and a dead blow, trim removal tools, a wire cutter stripper, and crimper, a pair of needle-nose pliers or open-ended wrench set ranging from 19-millimeters down to 10-millimeters, 3/8 inch drive and quarter-inch drive ratchet, a punch, the provided Allen key, the ratchet and the T40 Torx from the JL tool kit, a Phillips head screwdriver, a socket set ranging from 35-millimeters down to 8-millimeters, T25 and T8 Torx bit, a impact wrench, a tape measure, and grease.So our first step is to take off our spare tire. We're gonna go ahead and take off the cover for the backup camera first. I'm gonna use the T40 Torx as well as the ratchet from the JL tool kit. So all we have to do is spin that and pull back, and then we can access our lug nuts and take off our tire. So if you have factory lug nuts, you'll be using a 22-millimeter socket. We do not. So I'm gonna use our 65 lug key and 21-millimeter socket.We can start by taking off our tire carrier. So, what we need to do first is open up our tailgate, and we need to remove this trim piece to access our wiring harness for a third brake light and our backup camera. I'm using a trim removal tool. It may be a little bit easier to start from this side and pull back, just held in by a number of clips. Put this to the side. We can disconnect these top two connectors. Let's press down at the top and pull back.So now that that's free, we can close up our tailgate and start with carrier removal. So to make sure that those wires are free, we want to peel this grommet back, wiggle this out. And then we can remove the bolts that are holding on our carrier with a 13-millimeter socket. Now, just be mindful of that last bolt the carrier will come with it. Make sure you have a grip on the carrier. Then we can pull back and remove it.Now we can start our bumper removal, starting with this trim piece on the outer side in the wheel well. There are three 8-millimeter bolts holding it on. So I'm gonna use an 8-millimeter socket and a quarter-inch drive ratchet to remove those. Once those three bolts are out, we can fully remove the trim piece.Next, we can remove the two bolts that are holding on our secondary bracket to the bumper. I'm gonna be using a 16-millimeter socket. Next, we have another bracket up at the front holding on the back of our bumper. I'm gonna be using the same 16-millimeter socket to remove those two bolts. Now, on the passenger side, you do wanna be careful of the exhaust here, not to cut your hand on them. Once that bolt is out, we can repeat that same process on the other side.So once you've taken out the bolts on the driver's side, on the driver's side there is also going to be a wiring harness. This is gonna be for your license plate light. I'm just taking a trim removal tool and disconnecting the little clip just so we can pull it away from the body and disconnect the harness. And you can push down on this tab, pull back, and now we're ready to remove our bumper.After everything is disconnected from our bumper, what we can do is fully remove it. What we can do now is take off our brackets. Depending on the model, you will need a 21-millimeter socket and/or an 18-millimeter socket for the front brackets and then a 16-millimeter socket for the back ones. So I'm gonna be using a 21-millimeter socket to take off the front brackets as well as the tow hook here. Now, with the tow hook, there are two underneath. And the bracket and the tow hook will come off together. Next, we can remove this back bracket by removing the two 16-millimeter bolts. I'm gonna be using a 16-millimeter socket. And then we can repeat that on the other side.What will you do next is deconstruct our factory carrier. We do need to remove the third brake light as well as the backup camera. So we're gonna take those out and swap those over to our new rear bumper and tire carrier. So I'm gonna be using a T25 Torx bit to start removing the Torx bolts that are holding on the top piece of the carrier as well as the studs inside of the carrier. So, I'll start up here. As you can tell, when I took out those two bolts, the studs started to drop down. I'm just gonna take a dead blow and give it a little bit of a push out of the carrier.Next, we can start removing the T25 Torx bolts that are holding the rest of the carrier together. I'm gonna use that same Torx socket to do that. Once those are all removed, we can start to separate this. There's gonna be a wiring harness I want to take out of this little groove here. Take this and put that to the side.Let's start to separate these two pieces. Put this top piece inside. Start to pull up our harness. And there's gonna be two more T25 Torx bolts that are holding on our third brake light. I'm gonna use that same torque socket. I'm gonna hold on to these screws because we will be reusing them, and then we can go ahead and disconnect this harness.Now, we'll be using the harness as well so we can put this piece to the side and start working on our backup camera. So there is a little clip that's holding the wiring harness on. We're gonna take a trim removal tool. Just pull back on that clip and wiggle it out. These can tend to break. So if it does break on you, that is okay.All right. So once that's disconnected, we can take off our backup camera using a T8 Torx bit or T8 Torx socket. These are very tiny screws, and there's gonna be three of them. After those are removed, we can pull the harness up because we have to disconnect it. You can press down on this, pull back. Once the camera is disconnected, we can put that to the side. We can wiggle the harness back through and put our studs to the side and save our harness.So before we hop into the install of our rear bumper, I do wanna tell you guys a little bit more about it and the benefits that you're gonna receive out of this new setup by Barricade over your factory setup. So right off the bat, you can tell that this is going to be roughly the same size. This is a little bit more compact than the factory setup, and it is a little bit shorter, which will help your departure angles while you're out on the trail in comparison to your factory setup that wraps around the sides.This barricade setup is also going to be a lot more durable made of a steel construction, and it's gonna have a fine black-texture powder coat finish on top, which is going to give it a very sleek look and protect that steel underneath from any rust or corrosion. Now, when we're looking at the factory bumper, this is just going to be made of plastic. So, if you do take a hit to the rear end of your Wrangler, this is not going to give you all that protection that this barricade set up will. Not to mention, you're also getting some paneling around the sides, which will help out with styling and a more aggressive look. And you're getting a couple functional features with this on just the bumper as well.So you're getting a larger cutout in the middle for that larger wheel and tire that we'll be mounting up in just a second with our heavy-duty spare tire carrier. You're also getting two welded D-ring mounts on either side for some recovery while you're out on the trail. And they also incorporate a hook, which is a little bit different than some other options that we have available on the page.Now, you're also getting a hitch receiver. This is a standard two-inch hitch receiver that will mount up to the frame separate from the bumper. So this is going to be capable of some light towing and also accessories and even a recovery point. So let's go ahead and install that hitch receiver first, and then we can move on to our bumper.Now, we can install our hitch. We're gonna start with our backplate and our provided longer bolts. We're going to put this behind our frame and mount this up in the factory location. I like to hang this in place first before we go ahead and put our hitch on the place. Now, for right now, I'm just going to keep those two there, so we can line up our hitch, and then we can secure that down and work on the other bolts.So on this side, we'll attach the flat washer, lock washer, and nut. Then we can do the same for the middle. After the fourth, the top are secure. What we can do is secure the two at the bottom. These are gonna be our shorter bolts. The same thing goes for these two flat washers, a lock washer, and then the nut. We can do that on the other side.Now, we can go ahead and tighten everything down once it's secured. For the top four bolts, I'm gonna be using an 18-millimeter deep socket and then 18-millimeter wrench. Now, for the bottom, I'm gonna still use that 18-millimeter wrench, but I'm also going to use a shallow 18-millimeter socket, same thing for the other side. So while I'm at the Jeep, I'm gonna install the welded nut plate in the passenger side frame. We're gonna line this up with the two holes at the bottom, and then we'll be ready to prep our bumper.Before we mount our bumper up to our Jeep, we do need to install our spindle first, so we can send this up through the bottom, making sure that this is going to line up with our mounting locations. Then we can take our shorter 18-millimeter bolts, our flat washers, and our lock washers and thread those into the spindle. Now, with an 18-millimeter socket, we can tighten these down. You wanna make sure that the spindle is as straight as possible.Next, we can install our plate over the spindle, making sure that the mounting locations line up. We can take our small button head bolts, our flat washers, and lock washers for those and thread those into the bumper. Then we can take our provided Allen key and tighten those up. Now we're ready to mount up our bumper.Now, with the help of a friend, we can lift the bumper into place. Make sure you have your hardware staged. It's gonna be your 21-millimeter bolts, your flat washers, and your lock washers. You're gonna have two bolts on the side and two underneath. Once the bumper is adjusted where you need it to be, we can tighten the bolts that we just installed down with a 21-millimeter socket, same for the two on this side.So just like I did with the bumpers, I wanted to stop down and give you guys a little side-by-side comparison with our new barricade spare tire carrier and our factory one to tell you guys how this set up is going to benefit you a lot more than your factory setup. So this is going to be made of the same materials that the bumper is going to be made of, a 3/16 inch heavy-duty steel material. And you're also still getting that fine texture-black powder coat finish on top, which is going to protect the steel underneath and it's also going to do a good job of giving you a sleek but aggressive look.Now, this is going to be able to hold a lot more weight because of the heavy-duty steel construction, but it's also going to be frame-mounted instead of tailgate-mounted, which will accommodate more weight than your factory system. The factory spare tire carrier is made of a hard plastic material, and it's mounted up to the tailgate.This setup is gonna be perfect for stock applications and the stock's spare tire weight. But when you add an oversized tire, all that extra weight can damage the tailgate hinges. Over time, they can make them sag and wear out, damaging your tailgate. So, moving to a bumper-mounted system like this is definitely gonna be beneficial in that aspect.Speaking of the system as a whole, this is going to be a single-action tire carrier. So some other options on the page are going to be for a dual-action. That means essentially, you open up the carrier, and then you open up your tailgate to access your cargo area. But the spare tire carrier here is going to be attached to the tailgate. So all you have to do is open up your tailgate to access your cargo area, making it very hassle-free and one fluid motion.What I also do really like about this setup is that it's going to accommodate for all of your factory features. So you have a mount for your third brake light as well as your backup camera, and it comes with a mount for your license plate and even the light bolts for that. So, enough about these two on the table, let's go ahead and put our new system together.So before we can install our plate on our tailgate, what we need to do is take these vents off. I'm just gonna use a trim removal tool, and we can pop them forward. So making sure that this is oriented the correct way that our mount is over at the driver side, we can mount up our plate using the factory hardware for the spare tire carrier. This is gonna be the 8/13-millimeter bolts. I'm just gonna thread two in and let that hang out, and then we can thread in the rest of the bolts. Now, once all of those are threaded, what we can do is center this and start to tighten them down. We can adjust this later if need be, but I'm using a 13-millimeter socket.Our next step is to prep our carrier to be installed on the spindle. So we are gonna get two races, one small, one large. Same is gonna go for the two roller bearings. We're gonna have two washers and then we're also gonna have a seal for the bottom. So we're gonna start with our bottom. We're going to tap the race into place. So, we wanna make sure that the tapered part is facing up. We can put it down into our carrier. And then you can either use a large socket for this or you can use a punch and a hammer and go around the edge of the race. You wanna make sure that you're very careful when you do this, but we wanna tap it in evenly and make sure that it's flush and set. All right. So now that the bottom race is flush, what we can do is pack our large roller bearing. Then we're gonna place it down in the brace here.What we can do next is pack our bearing. So I have some grease here, and you wanna make sure that this is gonna be packed in the middle of the bearing. I just like to put some on my hand and then just press it in. Spin bearing, make sure that the grease fits everywhere. And then once it's successfully packed, you can put that down into place. What we can do next is take our large washer. Put that down on top of our bearing. Then take our bottom seal. Just press it into place. Now, this may not want to go by hand. So you can just take the hammer that we used earlier and hammer it into place.All right. Once that seal is sitting flush, we can turn this over and install it on our spindle. What we can do now is take our tire carrier and place it down over the spindle. Now, that our carrier is on the spindle, we can install our smaller race. This is gonna go up at the top. Now, it does have a ways to go. So we're gonna do the same method that we do at the bottom and take our punch and just slightly tap around.What we can do now is pack our smaller bearing with grease the same way that we did with our larger bearing. So once the bearing is packed, we can put it on the top of our spindle. So once the bearing is sitting flush and the smaller washer is in, what we can do is thread on our castle nut. This is gonna keep our carrier in place. What we can do now is tighten down the castle nut with a 35-millimeter socket.Next, we can install our car pin, making sure that it lines up with our castle nut. Take a pair of needle-nose pliers and bend that back. Then we can install our set screw using our provided Allen key. Then once that's on, we can install our cap. Now, that may give you a little bit of trouble just because it does need to seal to the carrier. So I'm just gonna hit it with a dead blow. All right. Once the cap is set, what we can do is attach our mouth.What we can do next is install the bracket for our bump stop. So we're gonna take our smaller button head bolts, flat washer, another flat washer, and the nylon lock nut and install those in the top and the bottom mounting location. Once those are both in place, we can take our provided Allen key and a 10-millimeter retching wrench. You could also use a socket, but it is kind of difficult to fit a deep socket here. We can go ahead and tighten that down.Then we can take our provided button head bolts, flat washers, and flange nut and install the bump stop on the bracket. Once that's mounted up, we can tighten that up with the same 10-millimeter ratcheting wrench and the same Allen key. But you wanna make sure that we're not over-tightening this because it will pull through the bump stop since this is made of rubber. Now we can attach our third brake light bracket. Next, we can take the bottom part of our third brake light bracket, the threaded plate, and our provided button head bolt and thread this into place. Once those are threaded into the threaded plate, we can tighten those down with the provided Allen key.Next, we can take our third brake light. Put this down on top. The pegs on the bottom will line up with the bracket. So you can flip it over and secure it down with the factory Torx bolts. I'm gonna tighten those up with a T25 Torx. Now, you don't wanna over-tighten these because this is made of plastic. But once they are snagged up, we can install this bracket on our bottom bracket. So overlapping the top bracket onto the bottom, we can install our button head bolts, the flat washers, and the nylon locknut.What we can do now is just snug these up. I'm gonna use a 10-millimeter deep socket as well as the provided Allen key that we used before. But we are not gonna completely tighten them down because this will be adjustable to the diameter of your tire. What we can do next is install our license plate bracket. This is going to be secured with the button head bolts with the captured lock washer and flat washer. Then we can tighten these up with the same provided Allen key.Next, we can install our tire mount. Next, we can install the first bracket of our tire mount. This is going to use the 18-millimeter bolts, flat washers, and 19-millimeter nylon locknut. Then we can tighten those up with a 19-millimeter wrench and an 18-millimeter socket. So first before we plug this in, what we're gonna do is take our extension harness and run this through. You can either run this through a mounting location, or you could run it through the side. I personally like to run it through the carrier. It is just a little bit cleaner, and you won't have to worry about pinching the wire when we put on the second mount. So once that's through, so we're gonna attach it on the other side. Then we can actually work this through.So next we can install the second part of our mount, making sure that we're feeding our wiring harness through. Now, how far this is set out from the actual tire carrier itself will depend on the backspacing of your wheel. I am just going to set it right there. Right now, we can adjust it in a little bit. Then we can take the two 18-millimeter bolts, the same size that were used on the first part of our mount, put those through with the two flat washers. Then we can secure those down with the other flat washers and nylon locknut. Before we go ahead and tighten anything down, I do wanna measure our wheel and tire make sure all of our brackets are set at the right height and length.So for our main mount, we want to measure from the face of the mounting surface to the edge of the tire, and it looks like we are about at six and a half inches. And then for the third brake light, we can really measure from wherever we need to. I'm just going to measure from the first mounting location for our wheel stud, and it looks like it's about 141/2. So I'm gonna put it at about 16 inches just to make sure that it's sitting above the tire and then to measure from the tire carrier to the mounting location. And I'm gonna put it about a half-inch out from six and a half inches, so we're at about seventh. Now we can tighten everything down.So now we can tighten the two bolts on our main mount with a 19-millimeter wrench and 18-millimeter socket. And we will have a set bolt that goes up at the top or bottom depending on which way you mounted this. I'm gonna tighten that down with an 18-millimeter socket, and that's just gonna hold that main mount portion in place. Then we can tighten down our third brake light bracket where we need to with the 10-millimeter ratcheting wrench. Then we can fully tighten down the third brake light bracket bolts using that provided Allen key and then 10-millimeter deep socket. Now we can plug in our third brake light wiring harness and close this up.Next up, we're gonna install our heim joint. We're gonna take our provided bolt, our flat washers, and our nylon lock nut. So now we can tighten this side down with a 19-millimeter wrench and 18-millimeter socket. Then we can connect the other side. So in order to adjust the heim joint, you can turn the turnbuckle in the middle and there are two jam nuts to lock it into place. We wanna make sure that the tire carrier is up against our tailgate that the bump stop is gonna make sure that it's not going to rattle. Once that is lined up, before we tighten it down, the two jam nuts down, we can install our bolt. We can tighten that up with a 19-millimeter wrench and 18-millimeter socket.And then before we go ahead and tighten the two jam nuts down, we wanna make sure that the tailgate is operating correctly. Once that's adjusted and it's not rattling, what we can do is tighten the jam nuts down with a 17-millimeter wrench. While we're here, we're gonna put our wiring harness through our tailgate. Push our grommet back in. Right. And then we can mount up our camera. Now we can mount up our backup camera in the mount.Now, you are gonna be provided with hardware for this. It is very small, but we're gonna take that bolt and flat washer. Flip it upside down. We also have another flat washer and lock washer, and then you will have a nut provided in the kit. So once you have it lined up, you can take a Phillips head screwdriver and start to secure it down. Then you can do the same with the other two. Next, we can take our camera mount, feed the wire through, mount it up onto the studs, and plug it in. Plug it into the back of our camera. After that song, we can grab the cover for our camera. Plug that over the top. And then now we can wire up our license plate lights.What we can do now is mount up our license plate light. We're gonna take the flat washer and the 10-millimeter nut off the back of our license plate bolt. It is pre-installed when you take these out of the box. Then we can feed the license plate light bolt through the bottom hole of our license plate. You can feed the wire through our bracket. You can feed the hardware on flat washer and then the nut and then secure it down. Now we can do the same thing for the other side.Once your hardware is in place and you made sure that the LED light is facing up to illuminate the license plate, we can tighten those down with a 10-millimeter wrench. What we can do now is connect both of the positive and both of the negative wires together. I already have a clip plugged into our factory wiring harness where it accepts a spade connector. So I am going to add spade connectors to both the negative and positive leads here. Now, you can wire this up however you want. If you want to directly wire it into the wiring harness, you can do that. I find it a little bit easier to add a connector onto the factory harness.Now, if you are gonna use spade connectors, I would recommend to heat-shrink these, and then we can run these wires over to the driver's side, so we can plug them into our wiring harness. Now, we can plug our spade connectors into our clip here, making sure that black goes to the black connector and that the red goes to the positive wire. You're only gonna have two. So, this one is the white wire with the blue trace. It may depend on your model. So once that's plugged in, we can mount up our tire. Last but not least, we can mount up our tire. So that's gonna wrap it up for my review and install. Make sure you like and subscribe, and for more videos and products like this, always keep it right here at extremeterrain.com.
Subscribe to our YouTube Channel
Features, Description, Reviews, Q&A, Specs & Installation
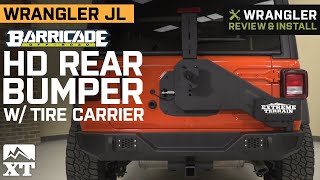
Perfect For Off-Road Use. Upgrade your 2018-2023 Wrangler for adventurous off-roading performance by investing in the Barricade HD Rear Bumper that includes a Swing Out Tire Carrier. Designed to provide your JL with superior rear end protection, this full width bumper will protect your rig in style. This HD Rear Bumper features two high strength D-Ring mounts and a 2 inch receiver for all your Jeep's towing and hauling needs.
Swing Out Tire Carrier. This Barricade Tire Carrier features a smooth operating handle and swing arm for easy access to your cargo without compromising the hinges of your tailgate for superior performance both on and off road. Constructed from heavy duty 3/16-inch thick mild steel plating, this Tire Carrier can securely carry the beefiest of tires. With its adjustable mounting positions this Tire Carrier and Extreme HD Bumper combo can accommodate oversized tires up to 35-inches in size.
Heavy Duty Construction. Barricade Off-Road manufactures their HD Rear Bumper to precise specifications from 3/16-inch thick mild steel plating for superior strength and rigidity. Barricade then completes their Bumpers in a two stage finish using epoxy pre-coating and high-grade textured black powder coating for long lasting durability. The D-Ring mounts are welded both inside and outside for extra strength.
Bolt-on Installation. The Barricade HD Rear Bumper with Tire Carrier was smartly designed to be a direct bolt-on solution for trail headed Jeeps. As a direct fit replacement, this Barricade Rear Bumper uses all factory mounting points and requires no additional cutting, welding, or fabrication for installation. This Bumper even includes grade 8 hardware for installation.
Application. This Barricade Off-Road HD Rear Bumper with Tire Carrier is specifically designed for use on 2018-2023 Jeep Wrangler JL models.
Please Note. The built-in receiver hitch is not rated for towing.
Freight Notes. Freight items can only be shipped within the continental 48 states, no expedited methods. What is freight shipping? Your Answers are Right Here!.
Fitment:
Barricade J130703-JL
CA Residents: WARNING: Cancer and Reproductive Harm - www.P65Warnings.ca.gov
Installation Info
Installation Time
(approx) 1 Hour
Difficulty Level:
Simple installation for anyone.
Installation Guides
What's in the Box
10 More Questions