Talk to a Wrangler Sales Tech
1-877-870-8556
M-F 8:30A-11P, Sat-Sun 8:30A-9P
Logo Image
$20K Sweeps! 10 Chances to Win! Enter Daily >

Teraflex Front Big Brake Kit with 13.30-Inch Vented Slotted Rotors (07-18 Jeep Wrangler JK)

Item J123653
Verify parts fit and get product recommendations.
Wrangler Sales Techs: Connect Now M-F 8:30A-11P, Sat-Sun 8:30A-9P
$0.00
Our Price

$955.99 (kit)

FREE Shipping Market Price $1,099.39 You Save 13% ($143.40) Up to 10% off for Military & First Responders! See Details

Will this fit your Vehicle?

Select a different vehicle Help?
Update or Change Vehicle
Ship to: Ashburn - 20149
Sorry, please enter a valid US or CA postal code
We're sorry, zip can't be updated at this time.
    Create a list
    Add to New List

    Saved - View your saved items

    We're sorry. We couldn't save this product at this time.

    or use

      Product Videos

      Jake: Jake here for ExtremeTerrain and in this video we're taking a look at the Teraflex Front Big Brake Kit with 13.3-inch Vented and Slotted Rotors fitting 2007 to 2018 JK Wranglers. If you fitted larger wheels and tires in your JK then your brakes are likely feeling a bit inadequate and even if you're running stock wheels and tires upgrading your brakes is never a bad idea. Having an upgraded big brake kit like this can make your rig much safer and better to drive and this kit from Teraflex is going to give you everything you need to update your front brakes including new vented rotors, new pads and calipers, and it features a bolt-on installation as well. Brakes are one of the places on your vehicle that you really don't wanna skimp out on. And adding larger wheels and tires can add more unsprung weight to your rig, which makes your stock brakes less effective. So getting some larger, better-performing brakes on there will mean that you can stop in shorter distances with less effort, making it safer for you behind the wheel. So let's start over here with the rotors. Now, these are a 13.3-inch diameter, and they are quite a bit larger than your factory 11.9-inch rotors. As you can see, they also feature a slotted design, giving them even more stopping power. Now, the slots in the faces of the rotors here are designed to get heat away from the pads and the rotors themselves. And heat is the enemy of braking performance. If you've ever had brakes get hot on you, you know exactly what I'm talking about. But rotors, however, can only do so much without upgraded pads to match, and thankfully, those are also included in this kit. You get a set of larger semi-metallic pads to go with your rotors here to further improve your JK's braking performance. These pads feature a better bite and more initial scrub speed, while also having excellent pad life and reduce noise and dust as compared to other performance brakes. As you can see, they've got chamfered edges here and a slot down the center too, to help with noise. So these are gonna grip better and they're gonna be quieter too. And since they have a larger surface area than your stock units, they're gonna have significantly improved stopping power without a lot of compromise. However, bigger rotors and pads also necessitate larger calipers. So these are oversized 56-millimeter dual-piston units, and they're gonna provide you a better, more even clamping force as compared to your stock calipers. And these feature a bolt-on installation as well, so you're not gonna need to fabricate or modify anything, and they'll function just like your stock brakes in most ways. Now, it is worth noting a couple of things with this kit overall. Since this is all physically larger than your stock rotors and calipers and pads, it's gonna require that you run at least 17-inch wheels. Smaller wheels simply aren't gonna clear those calipers. It's also recommended for earlier JKs, specifically 2007 to 2011 models that you snag an upgraded master cylinder to help make the most of those larger calipers so you've got the clamping force that you need. Now, we do have some options on our site for upgraded master cylinders as well. So be sure to check those out if you've an earlier JK especially. Since you're gonna have to bleed the whole braking system when you install the calipers anyway, it's a worthwhile swap at this point to get that new master cylinder on there too. It's gonna be not much more work and it's gonna be the same amount of effort because, again, you've still gotta bleed the brakes. Jumping over to construction, the rotors are made from a cast iron, much like your stock ones. They do feature a plating on top of them, though. They come just like this out of the box. They specifically tell you don't use brake cleaner on them because they're already coated and treated for you, so they're going to be resistant to rust and corrosion. Now, this cast iron is a solid material, too. It's going to last you a while, and it also helps keep the cost down as compared to some other performance brake options. These rotors are also mill-balanced, so they're not going to cause any strange or unwanted vibrations. And these also have vents in them, just like your standard brakes too, so they're similar in construction but with a little added something.Now, the pads, like we discussed earlier, are a semi-metallic composite resin material, so they're, again, going to provide excellent heat dissipation and stopping power. And the calipers come complete with all the sliders, the pins, and everything that you need to get this set up. You're basically just going to have to bolt them onto your stock caliper brackets. And they come exactly as you see them right here out of the box. You've even got some new crush washers included for them as well, so when you put your lines on, everything is going to go nice and smoothly. Pricing comes in at about $1,000 for this setup, and though that's not a small chunk of change, it is a good price for an upgrade like this. And especially if you're adding accessories or larger wheels and tires to your rig, this is a great way to get a better, safer braking setup on your JK without having to spend a small fortune to do it. In fact, this is about the least expensive big brake kit that you can get for these Jeeps. And even though it's just the front and it's not maybe the biggest braking kit you can find, it's still gonna provide you excellent stopping power and it's gonna do it for a pretty reasonable price. We're gonna give the install on this kit a two out of three on our difficulty meter, and it should take you about three hours to complete the job. While this is a bolt-on kit, again, you are gonna have to do a full system bleed since you're gonna have to open your brake lines to replace those calipers. So while the job is straightforward, it is gonna be a bit time consuming, and you're also gonna need either a second set of hands or a brake bleeder tool to help you get this done. But fear not, because now we're gonna head out to the shop and show you exactly what's involved.Man: For this install, you will need an impact, various ratchets, swivel adapters, various size adapters, 13, 14, and 21-millimeter sockets, 10, 15, and 17-millimeter wrenches or channel locks, also a vacuum bleeder, brake fluid, and not shown here, but a bucket, as well as a jack and jack stands.What's up, guys? Today we're going to be doing some brakes on our Jeep, so let's get started. So for this kit, we're going to be removing the caliper from the vehicle and swapping it out with another one. So the first thing we're going to do is remove the brake line from the caliper. So in this instance, you are going to want to get a bucket or something to catch the brake fluid that is going to come out of the line. It is inevitable and brake fluid is very slippery, so you don't want that all over your floor. So we'll go ahead and grab our 15-millimeter wrench, go ahead and crack this screw off of the line. get that off of there. And then you're going to want to let that drain out of the caliper as much as possible so you don't get any excess fluid going everywhere when you're trying to remove it and get it out of the way. So your new caliper should come with a plug in the place where your line's going to go into it. You can just grab that one out of it and go ahead and place that into your factory one like so. That'll kind of prevent any excess fluid from coming out. So now we can go ahead and remove the caliper from the bracket itself. You can also pop this ABS line out of its holder just to kind of give you some more room. Then we'll grab our 13-millimeter socket on our ratchet so we can go ahead and pop this off. Get our lower mounting bolt here. Then we can go ahead and remove our caliper and we'll set that aside. So now we'll go ahead and remove our pads from the bracket. Just simply just pull, pop right out like so. Set these aside as well. Next, we can go ahead and remove our bracket itself. We're gonna remove our two 21-millimeter bolts holding that in. So we've got our 21-millimeter socket and a swivel adapter on our impact. Go ahead and get these off. Go ahead and remove our bolts. Go ahead and set this aside. Then we can go ahead and just pull our rotor right off. Now, once you've got this done for this side, you can go ahead and repeat this process on the other side.Now we can go ahead and install our new rotor. So, we'll go ahead and slide that onto our lugs. Now, it's important to note the orientation of your slot should be facing out and forward. Go ahead and set that in place. Now, one trick to kind of keep your rotor more straight and not hanging like it is, is you can go ahead and grab one of your lug nuts, run that on, and it'll keep it from kind of hanging off farther than you want, make things a little easier when we go ahead and install our caliper. Now we're going to go ahead and install our new caliper and bracket as one complete assembly first. We'll go ahead and get this into place. Then we're going to reuse our factory 21-millimeter bolts. Go ahead and get that back on. First one in. Bottom one in here. I'm just gonna get these hand tight for now. So now we're going to go ahead and install our line on our new caliper. Now, one thing we want to do before we do that is remove our banjo bolt here. This may be a little tricky with these copper washers. They do need to be removed and replaced. We'll go ahead and get our inner one out. Pull that off. You also have another one on your bolt head itself. Make sure to replace that one as well with your new copper washers. Now we have our new washer on our bolt head side, so we'll slip that back into our fitting block. Then we'll put our new washer in on the bottom side here. Now we can go ahead and get our line bolted onto our new caliper. Get that threaded in. We'll tighten that right back down with our 15-millimeter wrench again. And we're gonna clean up any fluid drip we have here. We're gonna grab some brake clean here. We're just gonna spray a little bit on our caliper where the fluid drip was. We'll go ahead and wipe that right off. It's important to note you don't really wanna get any on any of your rubber pieces. You don't want that to dry out and crack prematurely. Just make sure everything's nice and clean. You can even spray some on your paper towel or rags. Kind of wipe of your system.Now we'll go ahead and grab our caliper hanger. You can use a hanger, you can use a bungee cord or anything like that just to hold your caliper from resting and hanging on the line itself. Now we're going to go ahead and remove the caliper from the bracket. These new bolts are a 14-millimeter here and a 17-millimeter here, but if you don't have a wrench thin enough to get into that backside nut, a pair of channel locks will work just fine. We'll go ahead and lock onto that and crack that loop. Get that bolt out. We'll go ahead and do the same thing for the top one. Loosen that up. Now I can go ahead, get that pulled out. Remember, you wanna support your caliper when you're taking these bolts out. Now that we have that out, we can go ahead and hook the caliper onto our hanger like so.Next, we're gonna go ahead and fully tighten down our bracket bolts here. So, again, we'll grab our 21-millimeter socket and we're gonna switch out to our ratchet this time. Remember, you always wanna refer to your manufacturer-specific torque setting for all of your hardware. We can go ahead and install our new pads. Those are gonna sit right into the ear slots. I can get this one in followed by outer pad. Now we can go ahead and reinstall our caliper. Get that over our pads here. We'll reinstall our 14-millimeter caliper pin bolts. We'll go ahead and tighten these down. Again, we're gonna use our channel locks and our 14-millimeter socket on our ratchet. So we'll go ahead and grab onto this. Now, you wanna make sure either your wrench or ratchet or channel locks are thin enough or out of the way for this caliper to fully tighten on the pin. So now we're gonna have to refill and bleed our brake system. And so the first thing we wanna do is come up under our hood to our master cylinder located on the driver's side right on the firewall right here. So we're gonna go ahead and remove the cap for that. You wanna check your fluid level, first and foremost, make sure that is good. And you wanna add a little bit extra because some is gonna be coming out. And you always wanna use the correct type fluid for your vehicle, which would be indicated in your owner's manual or found by your manufacturer tech specs. So we'll go ahead and add a little bit of fluid in here. And you will have a minimum and maximum line on the side of your reservoir to indicate your fluid level. So now that we have that topped off, we're gonna leave the cap off for now. We'll go back down to our brakes. So now it's time to come back down to our calipers and rotors and go ahead and begin bleeding. Now, the proper sequence for bleeding, if you're doing front and rear brakes, it's gonna be starting at the farthest wheel from the master cylinder, which would be your rear right wheel. And then you would go rear left and then front right and front left. So you wanna work farthest to closest from your master cylinder. So since we're only doing front brakes, we're gonna start at the right front caliper. And then you can go ahead and repeat the same process for the left front caliper. So we have a vacuum bleeder here that we're gonna be using. You can also do the traditional style of having a buddy pump up the brakes and hold them while you crack the bleeder and then tighten it back down, pushing your fluid out through. Or if you're solo, this is a handy tool to go ahead and do it. So we've got our vacuum pump. We have our reservoir with fluid in it. That's very key. Then we can go ahead and hook our caliper end up to the bleeder. Now, I like using the line style wrenches because we can just hang it on here, and that's a 10-millimeter wrench. So now we have our wrench on our bleeder, again, that's a 10-millimeter. We'll go ahead and stick our vacuum line onto our bleeder.We'll go ahead and crack that loose, then we can go ahead and begin pumping. And eventually after pumping, you will start to see fluid come through your line.And you want that to come through to the point where it doesn't look aerated and bubbly. And once you get that to a good point, go ahead and close your bleeder back up. Then you can remove the vacuum line, clean up any drips that may have came out of your bleeder. And then you wanna go ahead and check your pedal feel, make sure you have pressure, and then you can go ahead and repeat this entire process for the other side.All righty, guys, that about wraps up our review and install of our Teraflex Front Big Brake Kit with 13.3-inch Vented Slotted Rotors for your '07 to '18 Jeep Wrangler JK. Thanks for watching, and as always, for everything Wrangler, keep it right here at extremeterrain.com.

      Product Information

      Features, Description, Reviews, Q&A, Specs & Installation

      Features & Specs

      • Front Big Brake Kit
      • 13.3 Inch Vented and Slotted Rotors
      • Constructed Using Semi-Metallic and Composite-Resin Pads
      • Minimizes Noise and Dust
      • Made Using a Silver Painted Cast Iron
      • 17 Inch or Larger Wheels Recommended
      • Lifetime Warranty
      • Hard Degree of Difficulty to Install
      • Can Be Used for the 2007-2018 Jeep Wrangler JK

      Description

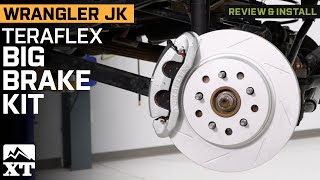
      Oversized Dual-Piston Calipers. Ensure high-performance braking power on the street or off-road with the Teraflex Front Big Brake Kit with 13.3 Inch Vented Slotted Rotors. These front brake rotors are comprised of oversized 56 mm dual piston calipers for maximum coverage area, constructed using semi-metallic and composite-resin pads that minimize noise, and dust while prolonging the life of the pad.

      17 Inches. This front brake kit come with a slotted and vented construction. It is made using silver painted cast-iron. 17 inch or larger wheels are strongly recommended.

      Warranty. Teraflex provides a lifetime warranty, which protects purchasers from any defects in materials and workmanship. Abnormal wear and tear, which may be the case with misuse, modifications, or accidents will not be covered.

      Installation. It takes no more than two hours to install this front big brake kit with a hard level of difficulty. Cutting drilling or welding is required for this application.

      Application. The Teraflex Front Big Brake Kit with 13.3 Inch Vented Slotted Rotors can be used for the 2007-2018 Jeep Wrangler JK.

      Fitment:

      Teraflex 4303420

      CA Residents: WARNING: Cancer and Reproductive Harm - www.P65Warnings.ca.gov

      Installation & What's in the Box

      Installation Info

      What's in the Box

      • (1) Front Big Brake Kit
      4.6

      Customer Reviews (9)

        Brand Image

        Reviews of Teraflex Brakes products have an average rating of 4.8 out of 5

          Questions & Answers

          10 More Questions