Talk to a Tacoma Sales Tech
1-877-870-8556
M-F 8:30A-11P, Sat-Sun 8:30A-9P
Logo Image
$20K Sweeps! 10 Chances to Win! Enter Daily >

RedRock Overland Bed Rack (05-23 Tacoma Double Cab)

Item TT6616
Verify parts fit and get product recommendations.
Tacoma Sales Techs: Connect Now M-F 8:30A-11P, Sat-Sun 8:30A-9P
$0.00
On Sale

$629.99 (each)

FREE Shipping Market Price $819.99 You Save 23% ($190.00) Up to 10% off for Military & First Responders! See Details

Will this fit your Vehicle?

Select a different vehicle Help?
Update or Change Vehicle
Ship to: Ashburn - 20149
Sorry, please enter a valid US or CA postal code
We're sorry, zip can't be updated at this time.
Recommended Install Shops
How It Works
Install Shops are available near Ashburn - 20149

Add Local Shop Installation

Total cost of service $199.00
    Create a list
    Add to New List

    Saved - View your saved items

    We're sorry. We couldn't save this product at this time.

    or use

    Get a $30 Prepaid Visa Card!

      Video Review & Installation

      Hey, guys. So, today, we're checking out the Overland Bed Rack, fitting on 2005 and newer Double Cab Toyota Tacomas. So, if you are in search of some exterior storage solutions and you're looking to carry larger cargo items for your truck on your off-road adventures, this is going to be a great choice to take a look into. Now, this bed rack is going to have three big crossbars and a couple of smaller pieces in the middle that will allow you to mount up really anything you'd like right on top and it's going to come with multiple mounting points or tie-down points for that larger cargo while also keeping your bed space completely open. Now, what I do really like about this bed rack is that not only are you just going to have a ton of space to work with on top of the bed rack and underneath, but this is also going to come up with multiple mounting points on the sides for accessories that you can take out on the trail that will be very helpful. Now, this kit is going to include a mount for a recovery jack, which will be great if you are looking to carry some tools while you're out on the trail, and this is even going to come with hardware to mount up a spare tire, right on top of the bed rack if you are looking to mount up any other accessories, including that spare tire. Now, this is going to be very durable, made of a steel construction. It's going to have a nice textured black powder-coat finish on top to protect that steel underneath. But it's also going to give a very heavy-duty and off-road look to the back of your truck.And, with all that being said, this is going to come in at roughly $700, and I personally think that what this comes with in the overall construction, that price point is definitely well worth it. Now, in comparison to some other choices, this is going to be a little bit bulkier than some of the other options on the page. I personally think that adds a very off-road and utilitarian look to the back of the truck, and then there are some other choices on the page that will allow different mounts to be mounted up and you can kind of customize it, which will be a little bit more expensive. Now, in my personal opinion, I think if you're looking for something that's going to allow larger cargo to be mounted up, you're looking for a more affordable choice while also getting some options in between to mount up some accessories, then this is a great choice to take a look into.Now, as far as install, I'm going to give this a one out of three wrenches on the difficulty meter. This is all bolted together. You don't have to do any drilling or modification to get this thing on your truck. You're just going to need a couple of basic hand tools and probably an hour's worth of your time. So, speaking of that install, let's jump into that now.Tools that I used for my install were an impact, a 1/4-inch drive and 3/8-inch drive ratchet, a T30 Torx socket, a 5-millimeter Allen socket, and a 16, 13, and 10-millimeter socket.So, the first step to our install is to put together our crossbars. We're going to have three of these that are going to span across the bed, and then we can connect them to create our full rack once these are put together. You are going to need your hardware out of the kit, you're also going to need a 13-millimeter wrench and/or socket, and you're also going to need a 5-millimeter Allen socket.So, on either side of our main crossbar here, we're going to slide in our leg. Now, as you can see, these are going to have a little bit of adjustability to them. So, once we put these together, I'm not going to completely tighten them down just because we want to make sure that everything is sitting on our bed correctly. We can tighten them down at the end. So, once our leg is sitting in this main crossbar, what we can do is take our provided hardware. This is going to be the Allen head bolt, lock washer, flat washer, and the flange nut here, and we can put that through our rack and secure down on the other side with that nut. Now, we're going to have four attachment points for each leg. So, again, we're just going to hand-tighten those. And we can snug them up with our tools in just a second so they're not completely moving around, but still loose enough to give us that adjustability that we need. What we can do is just tighten them up just a little bit just so the rack is not moving around when we're putting it on the back of the Tacoma. But again, you want to make sure that it's loose enough that we can adjust it. Then we can do the same thing for the other side of our crossbar, and then repeat that for the other two crossbars.So, now that our crossbars are put together, what we need to do is connect them all together to create our full rack. We're going to have a couple of outer pieces and two inner pieces here. I'm going to start with the outer ones. Now, for this, you're going to need a 13-millimeter socket and you're also gonna need that 5-millimeter Allen socket that we used before, and we're going to be utilizing the same hardware for these pieces as we did with our crossbars. Now, for these outer pieces, they are going to taper a little bit. So, the wider part's going to be at the top of the rack, which we have ours flipped over. So, if you have yours flipped over as well, we're going to install it with it facing down, and we can line up bolt on either side. This may be a little bit tricky at first, but once you get one on either side, bit easier. Now, I would like to get everything attached before we tighten anything down. So, I'm going to do the other side panel on this side, and then on the other side, and then we can connect the middle pieces. Next, we can connect the middle pieces using the same hardware that we did with the rest of our rack. So, it's going to be that large Allen head bolt, flat washer, lock washer, and flange nut. We're going to have two mounting locations on the front and the back of each of these middle sections. And we can repeat that for the other one as well. And once that is all together, we can go back and tighten everything down. Now, we can tighten down our middle section as well as these outer panels using a 13-millimeter socket and a 5-millimeter Allen socket or Allen key.So, our next step is to prep the rails on our bed for our bed rack to be mounted to our bed. Now, there is no drilling into the side of the bed or anything. We actually are going to use these brackets and we're going to put them in the rails here. Now, we're just going to pop off this part on the end that it's just the end cap here. And then we can take our provided mounts or brackets. So, all we have to do is just slide this in and we don't have to position it in the exact location just yet. Once we have the bed rack on the back of our bed here, we'll be able to kind of move it around and line it up as best as possible with the mount on our bed rack. So, we can just slide this up towards the front. So, there is a bolt at the end of the rail that's giving me a little bit of trouble sliding in the brackets. What I'm going to do is just take that bolt out. This is just going to make it a little bit easier, and then we can resecure the rail back down once our three brackets are in. So, I'm going to take a T30 Torx socket and just remove that bolt. Now, make sure you have a hand on the rail because once this bolt is out, you will be able to move it, but I'm just gonna take brackets and slide those in. Once those are back in place, we can just resecure that bolt down with the T30 Torx. And we can slide our brackets the rest of the way over. Then we can repeat that process on the other side.So, at this point just grab an extra set of hands and then we can align this with the bed of our truck. Now that the rack is sitting on the rails of the bed, what we can do is take our provided hardware, which is going to be the large bolt, lock washer, and flat washer, and we can thread that into the bracket. Now, you may have to adjust the bracket in order to line up with the arm of the bed rack here. I've already done that. And then we can just take our provided hardware and thread that in place. Then we can take a 16-millimeter socket and tighten those up. Then we can repeat for the other five mounts.So, last but not least, we have to tighten down our crossbars. At the beginning, we left these loose so we could adjust them to the side of our bed, but now we can tighten everything up. We're going to be using that same 13-millimeter socket and 5-millimeter Allen socket to do this. Once one is tight, you can repeat that for all the other hardware on the crossbars. So, now that the bed rack is installed, you can just leave it like this, but this does come with a couple of accessory mounts. I'm going to mount up the jack mount. This is for a recovery jack. This is going to go on the side. You can put it on either side of the rack. It does come with the hardware needed. And this also comes with the hardware that you would need to mount up a spare tire right in the middle of the rack if you'd like to do that as well. So, this is going to come with a couple of different mounting locations on the jack mount itself. I'm just going to line this up, put our bolt through, then we can secure it down on the other side with the provided nut. And repeat that for the other two mounting locations.So, now depending on the length of your jack is where you're going to mount the second jack mount. I am just going to mount it up at the front here. So, once those are on, what we can do is take a 10-millimeter socket and just tighten up the nuts on the back. So, once the mounts are on and you're ready to mount up a jack, all you really have to do is take off this knob here. There is going to be a triangular washer there as well, and you also are provided with brackets that will sandwich in between the knob and the jack itself. And this is going to have a rounded edge so it will hold the jack arm in place so it's not rattling around on the back of your rack. But once you have the jack mounted up, then you're all good to go.So, that's gonna wrap it up for my review and install. Make sure you like and subscribe for more videos and products just like this, and always keep it right here at extremeterrain.com.

      Product Information

      Features, Description, Reviews, Q&A, Specs & Installation

      Features & Specs

      • Overland Bed Rack System
      • Ideal for Transporting Sports Equipment and Gears
      • Heavy-Duty, High-Tensile Steel Construction
      • Fortified by a Textured Black, Powder-Coated Finish
      • No-Drill Installation
      • Designed for All 2005-2023 Toyota Tacoma Double Cab Models

      Description

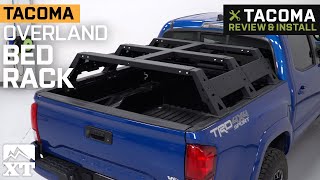
      Enhanced Utility and Style. Transform your Tacoma Double Cab with an aggressive cargo system by installing the Overland Bed Rack. This heavy-duty bed rack system is engineered to maximize your truck’s hauling capacity and provides multiple tie-down options for securing and carrying various cargo items.

      Excellent Functionality. This Overland Bed Rack System is designed to fit over your truck bed. It offers an enhanced overall style to your Tacoma’s exterior while providing extra roll-over protection. It comes in a low-profile configuration and is furnished with T-nuts for attachment to factory side rails.

      Reliable Durability. Built using high-grade materials with ultimate durability, this Overland Bed Rack offers ultimate strength to handle your heaviest gear loads. Each crossbar and rail provide secure mounting support to your cargo items. In addition, this bed rack is fortified with a textured black powder-coated finish for reinforced corrosion resistance and a bolder appeal.

      Bolt-On Installation. This Overland Bed Rack System comes with all the necessary mounting hardware for a hassle-free, no-drill installation. The installation process completes with light-to-moderate mechanical skills and basic hand tools.

      Application. The Overland Bed Rack is intended for use on all 2005-2023 Toyota Tacoma Double Cab models.

      Fitment:

      Details

      RedRock TT6616

      CA Residents: WARNING: Cancer and Reproductive Harm - www.P65Warnings.ca.gov

      Installation & What's in the Box

      Installation Info

      What's in the Box

      • (1) Bed Rack Assembly
      • Installation Hardware
      4.6

      Customer Reviews (16)

        Questions & Answers

        10 More Questions

        Will It Fit My Tacoma

        • 2.7L I4 - 05, 06, 07, 08, 09, 10, 11, 12, 13, 14, 15, 16, 17, 18, 19, 20, 21, 22, 23
        • 3.5L V6 - 16, 17, 18, 19, 20, 21, 22, 23
        • 4.0L V6 - 05, 06, 07, 08, 09, 10, 11, 12, 13, 14, 15