FREE 2 or 3-Day Delivery on 10,000+ Items. Details

Talk to a Tacoma Enthusiast
1-877-870-8556
M-F 8:30A-11P, Sat-Sun 8:30A-9P
Logo Image
$12k Summer Sweepstakes! Enter Daily >

Light Bar DRL Projector Headlights; Chrome Housing; Clear Lens (12-15 Tacoma)

Item TT6561
Call a Tacoma Enthusiast at 1-877-870-8556
M-F 8:30A-11P, Sat-Sun 8:30A-9P
$0.00
Our Price

$469.99 (kit)

FREE Shipping Market Price $477.24 You Save 2% ($7.25)

Open Box from $281.99

Will this fit your Vehicle?

Select a different vehicle Help?
Update or Change Vehicle
Ship to: Ashburn - 20149
Sorry, please enter a valid US or CA postal code
We're sorry, zip can't be updated at this time.
    Create a list
    Add to New List

    Saved - View your saved items

    We're sorry. We couldn't save this product at this time.

    or use

      Video Review & Installation

      Hey guys, it's Sara with extremeterrain.com. And today we have a review and install of the Light Bar DRL Projector Headlight with a chrome housing and clear lens, fitting your 2012 through 2015 Toyota Tacoma. These are perfect for the Tacoma owner who's looking to replace their worn out headlights with an upgrade over the factory reflectors and wants a projector style option with a chrome design and LED accents. These headlights include H7 high and low beam bulbs, as well as factory style connectors for ease of install, and they also feature LED daytime running lights for a more modern design. They feature clear housings, which are a nice upgrade from factory especially if they're aging or faded. They also feature chrome housings and are DOT and SAE approved, meaning they're legal for on-road use. So as far as price goes, these come in at around $400 for the pair, putting them about middle of the road price-wise when compared to other options. And for your money you are getting a projector style lens with chrome design and LED accents. And as far as the install goes, I'm giving this one a two out of three wrenches on the difficulty meter. They do feature direct plug-and-play installation that can be done within one hour. So, with that said, let's jump into the install. For this install you will need an impact gun or a ratchet will work just fine.You'll also need a 10-millimeter socket. You may want a short flat-head screwdriver as well as a longer flat-head screwdriver. You'll need a pop clip removal tool or a trim panel removal tool. All right. So the first step in the uninstall, with your hood popped, what we're gonna do is remove the two pop clips on either side of your grille. Grab the pop clip removal tool and let's get these out. Repeat that on the other side. Next up, we're gonna remove two 10-millimeter bolts on top of the grille. Grab a 10-millimeter socket and get these out. All right. Now that all the bolts are out of the grille, lift up these top plastic brackets to get them off of the two plastic posts in the top, and then you're just gonna grab the bottom of the grille, and pull straight back towards you. All right. So at this point we need to remove the trim piece underneath the headlight. Now to do that, there is a green clip at the back here, and what we're gonna do is just pry behind this trim piece, and just pop the back of that clip free. Once the front is free, next we're gonna use our trim tool, and we're gonna pry forward so this piece can slide in towards the center line of your truck. So slide it in and just tilt it and it'll be free. All right. Now we're moving on underneath the truck here. We do have to remove these two bolts. They're right underneath the corner of the bumper so that we can access the wheel well liner by peeling it back.Go ahead and grab your 10-millimeter socket and remove it. Now I did wanna point out one more thing about this wheel well liner before I pull it back. Right here should be a slotted clip, and what you're gonna do is grab a stubby flat-head screwdriver, and then you're just gonna twist that clip to remove it. It does not exist on our truck so we're just gonna go ahead and peel the wheel well liner back, but if you see that clip on your truck, all you need is a small stubby screwdriver to turn it out. Go ahead and grab your wheel well liner and pull it back. All right. Now that we have the wheel well liner out of the way, I can explain why. Now there are two headlight bolts on top but there is one more. It's down at the bottom. It's right about here. And to access it, you come up, sort of, diagonally behind the bumper through the wheel well with a 10-millimeter socket to get it removed. Now this may be hard to see, but you can definitely get a hand on it, and feel exactly where it is, and then we can remove it. Now at this point, we can remove the two 10-millimeter bolts on the top of the headlight. Grab your 10-millimeter socket and get these out. Now we do have to release two clips on this headlight. One is on the bottom towards the inside. And what we're gonna do here is we're gonna slide a screwdriver between the clip and the headlight.You can also use a trim tool here if you're worried about breaking it. Just pull back straight towards you to release it. Now there are two alignment tabs up top here. This one should pop free when you pop that tab on the bottom free. This one probably will not. You can do this by hand but if you're having trouble, all you do is slide your flat-head or trim tool underneath and turn it to the side. Now we're gonna unplug all of the connectors on the headlight. I'm gonna start with this one up top, this gray one. What you're gonna do is press back on the tab and just pull backwards to release it. Now we have two more connectors right behind the headlight. The first one is this little brown connector. Just grab it and pull straight back. There aren't any tabs on that style. And then this one over here is more of a traditional style. It does have a tab so press down on it and just pull backwards. Now removing the headlight itself is a little bit tricky. What we're gonna do here is just wiggle it until it's loose and then what we need to do is tilt it. So we're gonna start to twist it down and now we can rock it out. All right. So before we can get this headlight installed, we do have to transfer one of the amber bulbs over. So what we're gonna do, we have our factory headlight here. We're gonna twist the connector counterclockwise to remove it and it installs into your headlight the same way that it came out.Line up the tabs and twist it clockwise in place. All right. Now at this point we need to mount up this ballast. Now it is nice they've included some double-sided adhesive here. So what we're gonna do is pull off this protection for that, then we're gonna stick it onto the truck. All right. Now we're gonna stick this in place. I'm gonna go right on the other side of this frame here so that's out of the way of anything. These do tend to get a little bit warm so that way it won't be a danger to melt anything. Make sure it's clean and dry on the other side of this. We're just going to stick it in place. Now we can plug in the connector to the ballast that we just installed. Make sure that it clicks in place. And now we're grabbing the factory wiring harness and we're gonna plug in two of the three plugs here. That last one is a little short so we will do that one once the headlight is on the truck. Go ahead and plug in the brown connector. Then we're also gonna plug in the smallest connector that's all the way on the far side of the headlight. Make sure that clicks in place. And you may want to secure this wiring with a zip tie just to keep it tidied up, but now we're gonna install the headlight the same way that we uninstalled the factory. All right. Now we can install the headlight the same way we uninstalled the factory.It helps to approach it at an angle. And as we're twisting, we're also lining up the two tabs up at the top as well as the headlight to the side of the fender. Now once we have it in place, there's a tab on the inside here. We're gonna line that up and then press it in. And don't forget to plug in that last connector. It might be a little bit hard to see but it's right on the inside of the headlight. All right. Now we have to install the bolt that goes on the inside of the headlight the same way that you uninstalled it. Again, this might be hard to see but you can easily access this by going through the wheel well. And again, we're shooting for this area right here on the corner of the headlight behind the fender. You should be able to feel the opening. Line up your bolt and go ahead and thread it in place. Now once you have it threaded in, grab a small 10-millimeter socket and ratchet, or if you have a quarter-inch drive, go ahead and tighten it down. Now with the bolt in place, go ahead and line your wheel well liner back up. And if you do have that twist clip, now is the time to reinstall it. All right. Make sure the wheel well liner is popped into place. There should be a clip right here that you line up. And once it is in place, go ahead and reinstall the factory hardware. And with your 10-millimeter socket, tighten it down. Repeat that for your other mounting point. And now we're moving on to the top of the headlight.We're gonna replace the factory hardware. Grab your 10-millimeter socket and tighten it down. Now keep in mind that we are going into plastic so if you are using a power tool like we are, just make sure you're not over-tightening. Now we can install this trim piece underneath the headlight the reverse of how we took it out. So the first thing we're gonna do is line up this clip into the opening, press in place, and then the green clip on the inside here, line that up and press towards the truck. All right. So now that we have our factory headlight uninstalled from our truck, we can check it out side by side with our new headlight here. Now as you can see, they've updated the design quite a bit. This new headlight features LED accents as well as the projector style lens which, compared to the factory, gets you a brighter and more focused beam of light. In addition, they've kept the chrome styling for those who are a fan of chrome design, and they also include this nice fresh lens to upgrade if you are a victim of that cloudy lens from the factory. So, with that said, go ahead and repeat all of those steps to install your passenger side headlight. Now that we have both of the headlights installed, we can reinstall the grille. We're gonna line up all of the tabs on the bottom as well as the two tabs up top into each headlight.Once we have everything in place, we can press it in. And with the grille in place, you can reinstall the pop clips. There's one in each headlight. And repeat that on the other side. And now we can install the factory bolts through the top of the brackets on the grille, and with your 10-millimeter socket, tighten it down. Repeat that on the other side. And keep in mind, we are going into plastic as I said before, so if you are using a power tool, just be careful not to over-tighten. All right. So that is gonna do it for the review and install of these headlights. And remember, for all things Tacoma, keep it at extremeterrain.com.

      Product Information

      Features, Description, Reviews, Q&A, Specs & Installation

      Features & Specs

      • Sleek and Clean Headlight Design
      • Boosts Front-End Lighting Performance
      • Features H7 High and Low Beam Bulbs
      • Comes With Light Bar DRLs
      • Made With High-Strength Clear Lenses
      • Chrome Hermetically Sealed Housings
      • DOT-Regulated, SAE-Approved, and FMVSS 108-Compliant
      • Installation Requires Wiring Work
      • Sold in Pairs
      • Fits All 2012-2015 Toyota Tacoma Models

      Description

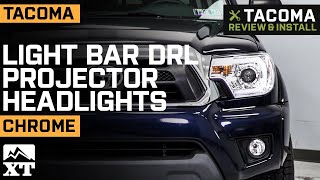
      Sharp Front-End Appearance. Give your Toyota Tacoma’s front-end a more distinct look by swapping its stock headlights with these Chrome Projector Headlights with Light Bar DRL. These superior quality lighting assemblies showcase chrome-colored headlights and clear lenses — design features that add a sharp and sleek touch to your truck’s overall appearance. What’s more, they’re powered by brighter, more reliable lights, so expect to be more noticeable when you activate these components.

      Highly Illuminative Lighting Components. These headlight assemblies utilize H7 high and low beam bulbs, each generating a 12 voltage and 55W. They’re also equipped with ultra-bright Daytime Running Light (DRL) light bars to help make your truck even more visible to oncoming vehicles. Thanks to these premium-grade lighting units, your front end will gain better lighting capabilities to keep your nighttime drives safe and secure.

      Features Highly Durable Parts. No matter how rough the driving conditions get, you can ensure that these headlights will hold up against the elements. This is because they’re constructed with impact-resistant lenses and durable, hermetically housings, so the lights are safeguarded against dust, dirt, trail debris, and moisture damage.

      Plug-and-Play Installation With Wiring. Before connecting these lights to your vehicle’s electrical system, some wiring work needs to be done. For this reason, having moderate mechanical electrical expertise is required. Fortunately, these headlights come pre-assembled with their harnesses, so the task can be completed in just 2 hours.

      Meets and Complies With Most Quality Standards. These headlights are compliant with the standards set by FMVSS 108. They’re also DOT regulated and approved by the SAE.

      Application. These Chrome Projector headlights with Light Bar DRL are compatible with all 2012-2015 Toyota Tacoma models.

      Bulb Application. These headlights with light bar DRLs also feature H7 low and high beam bulbs.

      Fitment:

      CA Residents: WARNING: Cancer and Reproductive Harm - www.P65Warnings.ca.gov

      Installation & What's in the Box

      Installation Info

      What's in the Box

      • (1) Driver Side Headlight Assembly
      • (1) Passenger Headlight Assembly
      4.7

      Customer Reviews (47)

        Questions & Answers

        10 More Questions