FREE 2 or 3-Day Delivery on 10,000+ Items. Details

Talk to Wrangler Enthusiasts
1-877-870-8556
M-F 8:30A-11P, Sat-Sun 8:30A-9P
Logo Image
$20K Sweeps! 10 Chances to Win! Enter Daily >
The ExtremeTerrain Show is Back! Register Now >

S&B Cold Air Intake with Oiled Cleanable Cotton Filter (18-23 2.0L Jeep Wrangler JL, Excluding 4xe)

Item J134157-JL
Call a Wrangler Enthusiast at 1-877-870-8556
M-F 8:30A-11P, Sat-Sun 8:30A-9P
$0.00
Market Price $407.99 You Save 14% ($58.99)
Our Price

$349.00 (kit)

FREE Shipping

Will this fit your Vehicle?

Select a different vehicle Help?
Update or Change Vehicle

Item Options

Ship to: Ashburn - 20149
Sorry, please enter a valid US or CA postal code
We're sorry, zip can't be updated at this time.
    Create a list
    Add to New List

    Saved - View your saved items

    We're sorry. We couldn't save this product at this time.

      Video Review & Installation

      Hi, guys. So today we're checking out the S&B Cold Air Intake with the Oiled Cleanable Cotton Filter, fitting all 2018 and newer 2.0-liter JL Wranglers. So if you are in search of some better performance to help your engine breathe better and an overall cool look to your engine bay, this option by S&B is going to be a great choice to take a look into. Now, cold air intake, and this one specifically is going to help you out when it comes to performance gains, horsepower, and torque, especially when it is in that throttle response. You're definitely gonna notice it out of this S&B cold air intake. Now, this will also help out with your MPG, considering that this is gonna help out your efficiency as well with the overall design. Now, speaking of that design, this is going to come up with a large oiled filter which will be great for anybody out there who is a fan of an oiled filter for the maintenance and the ease and the lifespan of that filter.Now, it is going to optimize filtration with its setup, and I'll tell you guys a little bit more about the details in just a minute. But paired with the intake tube that's going to eliminate all the restriction and streamline that airflow, this is going to give you some really good performance for your JL and help it breathe a lot better. Not to mention, this will also help out with that turbo noise or the little whistle. If you like to hear the turbo spool, this one is definitely going to help out. Now, what I really like about this choice is the fact that this is going to have a closed box set up as far as the airbox is concerned. Now, this will be great for anybody who lives in a wetter climate and is in search of a little bit more protection than some other options have to offer when it comes to that filter.Now, what I also really like about this choice is the fact that this is gonna have a nice little window here. Not only are you getting the styling of the red filter with the cold air intake, but you're also getting an eye on the filter for easy maintenance in the future. Really all you have to do as far as maintenance is pop off this window and you can easily pop out the filter, clean it, oil it, and pop it back into place. Now, with all that being said, this is going to come in at roughly $350, and I personally think that that price is well justified. You can really see the detail of the design down to even the hardware that is included in the kit. This is a very inclusive kit and it really comes with everything you need, and this is going to have an overall efficient design when it comes to getting all of that cold air to your turbo and keeping all of that hot engine bay air out.Now, in comparison to some other options available on the page, again, this is gonna have that closed airbox design. Some of their options may come up with a plastic heat shield or even an aluminum heat shield. However, I personally think that this is going to give you a little bit more as far as eliminating all heat soak or any hot engine bay air getting to that filter and, of course, that protection. Some of their less expensive choices will usually just come with that heat shield or have a more bare-bones design as where this is going to have a little bit more while still getting a lot of cold air to your turbo. Not to mention, some of their choices may not come with all the bells and whistles down to this window, the hardware, or even a very large intake tube like you see here. Now, again, I also like the fact that that is gonna be made out of a plastic material, considering that that's not gonna have any or at all heat soak inside that intake tube. Some other less expensive options are usually going to have an aluminum tube or a stainless tube that can take a little bit of heat and warm up that air. However, this option is not going to do that. So, overall, I personally think that this is a high-quality option. Again, very inclusive, and it's going to add a lot of performance to your JL if that is what you're looking for.Now, as far as installation is concerned, I'm gonna give this a very easy one out of three wrenches on the difficulty meter, taking you no longer than an hour to get this thing installed. You're gonna need some very basic hand tools to get the job done, so speaking of that install, let me walk you through that right now. The tools that I used for my install were an impact wrench, a trim removal tool, a soft pry tool, an 11/16-inch wrench, a 10-millimeter ratcheting wrench, a 1/4-inch drive ratchet, a Phillips screwdriver, a 10-millimeter, and 8-millimeter socket, and a pair of side cutters. So our first step is popping the hood and then we can disconnect some lines from our intake. So on the side of our airbox here, we're gonna have two lines or two hoses. All we have to do is press on this gray tab and pull back. It may be a little bit difficult, especially if you have some mud in your engine bay, so just be mindful of that.So the bottom one has a little green tab that you need to press down. I'm just using a soft pry tool to press down on that. So this bottom one may be a little bit tricky, you just have to press down on it hard enough. I'm using a soft pry tool in order to do this, but you just press down and pull back just like the top one. You can just move this out of the way and just tuck it on the power steering tank right here. And then what we can do next is disconnect our sensor. So our IAT sensor is right here. All you have to do is press down and pull back. We'll swap this over in just a minute. So we're gonna keep this in the intake tube. And then what we can do at this point is just make sure that this wiring harness is out of the way. So I'm gonna take a clip removal tool and just pop that little Christmas tree clip out of the side of the intake tube. Next, we can remove the two 10-millimeter bolts that are attaching the intake tube to the upper radiator support. So I'm gonna take a 10-millimeter socket and my impact wrench and remove those.Next, we can pop an 8-millimeter socket onto our impact wrench, or if you're using a ratchet and then we can loosen up the two clamps, one that's connecting to the piping that's going to our turbo and then one over at the airbox. Just gonna loosen both of those up. Once those are loose, we can put this to the side and we can wiggle that intake tube right off. For this, if you need to use that soft pry tool just to get the tube off the airbox. Wiggle out our intake tube and put that to the side. What we can do next is remove our air box, and this is gonna be held in by a bolt up at the front and then there's gonna be a couple of grommets. So I'm gonna use a 10-millimeter socket to remove this bolt and then we can pull the airbox right out. All we have to do at this point is just give our airbox a good lift and pop that out of place.So now that our intake tube and our airbox is out, we also need to remove our turbo resonator right here. Now, this is gonna have a wiring harness with a bracket up top. I'm gonna remove the wiring harness from the side of the resonator. This little clip is attached to this bracket that we're gonna remove fully. So I'm just gonna take a trim removal tool or a clip removal tool and we can just wiggle that out. Then we can take a 10-millimeter socket and remove the two bolts up top. The bracket should pop right off.So now in order to get this turbo resonator off of here, we do have to remove this barbed clamp. Now, this is a no-tamper clamp, so we're not gonna be able to use a socket to remove it. We do have to cut it. And you just cut it at the ear here with a pair of heavy-duty snips. So I'm just going to take my snips. We're gonna go ahead and cut that off. Now, once that's off of there, what we can do is just give this a good wiggle and the resonator should pop right out of there. While we're still in the engine bay, we can remove this bolt that's connected to our fender here. Now, this is gonna be used as a mounting point for our new airbox. So I'm gonna use a 10-millimeter socket and just remove the bolt on the left. And we can put that to the side.So before we go ahead and put this intake together, I do wanna stop down and show you some of the similarities and differences, a little bit of a comparison between the new one and our factory one, why this option by S&B is going to be a big upgrade for your turbo JL. Now, just as a brief overview of our factory system, you guys are probably pretty familiar with this system already, but this is gonna come with an enclosed airbox. That's gonna be great for protection as far as the filter is concerned, and then we're also going to have a factory paper element filter. Now, that is going to not be reusable. You will have to change it every so 1,000 miles or whenever you see fit. And it doesn't do the best job as far as performance. It does a pretty okay job when it comes to filtration, but nothing compared to this option by S&B. Now, moving over to the intake tube from the factory, as you can see, it's a pretty standard setup, but it is going to have resonators over on the side which can cause restriction and can dull down that performance out of the 2.0. So, overall, this is great for stock applications, but when it comes to performance and optimizing filtration, this is where the S&B option is really going to step in and take charge.So starting off with the air box, this is gonna be an enclosed airbox just like our factory one. This will give you a little bit of protection to that filter, which will be great if you take your Jeep off-road and want that extra protection to the filter. However, this is still going to pull in all of that cold air. And this is also going to be durable, made of a double-linked plastic material. So not only will this hold up, but it's going to get rid or eliminate any and all heat soak inside the engine bay when it comes to protecting the filter from any hot air. So this is really going to make sure that all that hot engine bay air stays away from the filter, making sure that you get all of that cold air in into your turbo.Now, speaking of the filter, this is going to be an oiled filter. It is going to be a lot larger than our factory filter, which is gonna pull in a lot more air. The oiled feature of this or the oiled surface of the filter itself is gonna be a little bit sticky and that's what's going to trap all of the dirt, dust, and microelements from getting through the paper or the cotton filter itself. So, overall, this is going to optimize the filtration, but it's also going to pull in a lot more air because of the size. Now, speaking of pulling in more air, this is going to do a really good job at that as far as directing that airflow right to the turbo. Now, the intake tube is also made of the durable cross-link plastic, so it is going to, again, be durable and hold up just as long as our airbox here and it's also going to have a straight-through and large design. So as you can see on our intake tube here, we're not gonna have any resonators, which is going to eliminate all the restriction that our factory intake tube was giving us, again, optimizing performance, optimizing airflow, and getting all of that cold air to the turbo faster and better.Now, what I do really like about this choice by S&B is the fact that as you can see on the top here, there's no top to this. This is gonna come up with a clear plastic window. Now, the plastic is going to be incredibly durable, but it is going to be clear. So you can keep an eye on your filter. If you see dust, or dirt, or really anything starting to build up on your filter, you can easily just pop that out and clean it. So it makes it easy as far as keeping an eye on it for maintenance and also you get the look of a cold air intake inside your engine bay, you get the look of the red filter right through the top window there. Now, as far as the rest of the kit, this is gonna come with everything that you need in order to swap over all of the factory components that you need like the IAT sensor and some fittings for the EVAP system. So, overall, this is a very inclusive kit. It's going to optimize the performance, optimize filtration for your 2.0 a lot better than the factory one did. So what do you say we go ahead and put it together and get this installed on our Jeep?So what we can do first is remove our IAT sensor or our intake air temperature sensor. And all we have to do is just give it a good twist. You have to make sure you get that little tab over the notch there, give it a good turn, and you can just wiggle it back. There's gonna be a little O-ring that keeps it in there, so nice little wiggle. We can put our intake tube from the factory to the side and use our new intake tube. We can grab the grommet, line up the little tab on the back, and just press it into place. It should sit in there just like that. And what's nice about this is that it's not like a universal grommet. This will have an arrow and a little tab, so the IAT sensor will be facing the correct way once you put it in. So making sure that the tab is closest to the ridge here. Just gonna press that down on in.Now, once the tab on the IAT sensor is flush, we can give it a good turn, make sure that it sits over the little slope here, and then we'll be all good to go with that. Now, the next thing that we're gonna do is add the fittings for the EVAP system on the back here. So there is going to be a little fitting that we can thread into place. Now, this is gonna go on to where it's hand tight, and then we can give it one rotation with an 11/16-inch wrench. You could also use an adjustable wrench for this as well. Just be careful because it is plastic. You wanna make sure that the end of this fitting is facing the back portion of the intake tube and that it's off-center a little bit.Next, we can attach the fitting for our EVAP. This is where those two EVAP hoses that we took off of our factory intake tube are gonna connect to and this fitting is going to wrap around and circulate through the bottom of here as well. So there is a little clamp. I'm just going to pop that onto the middle. It's gonna snap on. You wanna make sure that the fitting that's going to come around and attach to this one is facing the inside of the intake tube, we can line this up, grab our provided Phillips head screw and take a Phillips head screwdriver, you can thread that into place. Once that's threaded on, we can take our provided hose, pop that onto either side of the fitting. This is just gonna wrap around just like this and circulate through the bottom. Just be careful because these are plastic. You can adjust it however much you need. Give it a good tighten. And now our intake tube is pretty much set up so we can move on to assembling the airbox. So we're gonna have two couplers, one that needs to go on the back and then one for the air duct at the front that needs to go on the front, and you can just line them up with how they're oriented. So this is going to have a little point down at the bottom, and we can just fit that into the airbox.All right. We wanna make sure that's around all the edges. And we can do the same thing for the back. Now, while we're here, we can add the seal to the top of the airbox. We're not going to install this cover just yet. We need to get the airbox and the intake tube installed and then put in the filter and then we can pop our cover or our window right on top. This little seal is just gonna pop into the top. Make sure that no particles, dust, dirt, mud, water, really anything can get inside of here. Really good design by S&B with this. All right. Making sure that's sitting pretty flush. It's supposed to kind of sit up a little bit and we can squish it down with the window. But at this point, we can head over to the Jeep and start assembling our intake.Now, like I showed you guys before, we took off that bolt inside the engine bay on the fender. This bracket is gonna connect to the side of the airbox and the place where we took out that factory bolt. So I'm gonna take the provided hardware and we can thread this into the side of the intake. I'm using a 10-millimeter socket. Make sure that it's snug and now we can head over to the Jeep. Now, at the bottom where the intake box is supposed to be secured, there are two grommets. There are also two posts on the bottom of our airbox here. So what we're gonna do is line those up the best we can, give it a good push down and the airbox will be secure at the bottom.All right. So this bracket here is making contact with this second bolt. What we can do is just remove that second bolt with a 10-millimeter socket. So I'm actually just gonna pop the intake box right out. We can pop this bolt out then we can line it up. All right. So now it is a little bit closer. What we can do is take our provided hardware, line up that bracket there, and either using a 10-millimeter ratcheting wrench or a 10-millimeter socket, we can thread that in and snug that up. All right. So I just used a 10-millimeter socket to get it started. There's not a lot of room here. I'm just gonna use a 10-millimeter ratcheting wrench and tighten that up. And we can also just make sure that the other side of the bracket is snug. Again, we can use that 10-millimeter ratcheting wrench. You don't wanna over-tighten this one because it is a fitting that's inside that plastic there. But once our airbox is installed, we can move on to the intake tube.So what we can do now is put our provided clamp onto the coupler that was holding on our turbo resonator. And this is just gonna sit down where that barbed clamp was to begin with. Then we can wiggle our intake tube down on in, moving it into the airbox. Once it is in the airbox, you can get it into the turbo coupling over here, making sure that it sits over that lip. You wanna make sure that all sides are sitting over the first lip and butting up against the second one. All right. Same with the airbox side. And then what we can do from here to make sure that the intake tube is not gonna go anywhere, we can tighten up the provided clamp that we just installed with an 8-millimeter socket. So what we can do next is reattach this bracket to the top. There's gonna be two mounting points for our factory hardware, and then we can reinstall our IAT sensor plug. So I'm just gonna pop that one in real quick.So once you hear a click, we can move on to the bracket. I'm just gonna use the provided hardware. So once you hear the IAT sensor click, we can move onto installing this bracket. We're gonna use the factory hardware. I'm just gonna thread that right into captured nuts there that are installed already on our intake. We can take a 10-millimeter socket and tighten those up. If you need to tighten that back one up a little more and that clip is giving you some trouble, you can use a 10-millimeter ratcheting wrench, but once that bracket is installed, we can move to our filter. You may have to move the intake tube back a little bit just to get it to line up then we can pop the filter in, make sure that it's over that lip on the intake tube. And once it's sitting there... So once it's in a good spot, we can take an 8-millimeter socket and tighten that up, tighten up the clamp. Give it a good tug just to make sure that everything is all good then we can install our little window here. So this is gonna come with a cover to keep that little window protected.Now, once the plastics are off, what we can do is line this up to make sure that it fits. All right. And we can tighten that up. So these little covers are gonna go on each corner as a little accent and also as just a plastic washer and give that a good seal. You're gonna drop that down on in there. So you may have to work the screw through the plastic washer before it actually goes into the plastic, or through the plastic into the airbox should I say. I'm not gonna completely tighten everything up. We're gonna get all four of these threaded in and then we'll go back and tighten them up with the Phillips head screwdriver.All right. Now, once those are all threaded in, we can just go back, like I said, and just tighten those up. You wanna make sure that this window is sealing to the seal underneath there. Now you don't wanna over-tighten it, but you do wanna make sure that it's pretty snug. You can see the seal actually pressing up against the window there. So once that's on, our last step is just to plug in our EVAP hoses, which are just gonna slide on to that fitting there. So you just have to push these back and they should kind of push themselves onto that fitting there. And then after everything is all secure, then you're all set to go.So that is going to wrap it up for my review and install. Make sure you like and subscribe for more videos and products just like this, and always keep it right here at extremeterrain.com.

      Product Information

      Features, Description, Reviews, Q&A, Specs & Installation

      Features

      • Increases Airflow for More Power
      • Improves Throttle Response
      • Intake Tube With Fully Enclosed Air Box
      • Reusable High Flow Oiled 8-Layer Cotton Gauze Air Filter
      • OEM Design for Trouble-Free Installation
      • No Computer Re-Tune Required
      • CARB-Certification Pending
      • Fits 2018-2023 2.0L Turbocharged Jeep Wrangler JL Models

      Description

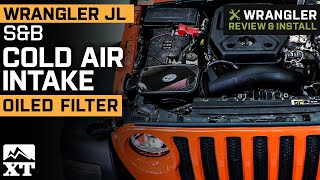
      Offers More Power. Enhance your Jeep’s off-road performance by equipping it with this S&B Cold Air Intake with Oiled Cleanable Cotton Filter. This cold air intake is designed to improve your engine’s airflow by providing it with cleaner and cooler air. As a result, your Jeep will be able to get a boost in horsepower and torque, enabling you to easily tackle challenging trails.

      No Tune Required. S&B engineered their Cold Air Intake to improve the performance of your Wrangler without the need of reprogramming your computer. By utilizing flow dynamics, this Intake will increase power using the original factory tune. Even though a re-tune is not required for operation, ExtremeTerrain recommends a custom tune to reprogram the vehicles computer (ECU) to get the best possible performance from this Cold Air Intake.

      Reusable Air Filter. The included high flow S&B air filter effectively filters out power robbing particles with its multi layer design. The specially treated 8-layer, cotton media creates a sticky surface to capture microscopic contaminants before they can enter your Wrangler's engine and do harm. Seeing that the filter is reusable there is no need to buy a new filter every few thousand miles. You can just clean the filter, re-oil it, and reinstall - saving yourself money in the long haul.

      High-Quality Construction. This cold air intake is built with high-quality components. Its intake tube is made of durable cross-linked plastic. Unlike steel types, plastic intake tubes dissipate heat faster for better performance. Furthermore, this cold air intake comes with an airbox that protects it from the engine’s excessive heat.

      Simple Bolt-on Installation. S&B designed their Cold Air Intake kit to be a direct bolt-on replacement. With no special tools or extra modifications required installation can be completed in under an hour. All parts and detailed instructions are included.

      Includes a Million-Mile Warranty. This cold air intake includes a million-mile warranty. In case your purchased item is underperforming or defective, S&B will provide a replacement. For more warranty information, you may check out their official website.

      CARB Pending. This S&B Cold Air Intake is not CARB certified, it is currently CARB pending, therefore it is not legal for use in California or any other state adopting California emission standards. Not intended for use on pollution controlled motor vehicles.

      Application.
      This S&B Cold Air Intake with Oiled Cleanable Cotton Filter is designed to fit 2018-2023 2.0L Jeep Wrangler JL models.

      Fitment:

      Details

      S&B 75-5129

      CA Residents: WARNING: Cancer and Reproductive Harm - www.P65Warnings.ca.gov

      Installation & What's in the Box

      Installation Info

      What's in the Box

      • (1) Air Filter
      • (1) Intake Tube
      • (1) Intake Box
      • (1) Fender Seal
      • (1) Tube Seal
      • (1) Lid Seal
      • (1) Clear Lid
      • (1) Hose to NPT Fitting
      • (1) EVAP Fitting
      • (1) IAT Sensor Grommet
      • (1) Intake Box Support Bracket
      • (4) Flange Bolts
      • (2) Hose Clamps
      • (4) Lid Screws
      • (4) Lid Washers
      • (1) Hose
      • (1) Cable Clamp
      • (1) Screw
      4.9

      Customer Reviews (363)

        Questions & Answers

        10 More Questions

        Will It Fit My Wrangler

        • JL Rubicon 2 Door - 18, 19, 20, 21, 22, 23
        • JL Rubicon 4 Door - 18, 19, 20, 21, 22, 23
        • JL Wrangler 2 Door - 18, 19, 20, 21, 22, 23
        • JL Wrangler 4 Door - 18, 19, 20, 21, 22, 23