FREE 1 to 3-Day Delivery on Orders $149+ Details

How to Install Rugged Ridge Hardtop 4 Piece Insulation Panel on your 2007-2013 Wrangler

Shop Parts in this Guide
Contents 2DR (12109.01)
(1) Front driver's side panel
(1) Front passenger's side panel
(1) Rear panel
(1) Bag - 4" Velcro Strips
Contents 4DR (12109.02)
(1) Front driver's side panel
(1) Bag - 4" Velcro Strips
(1) Front passenger's side panel
(1) Middle panel
(1) Rear Panel
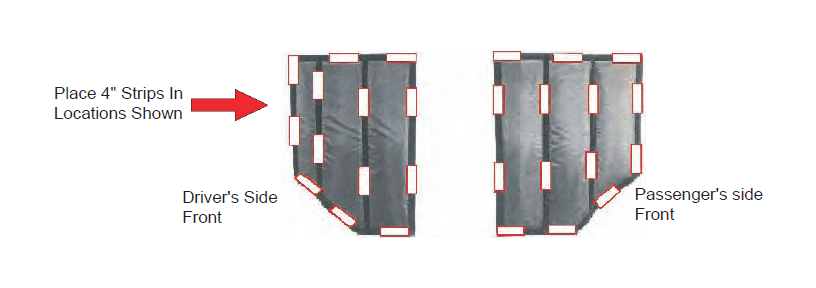
4 door and 2 door front driver's / passenger's side panel installation
Step 1: Clean surface where acoustic liner is to be installed with isopropyl (rubbing) alcohol. Freedom top front panels can be removed for cleaning and installation.
Step 2: Make sure surface is dry and clean. DO NOT proceed until surface is completely dry.
Step 3: The acoustic liners have been designed to fit the hardtop recesses. Hold liner up into each section of the hardtop before applying Velcro strips to insure that the correct liner is being installed into the correct location.
Step 4: Place 4" 3M Velcro strips in locations shown in supplied image. Proper placement of the Velcro strips is needed for a secure fit. With 4" strips attached to headliner remove protective backing tape from strips being very careful not to get dirt or grease on adhesive. With the help of a second person carefully place liner into recess of the hard top panel. Press firmly against liner and hardtop working around the liner making sure all strips have been pressed against top. DO NOT REMOVE headliner. Allow Velcro adhesive to cure for 72 hours before removing or adjusting acoustic liners.
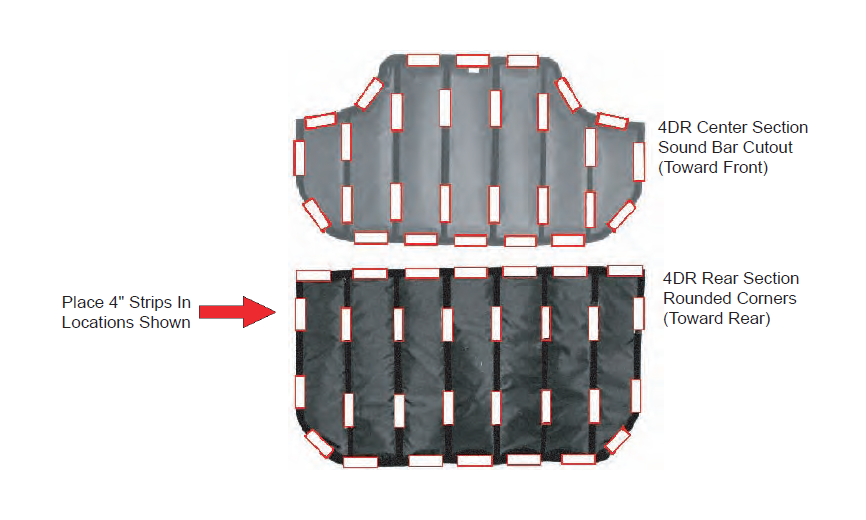
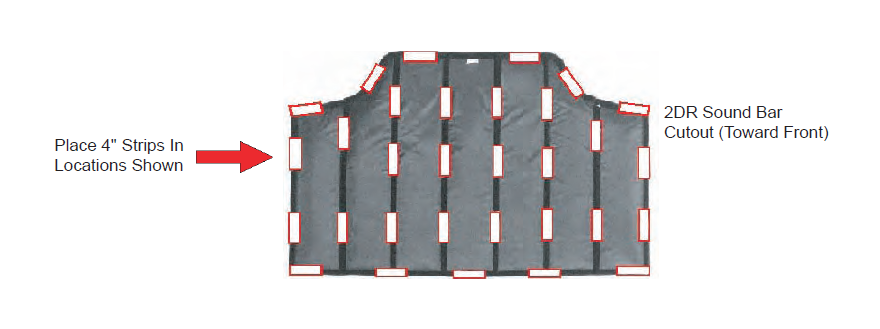
4 door center panel and 2 door rear panel installation
Step 5: Make sure surface is dry and clean (see step #1).DO NOT proceed until surface is completely dry.
Step 6: Slide liner up and between the hardtop and sound bar. Note the correct orientation of the liner. It has been shaped to match the sound bars profile. Confirm that the liner fits correctly before proceeding.
Step 7: Place 4" 3M Velcro strips in locations shown in supplied image. Proper placement of the Velcro strips is needed for a secure fit. With 4" strips attached to headliner remove protective backing tape from strips being very careful not to get dirt or grease on adhesive. With the help of a second person carefully place liner into recess of the hard top panel starting at the sound bar. The liner has been designed to fit the shape of the sound bar to allow installation without the removal of the hard top. Starting at the outer corners of the recess work around hardtop pressing firmly against liner and top. Make sure all strips have been pressed against top. DO NOT REMOVE head liner. Allow Velcro adhesive to cure for 72 hours before removing or adjusting acoustic liners. .
4 door rear panel installation
Step 9: Clean surface where acoustic liner is to be installed (see step #1). DO NOT proceed until surface is completely dry. Position liner in rear recess to find correct orientation.
Step 10: Place 4" 3M Velcro strips in locations shown in supplied image. Proper placement of the Velcro strips is needed for a secure fit. With 4" strips attached to headliner remove protective backing tape from strips being very careful not to get dirt or grease on adhesive. With the help of a second person carefully place liner into recess of the hard top panel. Starting at the outer corners of the recess work around hardtop pressing firmly against liner and top. Make sure all strips have been pressed against top. DO NOT REMOVE headliner. Allow Velcro adhesive to cure for 72 hours before removing or adjusting acoustic liners..
2DR and 4DR front panel - 4" Velcro strip placement guide
2DR Rear panel - 4" Velcro strip placement guide
4DR Center and Rear panel - 4" Velcro strip placement guide