Talk to a Wrangler Sales Tech
1-877-870-8556
M-F 8:30A-11P, Sat-Sun 8:30A-9P
Logo Image
$20K Sweeps! 10 Chances to Win! Enter Daily >

Rough Country 2.50-Inch Suspension Lift Kit (18-23 Jeep Wrangler JL, Excluding Rubicon 392)

Item J122658-JL
Verify parts fit and get product recommendations.
Wrangler Sales Techs: Connect Now M-F 8:30A-11P, Sat-Sun 8:30A-9P
$0.00
Our Price

$199.95 (kit)

FREE Shipping Market Price $229.99 You Save 13% ($30.04) Up to 10% off for Military & First Responders! See Details

Will this fit your Vehicle?

Select a different vehicle Help?
Update or Change Vehicle
Ship to: Ashburn - 20149
Sorry, please enter a valid US or CA postal code
We're sorry, zip can't be updated at this time.
    Create a list
    Add to New List

    Saved - View your saved items

    We're sorry. We couldn't save this product at this time.

    or use

      Video Review & Installation

      Hey. What's up, guys? I'm Ryan from ExtremeTerrain. And today I'm here with the Rough Country 2.5-Inch Suspension Lift Kit, fitting your 2018 and up Wrangler JL. This is gonna be for the budget-minded enthusiast that's looking for a very affordable option to gain them some additional ground clearance. This kit makes it very affordable to lift your Jeep by reusing all of the factory suspension so we're not spending extra money on buying springs and shocks. Now, this kit lifts your Jeep, retains that factory ride quality somewhat, and allows you to fit up to a 35-inch tire, which is gonna gain you some additional ground clearance. Now, this kit comes with heavy-duty shock brackets and spacers, as well as bump stops and even aftermarket sway bar links. This is everything needed to lift your Jeep and get it back on the road for under $200.Now, as far as lift kits go, this is a relatively easy one to install. There's no drilling or modification required that we need to do to the Jeep. Now, as far as these spacer kits go, this is an incredibly affordable option. It's just around $180. I think this is a great way to go, especially if you're not trying to spend a lot of money. One thing I would like to point out is if you plan on running 35s on those stock wheels, you'll want a wheel spacer of at least 1.5 inches. If you're planning on going with aftermarket wheels, you want a backspacing of at least 4.5 inches. Now, as far as installation goes, I am gonna rate this a three out of three wrenches on the difficulty meter since we are dealing with suspension. However, expect this to take you about a half a day and you can get all of this done with basic hand tools. Now, with that being said, let's hop into the install.Tools we used for this install, pry bar, 3/8 drive impact, 1/2-inch drive impact, crayon, 6-millimeter Allen key, 3/8 drive extension, an adjustable wrench, dead blow hammer, prying tool, standard and metric wrench set, butthead screwdriver, magnet, 3/8 drive ratchet, 1/4-inch drive ratchet, standard and metric socket set, a ratchet strap, and a torque wrench. So there are two ways that you can do this. You can do it on a lift like we're gonna do it, or you can do it on the ground. Now, if you're doing it on the ground, you wanna start with the front, jack it ups, support it with jack stands, and take your wheels and tires off. You're gonna need a 22-millimeter socket to take your wheels and tires off. Now, we already have ours on the lift. We've already taken our wheels and tires off. So we're gonna start with the splash shield. Splash shield is gonna give us access to the track bar. So this is held in by a series of pushpins and we have two screws. You're gonna start with pushpins. We're gonna use a flat-head screwdriver to pry out the center and then remove this from the vehicle. Like I said, you're gonna have two screws, you're going to have one on both sides. We're gonna use an 8-millimeter socket to take those screws out. So we're gonna place a hand on it, take this last screw out, and remove it from the vehicle.So the next thing we're gonna do, we're gonna take our pole jacks, we're gonna support the axle so we can remove our track bar. So next thing we're gonna do is remove our track bar where it meets the frame. So we're gonna take a 21-millimeter socket and a 21-millimeter wrench if you have one or an adjustable. The next thing we're gonna do is remove our sway bar links. Now, since we have brand new links to install, we're gonna remove them completely. We're gonna start with where it connects to the sway bar, use an 18-millimeter socket to get that nut off. After that, we're gonna use another 18-millimeter socket to take out the lower bolt. So the next thing we need to do is free up and unplug our axle disconnect. You're gonna have a spot here at the upper control arm. We're gonna pry that out using a flat-head screwdriver or trim panel removal tool, pretty much anything you can find. Once we get that out, we're gonna free this area up right here. And we're gonna unplug this. So the way we're gonna unplug it, you're gonna have this white little locking tab, you're gonna pull that tab all the way back and that should allow us to unplug it. So next on the outside of our lower control arm, we're gonna take this nut off. This nut holds our ABS and our brake line. Use a 15-millimeter socket to take that off. Now, after that, we're gonna disconnect our lower shock bolt. So we're gonna use an 18-millimeter wrench for the nut, 18-millimeter socket for the bolt head, and take that bolt out.All right. So the last thing we're gonna do before we lower this axle down, we don't wanna damage the end of the drive shaft where it meets the transfer case. So we're gonna disconnect it from our axle. So what we're gonna do is take a crayon, and we're gonna mark where this lines up, that way when we put it back together, we put it back in the same exact spot. After you've done that, you wanna get a bungee ready and a 15-millimeter socket because we're gonna take all four of these bolts out, suspend that bad boy up and out of the way. So we're just gonna pry this back a little bit and find a good spot to hang it.So after that, you're gonna lower the axle down enough that you can get these springs out. So we're just gonna lift them up off of the bottom pad and pull them out. So we have a whole front torn apart and we are just about ready to install this new kit, put all that suspension back in. But before we do that, I just wanna tell you a little bit about what this kit comes with. Now, why do we wanna lift our Jeeps? We want more ground clearance, right? We wanna add larger tires. This is gonna add to that aggressive look. It's also gonna add to the capability of our Wranglers. So most kits, more expensive kits are going to come with brand new springs and shocks. This is gonna cost you a little more. It's also gonna change up that ride quality.So if you want a really affordable option to go with, a spacer lift kit is the way to go. Now, this kit comes with coil spring spacers. These spacers are going to give you the height. They're gonna retain that factory spring, allow you to reuse that, and that's going to keep that ride quality from the factory. Now, since we are pushing the axle further away, we need longer shocks. Instead of adding new shocks and spending all that extra money, we're gonna go with shock relocation brackets. This is gonna add some length to that and allow us to reuse those factory shocks. Now, another nice thing about this kit is it comes with brand-new sway bar end link. We need longer ones because we are pushing the axle further away. This is gonna flatten out that sway bar and just add to that ride quality. Now, this kit is gonna allow you to run larger tires up to a 35-inch tire and if you are planning on running larger tires, you'll need bump stops. This kit comes with bump stops front and rear and is gonna keep you from jamming that tire up into the fender and doing any damage. This kit is incredibly affordable and pretty easy to install since we're basically reusing all the factory components. So with that being said, let's show you how this gets put back together, what it looks like on the Jeep.First thing we're gonna do is take our factory isolator out. You're gonna have a little rubber isolator out here. We're just gonna pull that up and off of the bump stop. Then we're gonna slide our spring spacer on. Now, you're gonna have two different spacers. You want the one that looks like this for the front. So that's gonna go up on there and we're gonna put that isolator back on. So after that, we're gonna install our spring. Now, we have a bump stop that's actually gonna go on the pad on the axle. So we wanna get that up inside of the spring while we're doing that because we're not gonna be able to fit it through the coils.So we're gonna take the tightly wound section for the top and we're gonna place that up and in. So with our spring staged, we're gonna get our bump stop up and in there, and we're gonna put this up over the mount. Now, there is a stop on the axle so we wanna turn our little pigtail until it hits that stop. After that, we're gonna bolt this bump stop onto the axle. So you're gonna have a bag of hardware that has two silver bolts, two silver flat washers, and then two gold nuts. This is gonna be for the front bump stops. So we're gonna drop a bolt with a flat washer on there, make sure that it goes through that hole in the axle mount, and then we're gonna put the nut on the bottom. Now, that's a pretty hard spot to reach so I'm gonna use a magnet, try to get up in there, get this thing on. So after you get that on there, we're gonna use a 14-millimeter wrench and a 14-millimeter socket to tighten this up.Now that we have the springs in, the next thing we're gonna do is install our shock bracket. So you're gonna have longer shock extension brackets. These are for the front. It has a curve in it. We're gonna face that curve towards the front. And you're gonna open the bag of hardware and you're gonna have a series of new bolts and the sleeves. These sleeves are to go inside of this. So we're gonna start with this hole first. I'm gonna reuse our factory bolt. So what we're gonna do is place this bracket over top of it just like that. Line these holes up that we're gonna place our sleeve inside, pass our factory bolt through then we can put the nut back on the other side. Now, in that bag of hardware, you're gonna use the smallest bolts that they give you. I'm gonna place a flat washer on there and it's gonna go up through the bottom and then on the inside, we're gonna place this nut. After that, we can tighten all this up. So we're gonna tighten this small bolt first. We're going to use a 9/16 wrench, 9/16 socket, tighten that up.After that, we're gonna switch to an 18-millimeter socket and a wrench and we're gonna tighten up this factory bolt. In that same kit, you're gonna get four gold bolts. We're gonna place a large flat washer on those and you're gonna have this large flange nut. This is gonna be used for this other bolt hole. So we're gonna raise our axle a little bit, pull our shock down. Once we get that lined up, we'll install that hardware through there and we're gonna take a 19-millimeter socket, 18-millimeter wrench, and tighten it up. And you wanna torque that to 55 foot-pounds. After that, we're gonna reconnect our brake lines to our lower control arms. We're just gonna press that bracket back on there, reinstall that factory nut, tighten it up with a 15. After that, we can do our axle disconnect. So we're going to plug that back in, push in that white locking tab, and then we wanna put these back into their mounts. After that, we can reinstall our front driveshaft. Now we're gonna reuse those factory bolts, we use a 15-millimeter socket to tighten them all up, and you can torque them to 89 foot-pounds. So we wanna line up those chalk marks.So one of the last steps on the front is to install our brand new sway bar end links. We're gonna use the bent links. We're gonna reuse the factory bolt for the bottom hole. So we're gonna start with that first. I'm going to get that lined up, face our bolt in towards the Jeep, and then get that flag nut on there. Now, for the top, we're gonna use the brand new hardware that they give us. You're gonna have a bag that's strictly for the sway bar end links. You're gonna have four gold bolts, six washers, and four nuts. So I'm gonna place a flat washer on one of the gold bolts. We're gonna go from the outside in, and then we're gonna do a large flange nut on the inside. So once you get both of those links in, we're gonna take an 18-millimeter socket, tighten up the bottom bolt, and then we'll get to the top.Now, for the top, you need a 19-millimeter socket, 18-millimeter wrench. Tighten those up and then you can torque both of these to 55 foot-pounds. Now, there's two ways that you can do this. You can wait until you're all done, put the wheels and tires back on, sit it on the ground with the weight of the vehicle and use the steering wheel to line up the track bar with this mount in the frame, or you can do what we're gonna do and use a ratchet strap. If you are gonna use a ratchet strap up in the air, you need to be really careful because you're dealing with suspension, stuff under tension. So I'm gonna show you how to do it with a ratchet strap right now.So the first thing we're gonna do is find a nice area to hook into the frame. And after we find a nice area to hook into the frame, we need to hook the other end to the axle, somewhere where it's not gonna get in the way. After that, we're gonna use our ratchet strap to shift the axle over. This is gonna help us to line this hole up. Once it's close, we're gonna reinstall that factory bolt. Once you get that bolt in, you can reinstall the factory nut, and then we're gonna tighten it up with our 21-millimeter.So the next thing we're doing is moving to the rear. First thing we're gonna do is support the axle, this way we can take the track bar out. So we're gonna take the bolt out of the track bar where it meets the axle. We're gonna use a 21-millimeter socket, and there's a flag nut on the back, so you don't need a tool for that. Once we get that out, we're gonna pull this bolt out and you wanna keep a handle on that because it might drop down a little bit. So the next thing we're gonna do is remove our factory sway bar links. We're gonna start with the bottom bolt. We're gonna take that bolt out with an 18-millimeter socket and a wrench. Now we wanna save this factory hardware because we're gonna reuse it. So to get the top ones off, it's a little different. We're gonna use an 18-millimeter wrench and a 6-millimeter Allen key.At the end of the axle rake behind the brake rotor, you're gonna have a brake line bracket here. We're gonna use a 13-millimeter socket to take that bolt out. Next, what we're gonna do is disconnect the bottom of the shock. There's gonna be an 18-millimeter socket, 18-millimeter wrench. So the next thing we're gonna do is lower the axle down, that way we can get the springs out. And we're gonna lift them up off of the bottom perch and pull them out. Next, we're gonna install our rear coil spring spacers. So you're gonna have this washer nut plate, so this is actually gonna go on top of the rear spring perch. That's gonna sit right over top of that like that. Then we're gonna take our new 2-1/2-inch gold bolt and we're gonna put that up through our spring spacer, and then we're gonna screw it into that nut plate. So once that's in, we're gonna take a 3-1/4-inch wrench, 3-1/4-inch socket. We're gonna center it the best that we can and then we're gonna tighten it up.Next thing we're gonna do is take our factory spring, we're gonna place our isolator on top of it. So you're gonna have a little stop on there. You wanna make sure that that lines over that little pigtail there, then we're gonna put it back in the Jeep. After that, we're gonna set the bottom where it was in the factory position, then we'll put a little tension on it. You can do the same thing for the other side. So after we get an axle up in the air a little bit, we're gonna put our brake lines back on. We're gonna reinstall those factory bolts and use a 13-millimeter on an extension to tighten them back up. So next, we're gonna install our bump stops on the rear. We're gonna have two holes in the bottom of this block. We're gonna use a small little gold hardware that they give us. So you have these little tiny gold bolts. Each one is going to get a nut and a flat washer. So we're gonna place these over these pads on the axle and we're gonna put the flat washer on the little gold bolt, drop that down through, and then we're gonna install the nut on the bottom. Get both of those in and then we'll tighten them up with two 9/16 wrenches.Next, we're gonna reinstall our shock relocation bracket. So this is gonna have a little bit of an offset. We wanna face that towards the rear. This is going to slide over the bracket and the same thing as the fronts, we're gonna have this sleeve that goes inside of here. So we're gonna place this sleeve in here, insert our factory bolt all the way through, out the other side, put that factory nut back on. And now for this lower hole, we're gonna have a rather large short bolt. This is gonna get a flat washer on it, and it's gonna come up through the bottom and get this large nylon locknut. So the first thing we're gonna do is tighten this bottom one. So we're gonna use a 3-1/4-inch wrench and socket to tighten up this lower bolt. After that, we're gonna tighten our factory bolt with an 18-millimeter wrench and socket. So we're gonna take the supplied hardware that they give us, place a flat washer on there, and then we're gonna use one of these flange nuts. So we need to pull down onto the shock to line that hole up, then we can get that bolt through.After you get that installed, we're gonna use a 19-millimeter socket for the bolt and an 18-millimeter for the nut. So after that, we're gonna install our brand new end links. We're gonna use our factory hardware for the bottom and the supplied hardware for the top. So we're gonna start with the bottom. Drop our link down, install our bolt, put the nut on, and then we'll get the top installed. So we're gonna take our 12-millimeter by 65-millimeter bolt. We're gonna place a flat washer on the head and then we are going to slide this through, through our sway bar, and then install our flange nut. So to tighten it up, we're gonna use a 19-millimeter socket for the bolt head and an 18-millimeter socket for the flange nut. Then to tighten the bottom, we're gonna use an 18-millimeter socket, 18-millimeter wrench. So just like the front, you can wait till you get this thing on the ground, get that track bar bolt back in, or you can do it with a ratchet strap. We're gonna do it with a ratchet strap. So you wanna find a good spot to hook on into the frame.Now, this track bar seems to be pretty close unlike the front, so we shouldn't have to move it too much. So we'll reinstall that factory bolt, put the flange nut on the backside, and then we can tighten it up with a 21-millimeter. So at this point in time, we are all done with the installation of this lift kit. You can go ahead and put your wheels and tires back on, torque them down to factory specs. After that, you wanna get an alignment. When you get an alignment, have them recheck all of the fasteners.However, that's gonna wrap up my review and install. For more videos like this, check us out are extremeterrain.com.

      Product Information

      Features, Description, Reviews, Q&A, Specs & Installation

      Features & Specs

      • 2.50-Inch Suspension Lift Kit
      • Includes Shock Extensions
      • Quality Sway Bar End Links & Bump Stops
      • Front and Rear Coil Spring Spacers
      • Front and Rear Shock Relocation Brackets
      • Accommodates up to 35 Inch Tires
      • Aggressive Look/Commanding Stance
      • Stellar Performance On and Off-Road
      • Increases Ground Clearance
      • Great Handling and Smoother Ride Quality
      • Easy Bolt-On Installation
      • Limited Lifetime Warranty
      • Fits All 2018-2023 Jeep Wrangler JL Models

      Description

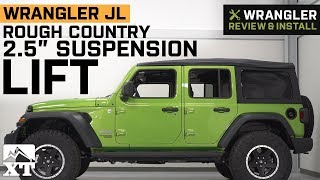
      High Impact. Are you looking for a suspension lift kit that will give your Wrangler JL a commanding stance? Then look no further than the Rough Country 2.50 inch Suspension Lift Kit. This kit has all the elements to enhance your off-road performance including increased ground clearance. With 2.50 inches of extra height, this lift kit delivers an aggressive look as well as ride.

      Smoother Ride. The Rough Country 2.50 inch Suspension Lift Kit is guaranteed to deliver a stellar performance on and off-ride. Featuring durable shock extensions built specifically to provide a smoother ride, these extensions are engineered to strategically absorb trail impact.

      Better Handling. This suspension lift kit comes with front and rear coil spring spacers. Engineered for durability and performance, these coil spring spacers allow 2.5 inches of extra lift, which helps your Jeep accommodate up to 35 inch tires.

      Quality Built. Crafted from premium, durable materials, every component in this kit is built for longevity. From the quality-built sway bar end links, to the sturdy bump stops, you won’t be disappointed in the handling and ride quality this lift kit provides.

      Installation. This easy, bolt-on install can be completed with common garage tools in approximately 3 hours or less. Don’t forget to check the double clearance of front, lower control arm and sway-bar links if you choose to utilize 35 inch tires on factory wheels.

      Warranty. Any defect found in the materials or craftsmanship will be covered in full with Rough Country’s Limited Lifetime Warranty.

      Application. The Rough Country 2.50 inch Suspension Lift Kit will accommodate all 2018-2023 Jeep Wrangler JL models.

      Fitment:

      Details

      Rough Country 67700

      CA Residents: WARNING: Cancer and Reproductive Harm - www.P65Warnings.ca.gov

      Installation & What's in the Box

      Installation Info

      What's in the Box

      • (1) Pair of Front & Rear Coil Spacers
      • (1) Pair of Sway Bar End Links
      • (1) Pair of Shock Relocation Brackets
      • (1) Pair of Bump Stops
      • Installation Hardware
      4.7

      Customer Reviews (500+)

        Questions & Answers

        10 More Questions

        Will It Fit My Wrangler

        • jl Rubicon 2 Door - 18, 19, 20, 21, 22, 23, 24
        • jl Rubicon 4 Door - 18, 19, 20, 21, 22, 23, 24
        • jl Rubicon 4xe 4 Door - 21, 23, 24
        • jl Wrangler 2 Door - 18, 19, 20, 21, 22, 23, 24
        • jl Wrangler 4 Door - 18, 19, 20, 21, 22, 23, 24
        • jl Wrangler 4xe 4 Door - 21, 22, 23, 24