Installation Time
(approx) 2 Hours
Difficulty Level:
Light to Moderate mechanical skill required.
Installation Guides
FREE 2 or 3-Day Delivery on 10,000+ Items. Details
$176.95 (kit)
FREE Shipping Market Price $202.99 You Save 13% ($26.04)Saved - View your saved items
We're sorry. We couldn't save this product at this time.
or use
Merideth: If you're looking for an easier way to get 30% more articulation off-road for your 2018 or newer JL Wrangler with 2.5 to 6 inches of Lift, these JKS Quicker Sway Bar Disconnects will be a great addition to your build. Now, whenever you're going off-road, there are a couple of things that you have to take care of at the trailhead, and one of those things is disconnecting your front sway bar end links.Now, if you don't have a quick disconnect system, you'll need tools to disconnect them, which can be a hassle, and a place to store them, so they're not interfering with the rest of your suspension. Now, this kit by JKS will take care of both of those problems with easily being removable with no tools at all, taking you less than one minute to disconnect your sway bar and brackets to hold them up and out of the way, making your life a whole lot easier.Now, these will be incredibly durable with stainless steel tapered mounting points, and will also include self-aligned spherical bushings to allow for the right movement when they're connected. This kit will also include Zerk fittings on the front that are easily accessible and will keep them working properly for years to come, while also coming with a cover that's attached to each of the Zerk fittings, keeping any contaminants that you may come in contact with out of the fitting itself.Now, each sway bar is also fully adjustable, so you can fine-tune this to your setup between that 2.5-inch to 6-inch range. Now, the kit will also feature a mounting post for the top of the spring bucket, as well as the axle. So, you can easily slide the link off into the other post, while securing it with the included pin. Now, I think it is notable compared to other options that the pin is spring loaded, and it's just gonna act as some extra security, or extra insurance that it's not going anywhere.Now, these will be more of a premium choice when it comes to quick disconnects at roughly $250. Now, comparing this to others on the page, these will be fully adjustable. The ability to maintenance them is there, and the small pin is going to be super helpful when it comes to the security of the link no matter where it's mounted. Now, other choices may be pre-set to a certain lift size, compared to these that have a pretty large range. Some may include a different style joint, or even a Heim joint, or use different components to attach the links. Now, I think if you want a quality system that includes all of the bells and whistles that you may need for your rig, then this is gonna be a great choice.Now, install on this will require a little bit of cutting, so, I am gonna give this a light two out of three wrenches on the difficulty meter, taking you about two hours to get the job done with the right-hand tools. Now, speaking of the install, one of our customers here has installed this on their JL and is gonna walk you through that process step by step. So, that's gonna wrap it up for me. Let's get into the install.Sara: Hi, I'm Sara from Ladies Rock Off-Road Club, and I'm going to install my JKS Quick Disconnects on my 2019 JLU Sahara that's been lifted 2.5 inches. The tools that we're gonna be using is a angle grinder, a electric ratchet with a 18-millimeter socket, an 18-millimeter open box, a small screwdriver, and an Allen wrench. First, we're gonna take the ratchet and the box end, and we're gonna take off the top bolt. First, we're gonna take off the top bolt, and this is a 19-millimeter ratchet.Now, we're gonna take off the lower bolts, and I'm using an 18-millimeter socket and wrench. And now, we're gonna take off the bottom bolt. Okay. Now, we're gonna cut off the tab. And we need to cut off this tab, so the quick connect bolt will fit in here. So, I'm gonna draw my line from where the crease is, like so. And I'm gonna cut it up.So, I filed off the burrs and the rough edges. I took a piece of cardboard, cut it down the middle, placed it around the tab, and now I'm just gonna spray-paint it black to prevent some rust. Just like so. All right. The tab has been cut off, so later on I'm gonna be able to take the bottom bolt and stick it in here without the tab being in the way.Now, we're gonna install the lower disconnect bolt on the driver's side. So, I'm sticking it in there, put the screw and the bolt on, and then I will put the screwdriver in here to hold it still while I use this to tighten it. So, to ensure that both quick disconnects are the exact same length, I used this as the template to measure where it's at. This is the one I measured, same exact length, tighten it up. And I did this before greasing to have a little less mess. So next, we're going to grease the disconnect. So, I'm taking off the thread protectors. So, now we're gonna grease the quick disconnects. So, I attach this. Oh, yep, now it's coming out. We can see it right there, plenty. So, I take it off. I'll move it around.Man: You can spin the whole frame.Sara: Now, we're gonna attach the first disconnect. So, I'm gonna take my upper bolt with the washer, add the spacer, gonna put it in, and then these will go on the other side. Washer and nut. So, before tightening the top, I'm gonna add a spacer to the bottom. I'm gonna attach the bottom of the quick disconnect. I'm gonna attach or insert the pin. Now, I'm gonna tighten. Now, I'm gonna tighten up the bolt on the disconnect.So, now I'm gonna insert the smaller pin on the passenger side attaching it to the inside. Notice that the holes are parallel to the ground, so they're horizontal. I will tighten it from the inside. Okay. So, on the passenger side, I have put the disconnect on the bottom pin, then I put the bolt, the washer, the disconnect, the spacer. And now, I'm gonna put a washer and a nut on the other side, and tighten it up.Now, I'm gonna install the retention bracket on the shock tower. So, I have the bolt and a washer, the bracket into the hole that's already there on the shock tower. Then I add a washer and the other bolt.Man: Nut.Sara: Nut. Here we go. Now, we'll tighten it up.Merideth: So, that's gonna wrap it up for my review and the install of the JKS Quicker Sway Bar Disconnect Kit, fitting all 2018 and newer JL Wranglers with 2.5 Inches to 6 Inches of Lift. For more videos and products just like this, remember to always keep it right here at extremeterrain.com.
Subscribe to our YouTube Channel
Features, Description, Reviews, Q&A, Specs & Installation
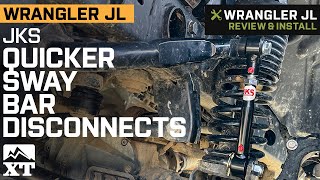
Unlocks the Jeep’s True Off-Roading Potential. Release your Jeep Wrangler JL’s sway bar with JKS’s Quicker Sway Bar Disconnects for 2.50-6-Inch Lift and have an easier time conquering the most challenging off-road terrains. With these aftermarket upgrades, you’ll gain 30% more axle articulation, improving your vehicle’s overall off-roading capabilities as a result.
Boasts a Superior Sway Bar Disconnect Build. These disconnects boast a high-strength construction and are designed with stainless steel tapered mounting posts, self-align spherical bushings, and grease fittings. They’re also made to easily adapt to your Jeep’s current and future modifications. Thanks to their remarkable build, they can keep up with your extreme off-roading lifestyle.
Straightforward Installation. Installing these Sway Bar Disconnects will take no more than 2 hours. These Sway Bar Disconnects do require some cutting a lower bracket for proper installation.
Comes With a Lifetime Limited Warranty. A lifetime limited warranty is included with every Quicker Sway Bar Disconnects set sold. For more details about the warranty’s terms and conditions, please visit JKS' website.
Application. JKS Quicker Sway Bar Disconnects for 2.50-6-Inch Lift fit all 2018-2023 Jeep Wrangler JL models.
Fitment:
JKS Manufacturing JKS2033
CA Residents: WARNING: Cancer and Reproductive Harm - www.P65Warnings.ca.gov
Installation Info
Installation Time
(approx) 2 Hours
Difficulty Level:
Light to Moderate mechanical skill required.
Installation Guides
What's in the Box
10 More Questions