FREE 2 or 3-Day Delivery on Orders $119+ Details

Talk to a Tacoma Enthusiast
1-877-870-8556
M-F 8:30A-11P, Sat-Sun 8:30A-9P
Logo Image
Win $3,000 in Store Credit! Enter Daily >

Putco Venture TEC Bed Rack (16-23 Tacoma)

Item TT6778
Call a Tacoma Enthusiast at 1-877-870-8556
M-F 8:30A-11P, Sat-Sun 8:30A-9P
$0.00
Our Price

$1,908.99 - $1,958.99

FREE Shipping + $40.00 Oversized Item Fee Market Price $2,175.99 You Save 12% ($267.00)

Will this fit your Vehicle?

Select a different vehicle Help?
Update or Change Vehicle
Ship to: Ashburn - 20149
Sorry, please enter a valid US or CA postal code
We're sorry, zip can't be updated at this time.
    Create a list
    Add to New List

    Saved - View your saved items

    We're sorry. We couldn't save this product at this time.

    or use

      Video Review & Installation

      Hey, guys. So, today we're checking out the Venture TEC Bed Rack, fitting all 2016 and newer Toyota Tacomas. So, if you are in search of some exterior storage for your truck and you're looking to take a bunch of things on your off-road adventures, or even your daily adventures, this is gonna be a great rack system to take a look into. Now, this is gonna offer a lot of space up on top, and even over on the sides, to carry any larger cargo that you don't want in your bed space or even in your cab area. Now, this is also going to allow all of your bed space to be utilized by other things that you're not carrying on the rack, really maximizing your storage. Now, what I really like about this system is this. This will be able to accept a number of different accessories, like a third brake light, different mounting systems for recovery tools, a recovery jack, and this will even accept a rooftop tank. Now, those items are sold separately. However, this is going to be the main rail system and the main frame that's going to accept those accessories.Now, with that being said, this is also going to be incredibly strong, made of a durable T6061 lightweight aluminum. So, this is going to be very lightweight and very easy to install, but it is going to be incredibly strong, able to hold up to 1,000 pounds. So again, if you are looking to mount up a rooftop tent, this is going to be a system that you will want to utilize. Now, with that being said, this is also going to have a nice textured black powder coat finish on top, really adding a utilitarian and off-road look to the back of your truck. Now, this is going to be one of the pricier choices when it comes to a bed rack, at roughly $1,400. Now, that is going to be based off a couple of different things. First off, this is going to be made of an aluminum material, again, so it will be lighter weight. It is going to be very strong. Some other options on the page that are a little bit less expensive are usually gonna be made of a steel material, as to, again, where this is made of aluminum.And then some other choices on the page are going to be a little bit more simplistic. They may not have an integrated rail system like this one does, so they may not be able to accept as many accessories. So, really, if you're looking to kind of customize the back of your truck, if you're really looking for a strong system that's able to carry a rooftop tent, or any larger cargo, that you need that extra load capacity, and you're also looking for something that's super sleek, I definitely think that this is a great choice. Now, when it comes to install, I'm gonna give this a one out of three wrenches on the difficulty meter. This is pretty easy to install. You can do it in your driveway in less than an hour, with some very basic hand tools. So, speaking of that install, let's jump into that now.The tools that I used for my install were an impact wrench, a 10-millimeter socket, a 4-millimeter Allen socket, a 7/32-inch Allen socket, the provided alignment tool, a 3/8-inch drive ratchet, and a dead blow. So, the first step of our install is to take off the end cap on our rail here. Now, that is going to allow us to slide in our brackets so we are able to mount up the front and the rear hoop of our bed rack. And we can also take out this bolt on the side. That is going to allow us to mount up the rear hoop of our bed rack as well.We're just going to pop off this end cap here, and we can take our provided brackets and slide those in. We're gonna need two up at the front and one at the back. And once those are on, we can pop our cap back into place. So, while we're over here, we're also going to remove this bolt that's directly in line with our rail there. I'm gonna use a 10-millimeter socket and my impact wrench to remove that. And we are gonna be reusing this. This is gonna be one of the mounting locations for the rear hoop. So, we're gonna just put that to the side, then we can repeat that process on the other side.So, what we can do at this point is mount up our front hoop. This is just gonna lay over the bed of the truck, and it's also gonna lay over this rail here. And then once it's aligned with the front of our bed, what we can do is align our brackets behind there, so we can mount up this part of the rack. So, now that the front hoop is on the truck, we can secure the front two bolts. This is going to be the larger Allen head bolt, and it's gonna go into that threaded nut plate that we put in the rail. You wanna make sure that they're in the general location, and kind of line them up beforehand. You also wanna make sure that that little lip is sitting on the rail, because this is kind of a short bolt, so you wanna make sure that it is in place before you go ahead and put it in. So, I'm gonna take the bolt and a 7/32-inch Allen socket, and I'm going to just carefully thread that into place. Now, you wanna make sure that these are loosely threaded, just because we will need to adjust this in the future. I'm just using a small pick to keep the back of the bracket still while I'm threading it in, and then we can do the same thing on the other bolt.So, once the bolts on this side are loosely installed, we can do the same thing on the other side and then head to the back hoop. After the front hoop is in place, we can install the rear hoop. Now, one of the mounting locations, it's going to be the larger one, is going to sit over the rail, and the smaller mounting location on this bracket on the rear hoop here is gonna be mounted up where we took out that bolt earlier. Now, just like the front one, this is just gonna sit over the bed. So, what we can do first is reinstall that 10-millimeter bolt. This is gonna go in the factory mounting location. You may have to give this a little press down, just because there is a trim piece here. Once you have that threaded in, we can take that 10-millimeter socket and tighten that up, then we can secure the front mount. Now, we can tighten this one up once the other side is installed. So, after we have everything threaded in on this side, we can repeat the same process on the other side and then come back and tighten it down with this 7/32-inch Allen socket.So, once the other side is threaded in, we can tighten down our front bolt with the 7/32-inch Allen socket. So, once that's tightened down, then we can start installing our side pieces. At this point, what we need to do is prepare our side support bars, as well as our upper support bars, to be installed on the front and rear hoop on our bed rack here. Now, we need to install our brackets, and we are provided with the CoreTEC block, really. This is going to slide into the bottom on each side of our support bar. Now, this is gonna have threaded holes on this side, as well as on the front. The side holes are going to allow it to stay into the support bar, and then the front holes are going to allow the bracket to be mounted up, so then we can mount it up on our bed rack there. So, I'm gonna start with our block here. We're gonna slide this into the end, and we are going to secure it down so we can mount up our bracket.Now, we need to align the holes on the side. We can take our provided hardware, it might be easier to grab the Allen socket that we used before, thread this into the side just like that. Same thing for the other side. And then we can mount up our bracket. So, I'm going to start with the side support bracket. This is going to be the bracket with the tab down at the bottom. You wanna make sure that the orientation of this is correct. So, once you have it in the correct orientation, we can align it up with our support bar. And we can do the same thing that we did with the side. We can just take our 7/32-inch Allen, and thread that into that bracket in there, or the block. Now, for the side pieces, you're going to have a passenger and a driver's side. You wanna make sure that this tab is on, or this side of the bracket is on the same side on the other side of the support bar.So, once you have the four bolts threaded into the end of your support bar, what you wanna do is just take that same 7/32-inch Allen and a ratchet or an impact. I recommend a ratchet, just because these are Allen head bolts, they do strip pretty easily, and we can just tighten them up. Then we can repeat that for the other support bars, and the other side of this support bar. So, just like the side support bars, we're going to put in the same CoreTEC block, and secure it down how we did with that Allen socket. You could also use an Allen key for this. Just depends on what you have on hand. And then once that is in and tightened down, what we need to do is install our bracket. So, this is going to have these two tabs facing outward. And this flat surface up here, that's going to sit on top of the front and the rear hoop, that is going to be up at the top. So, just like we did with the other one, we're gonna thread same hardware into the CoreTEC block.Give them a good tighten with your ratchet. And then we can do the same thing on the other side of this support bar, as well as our last support bar. So, if you're having trouble fitting these in, sometimes they slide in, sometimes they don't want to at first, you could just take a small dead blow, and just give it a good tap. So, our next step is to install the captured nuts onto the front and the rear hoop. Now, there is going to be a break in this channel here where we can install them. We're gonna put four on either side for the side channels, and then we're going to place four up top on either side for the top support bars. So, these are just going to slide in here, or place in here just like this. So, once we have four on each of the tracks on either side of our rear hoop, we can do the same thing with the front hoop. So, what we can do at this point is line up our top support bar. So, this is gonna have to be installed sideways, and then you're just gonna have to slip it into place.Now, lining this up where you want this to sit on top of your bed rack is gonna depend on your personal preference. So, once the captured nuts inside of the rails are lining up with the bracket on your top support bar, we can grab the provided hardware, which is the smaller Allen bolt, and then we can thread that in, and I'm using a 4-millimeter Allen socket in order to thread that into place. Then we can do the same thing for the back mount, and then we can tighten these up. So next, we can just tighten these up using that 4-millimeter Allen socket and a ratchet. Then we can tighten up the other side of this support bar, and then repeat that for the other upper support bar. So, our next step is to install our side support bar. Now, because of those tabs, this is going to sit right in place just like that. And then we can line up our captured hardware, and we can line it up with the bolts, with our provided alignment tool here. So, what we can do is take one of the captured nuts there, then we can take our alignment tool with the longer side, and push that up into place. Once that's in place, we can just do the same thing that we did up on the top. Take our smaller hardware, with that 4-millimeter Allen, and we can thread that in.Now, with the smaller one, we can use the longer side or we can use the shorter side. Essentially, we just have to push that up into place, and then thread it in. Then we can do the same thing for these two. We can tighten them up with that same 4-millimeter Allen, and then we can repeat that for the other side of this support bar. Then we can repeat that for the other side. So, our last step is just to tighten down these two bolts at the front that we installed at the beginning. So, I'm gonna use that 7/32-inch Allen in my impact, and we can tighten those up.That's gonna wrap it up for my review and install. Make sure you like and subscribe for more videos and products just like this. And always keep it right here at extremeterrain.com.

      Product Information

      Features, Description, Q&A, Specs & Installation

      Features & Specs

      • Venture TEC Bed Rack
      • Improves the Truck’s Utility
      • 6061 T6 Aluminum Construction
      • Durable Black Finish
      • Easy, No-Drill Installation
      • Accessories Sold Separately
      • Made in the USA
      • Fits 2016-2023 Toyota Tacoma Models

      Description

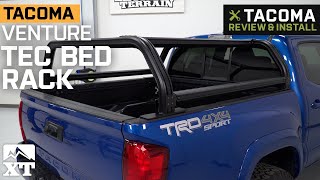
      Extra Utility. With this Venture TEC Bed Rack is designed to accept a variety of accessories, boosting your Tacoma’s utility.The rack’s robust construction also helps give your vehicle a more aggressive appearance.

      Impressive Aluminum Build.
      Made from 6061 T6 aluminum, the Venture TEC Bed Rack has the strength to withstand whatever the harshest driving environments throw at it. What’s more, it comes completed in a high-impact, black powder coated finish, to further improve its durability, as well as its rust and corrosion resistance.

      Simple, Bolt-On Installation. There won’t be any drilling necessary when it comes to installing this bed rack. All of the necessary hardware is also provided with every Venture TEC Bed Rack sold. As a result, anyone with light mechanical expertise and basic garage tools can mount this product with ease.

      Application. This Venture TEC Bed Rack fits 2016-2023 Toyota Tacoma models.

      Fitment:

      Details

      Putco 184400

      184410

      CA Residents: WARNING: Cancer and Reproductive Harm - www.P65Warnings.ca.gov

      Installation & What's in the Box

      Installation Info

      What's in the Box

      • (1) Bed Rack Assembly
      • Mounting Hardware
      4.5

      Reviews of Putco Exterior Products (74)

      Brand Image

      Reviews of Putco Exterior products have an average rating of 4.5 out of 5

        Questions & Answers

        10 More Questions

        Will It Fit My Tacoma

        • 2.7L I4 - 16, 17, 18, 19, 20, 21, 22, 23
        • 3.5L V6 - 16, 17, 18, 19, 20, 21, 22, 23