Installation Time
(approx) 1 Hour
Difficulty Level:
Simple installation for anyone.
FREE 2 or 3-Day Delivery on Orders $119+ Details
$339.99 (pair)
FREE Shipping Market Price $373.99 You Save 9% ($34.00)Add Local Shop Installation
Saved - View your saved items
We're sorry. We couldn't save this product at this time.
or use
Hey guys, it's Sara with extremeterrain.com. And today, we have a review and install of the PRO-Series LED Tail Lights with Jet Black Housings and Smoked Lenses, fitting your 05' to 15' Toyota Tacomas. These are perfect for the Tacoma owner who wants an LED tail light and wants a style upgrade as well with their black housings and smoked lenses, and also a very simple plug-and-play install.These tail lights provide better visibility, thanks to their LEDs. And because they are an LED, will outlast the life of your factory halogen bulbs. They are constructed from durable smoked lenses with polycarbonate black housings and are DOT and SAE approved, meaning they're legal for on-road use. They feature LED running lights, brake lights, and turn signals, and reuse your factory reverse bulb for ease of install. And, as far as price goes, these tail lights come in at around $325 for the pair, putting them about middle of the road price-wise when compared to other options. And for your money, you are getting an LED tail light with smoked styling and a very simple plug-and-play install. And speaking of the install, I'm giving this one a one out of three wrenches on the difficulty meter. It does feature a direct bolt-up and plug-and-play install that can be done in under an hour. So, with that said, let's check out that install.For this install, we use an impact gun, but a regular hand ratchet will work just fine. You'll also need a 10-millimeter socket, and you may want a pair of needle-nose pliers. Alright, so the first step in our uninstall is to remove the two bolts on the inside of your tail light. Grab a 10-millimeter socket and let's get these removed. Now, the one you wanna remove is at the very, very bottom. There's a few bolts so make sure you're pulling out the proper one. Go ahead and grab that 10-millimeter socket and get it removed. Now that you have both bolts removed, go ahead and grab your tail light and pull it straight back towards you to release it. Once you have that off, we can start to remove each of these connectors. For now, we'll be removing this main connector. Just go ahead and press down on the gray tab and remove it.All right. And now that we have our factory tail light uninstalled from our truck, we can check it out side-by-side with our new tail light here. Now the biggest difference in these tail lights is the design. This new tail light features a more blacked-out look with that smoked lens to give the rear of your truck a more modern look. In addition, it also features LED running lights as well as turn signals, which is a nice upgrade from the factory. So with that said, go ahead and repeat all of those steps to install your driver-side tail light. And before we can get our new tail light installed, we need to transfer over this wiring harness from your previous tail light.We're gonna start by removing this main connector from its housing. And to do that, we're just gonna squeeze on the backside here, and pop it through. From there, we're gonna twist and remove each of these sockets. Just grab them and twist counterclockwise to remove them. We're gonna leave the bulb in the bottom one here. Twist and remove the middle one. Disconnect it. Twist and remove the top one and remove this amber bowl. Now, we can transfer over the harness to the new tail light. Connect each of these connectors. And it doesn't hurt to just double-check that you have the power going to your power wire and the ground lined up with the ground.Same thing for the middle one. There are several wires, but just make sure your ground is on the bottom, which it is on the backside here as well. Twist that one in place. And then the bottom one, this one just twists in place in the housing. You'll notice there're small tabs on each one. Go ahead and line that up and twist it in. Now we can get this installed. And now that you have that wiring harness transferred over, we can plug it back in on our truck. Kind of route the wiring inside there. If you're thinking you need to, go ahead and throw a zip tie on it just to keep it in place. Line up the two metal tabs at the back of your tail light and press it in place. And now that your new tail light is in place, go ahead and thread in your factory hardware. And with your 10-millimeter socket, tighten it down.That is gonna do it for the review and install of these tail lights. And remember, for all things Tacoma, keep it right here at extremeterrain.com.
Subscribe to our YouTube Channel
Features, Description, Reviews, Q&A, Specs & Installation
Tail Lights Style | Custom Style |
Tail Light Type | LED |
Tail Light Lens Color | Clear |
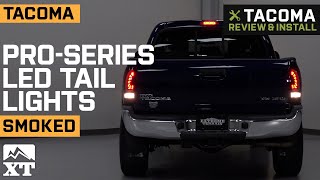
Upgrade Your Tail Lights. Improve your off-roader’s rear-end visibility and looks with these PRO-Series LED Tail Lights. These tail lights get their lighting from ultra-bright LED bulbs that are way efficient than halogen types. This offers increased brightness to boost visibility at your rear-end. Likewise, these tail lights give your tail area a more dynamic look that’s sure to get you noticed.
Better Build Quality. These tail lights feature lenses manufactured from high-grade acrylic that’s designed to be highly resistant to deterioration. This ensures the lenses remain clear through many miles of driving. Furthermore, these lenses are completely sealed to the sturdy polycarbonate housing to deliver an all-weather performance.
Installation. No modifications are needed as these assemblies are designed to affect an OE-style fit. These tail lights mount into the pre-existing tail light locations of your truck. What’s more, these lights include factory-style harnesses, making the installation an essentially plug-and-play procedure.
Application. These PRO-Series LED Tail Lights; Jet Black fits all 2005-2015 Tacoma models.
Fitment:
CA Residents: WARNING: Cancer and Reproductive Harm - www.P65Warnings.ca.gov
Installation Info
Installation Time
(approx) 1 Hour
Difficulty Level:
Simple installation for anyone.
What's in the Box
10 More Questions