FREE 2 or 3-Day Delivery on 10,000+ Items. Details

Talk to a Tacoma Enthusiast
1-877-870-8556
M-F 8:30A-11P, Sat-Sun 8:30A-9P
Logo Image
$12k Summer Sweepstakes! Enter Daily >

JDM Style Headlights; Chrome Housing; Clear Lens (12-15 Tacoma)

Item TT7978
Call a Tacoma Enthusiast at 1-877-870-8556
M-F 8:30A-11P, Sat-Sun 8:30A-9P
$0.00
Our Price

$214.99 (pair)

FREE Shipping Market Price $233.99 You Save 8% ($19.00)

Will this fit your Vehicle?

Select a different vehicle Help?
Update or Change Vehicle
Ship to: Ashburn - 20149
Sorry, please enter a valid US or CA postal code
We're sorry, zip can't be updated at this time.
    Create a list
    Add to New List

    Saved - View your saved items

    We're sorry. We couldn't save this product at this time.

    or use

      Video Review & Installation

      Merideth: If you need an update to the headlights on your 2012 to 2015 Toyota Tacoma, these JDM Style Headlights with the Chrome Housing and the Clear Lens will be a great pick. Now, these will add an incredibly clean appearance to the front end, switching it up from most of the smoked or blacked options with a clear and fully chrome design, which will be right up your alley if you like that classic and more chrome appearance. Now, this set will also up your street appeal with the uniform design if your headlights have seen better days, whether they're fogged or you just need a set of housings to refresh while also getting some better lighting performance in the meantime.These will feature a simple and to-the-point design, as you can see here on the table, with a high and low beam in the factory location, but these are going to feature an improved chrome reflector for better lighting performance at night. Now, these will also feature a clear corner marker light, as well as the inner turn signal housing for more of a uniform appearance, again, for that classic and clean aesthetic.When it comes to the construction, these will be made of a durable plastic as far as the housing is concerned and hold up very well and mimic a factory-like build and fit. Now, the lens will be tough, made of a polycarbonate material, able to stand up to any street kickup while being fully transparent to offer the best lighting performance possible. Now, I would keep in mind that this kit here is just for the housing. You will be swapping over your factory bulbs, so you don't have to worry about outsourcing for new bulbs. Not to mention, this entire kit is DOT and SAE-approved, so you can keep some peace of mind there.Now, these will come in at roughly $250, putting these at a pretty affordable price point. Now, this set will be more on the affordable side because of what's included compared to other more expensive choices that usually will include the bulbs, a daytime running light possibly, or a full LED construction. Now, I think if you don't necessarily need all the bells and whistles, you're just looking for a refresh to the housing of your factory headlights and you want that classic uniform appearance while getting some improved lighting performance out of the front end of your Tacoma, then these are a great set to choose.Install will be a light two out of three wrenches on the difficulty meter, taking you about an hour to get the job done. Now, at this point, we can head over to the shop and check out a detailed breakdown of the install and what it looks like step-by-step. So, that's gonna wrap it up for me. Let's go ahead and jump into it.Man: Tools required for this install include an impact gun, an electric ratchet, a hand ratchet, a clip remover tool, a flathead screwdriver, a panel remover tool, a shallow and deep 10-millimeter socket, and some microfiber towels. What's up, guys? Today, we're installing a set of headlights on our Tacoma. First, we're gonna watch a quick video on how to uninstall our factory headlights, and then I'll meet you right back here for the install.Woman: All right. So, the first step in our install, we're gonna remove several pop clips on each side of the grille to remove the grille itself. With a pop clip removal tool or a trim panel removal tool, go ahead and remove the pop clip. Remove the pop clip on the other side as well. At this point, you can remove two 10-millimeter bolts holding on the top of your grille. At this point, we can remove our grille, pull up on the plastic brackets on top, and then grab your grille and pull straight forward to release all the clips.All right. So, at this point, we're gonna remove the trim piece beneath the headlight. In order to do this, we're gonna grab a trim panel removal tool. And if you're worried about scratching your paint, you can throw a bit of painter's tape on the end here. To release the tab, go on the top here. You're gonna look for a green pop clip. If you press on the back of the pop clip, it will release the tab. To release the back of this trim piece, put your pop clip in the end and twist forward because the clip goes in this direction.At this point, you can remove the two 10-millimeter bolts holding on the top of your headlight. All right. So, there is one more bolt that we do have to remove, which is a bit hard to get to. It's right about here on the bottom of your headlight. And the way we're going to access this is remove two bolts underneath the wheel well liner and one screw in the side of it. With a 10-millimeter socket, remove the two bolts underneath your bumper. At this point, we're also gonna remove a pop clip with a stubby flathead screwdriver. Twist it to remove. With that clip removed, peel back your wheel well liner. And now you should be able to access the bolt by going in through here to the back of the headlight.All right. Now at the wheel well liner back, you can see this bolt. You might have a little trouble seeing it on camera here, but you can feel the one that you have to remove. We're gonna grab a 10-millimeter socket and a ratchet, and we're gonna go ahead and get it out. With all the bolts removed, we're now gonna release this tab here. You can do this by hand or if you like, you can do it with a flathead screwdriver and you're just gonna pry forward. Release the two tabs at the top as well. Again, you can just lift up, or if you have a flathead, just pry it off.Now that the headlight is released and loose on your truck, we're gonna disconnect each of the connectors at this point. Go ahead and pull each of them off. There should be three, one main and then two marker lights. And there's one a little bit farther forward up here. Now that everything is released and your headlight is disconnected, it's a matter of wiggling the headlight and maneuvering it in just the right way for it to come out.Man: Now, before we install our new headlights onto the truck, we're gonna have to transfer over our bulbs from our factory headlight to our new one. Now, our turn signal bulb and our side marker bulb will both turn to the left to unlock it. We'll transfer it over, turn it to the right to lock it into place. Our headlight bulb, we have a little clip that we're gonna have to remove to transfer that one over. So, now we'll start with our turn signal light. We'll twist that to the left and then wiggle it out of place. And then we can press it into our new housing, twist it to the right to lock that into place. Now we'll do the same thing for our side marker. Lock that in place.Now for our headlight bulb, we'll pop off our cover. Now on this tab here, we're gonna push down and pull to release our clip. And then we can transfer our bulb over and we'll just do that same thing in reverse. And then we can pop our cover back on and get that middle section seated around our bulb. And then we can repeat the same process for our other headlight and get this installed on the truck.So, now we're ready to install our new headlight onto the truck. Before we do that, it's important to note that we have a bolt coming through this piece of metal right here. That's gonna go into this U-clip. It's gonna be very hard to see on camera once we have our headlight in place. So, we'll just call that out now so we know where that goes. And now we can start plugging in our harnesses. We're gonna do our side marker light and our headlight first because our turn signal harness is a little bit shorter and it'll get us caught up trying to angle it back in.And now with these two connections plugged in, we can get our headlight installed. And now with our headlight installed, we can go back and plug in our turn signal harness. Next, we can come back up to the top and reinstall our two factory 10-millimeter bolts. And we'll tighten those down with a 10-millimeter socket.So, now comes the part that we called out earlier where we're gonna have to get our bolt through that hole in our metal and into that U-clip in our headlight. Now, once again, this is gonna be impossible to see on camera once we have this headlight in here, but we're gonna go through the fender liner with our factory bolt, get it threaded in. You're probably gonna have to do it by feel. And then I've got 1/4-inch drive ratchet with a shallow 10-millimeter socket so that we have the room we need to get in there to tighten it down.So, now we can reinstall our 10-millimeter bolt. And then once we have that hand-threaded in there, we can come back with our ratchet. So, now we can come back down into our wheel well to reinstall our bolt in our fender liner. And then we'll tighten that down using a 10-millimeter socket. Now we can come back underneath our bumper to reinstall our two 10-millimeter bolts. And then once again, we'll grab our 10-millimeter socket to tighten these down.Now we can reinstall our lower headlight trim piece. So, we have this little notch that's gonna slide into our groove here, and then we'll just push our clip into place. Now, at this point, we can repeat that same process on the other side and get ready to install our grille.Now we're ready to reinstall our grille. So, we'll slide it into place and then lock our two brackets into our white tabs. So, now coming to the top of our grille, we can reinstall our two push clips as well as our two bolts. And then we can just grab our 10-millimeter socket to tighten down our two bolts.So, that'll wrap up this review and install of the JDM Style Headlights with Chrome Housing and Clear Lens for your 2012 to 2015 Tacoma. Thank you for watching. And for all things Tacoma, keep it right here at extremeterrain.com.

      Product Information

      Features, Description, Reviews, Q&A, Specs & Installation

      Features & Specs

      • JDM Style Headlights
      • Superb Brightness for Improved Visibility
      • Bulbs Not Included
      • Clear Polycarbonate Lenses with Chrome Housings
      • Complies with the DOT Requirements
      • Quick and Simple to Set Up
      • Sold as a Pair, Driver and Passenger Side Included
      • Fits All 2012-2015 Toyota Tacoma Models

      Description

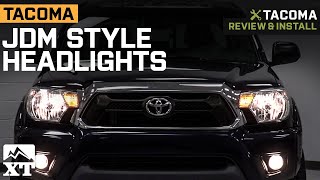
      Remarkable Appeal and Performance. Make your Toyota Tacoma look more impressive with these Chrome JDM Style Headlights. These direct-fit replacement headlights are designed to significantly improve your truck’s lighting capability with their advanced design and performance. With these headlights, your truck becomes an even more capable and formidable-looking nighttime driving machine.

      Impressive Lighting Capability. These headlights seamlessly work with your Toyota Tacoma’s factory low and high beam lights. They have been specially engineered to allow your lights to emit sharper light beams for improved visibility.

      Built to be Tough. Designed to be as durable as your Toyota Tacoma, these headlights come with heavy-duty chrome housings and high-quality polycarbonate lenses to guarantee lasting life and performance, even after repeated use in aggressive driving conditions.

      Straightforward Installation. These headlights come with an OE design. This allows you to replace your truck’s factory headlights with these without the need for special modifications.

      Completely Street Legal. These headlights are street legal. They meet the strict guidelines set forth by the U.S. Department of Transportation (DOT) so you can use them with confidence in their quality and reliability.

      Application. This pair of Chrome JDM Style Headlights is designed for all 2012-2015 Toyota Tacoma pickup trucks.

      Re-Uses Factory Lights. Bulbs are not included in these headlights. They have been designed to re-use your truck’s factory headlight bulbs.

      Please Note. AmericanTrucks recommends sealing these headlights with silicone RTV sealant before installing to ensure protection from damage that results from internal moisture condensation.

      Fitment:

      CA Residents: WARNING: Cancer and Reproductive Harm - www.P65Warnings.ca.gov

      Installation & What's in the Box

      Installation Info

      What's in the Box

      • (1) Driver Side Headlight
      • (1) Passenger Side Headlight
      4.9

      Customer Reviews (20)

        Questions & Answers

        10 More Questions