 FREE 1 to 3-Day Delivery on Orders $149+ Details

How To Install a Superchips Flashpaq F5 Programmer on your 2015-2016 Jeep Wrangler JK

Shop Parts in this Guide
STOP
If you plan on tuning your Jeep, please review the contents of this Guide and follow its instructions before connecting your device.
Saving Stock Files
The first thing you need to do is properly save your stock files to the Flashpaq. Please follow these instructions:
STEP 1
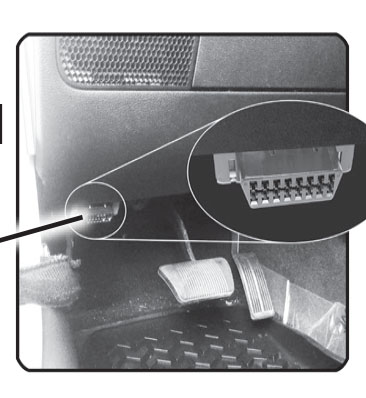
Remove the Flashpaq from its box, and plug the Flashpaq into the vehicle’s OBDII Port located below the driver side dash console.
STEP 2
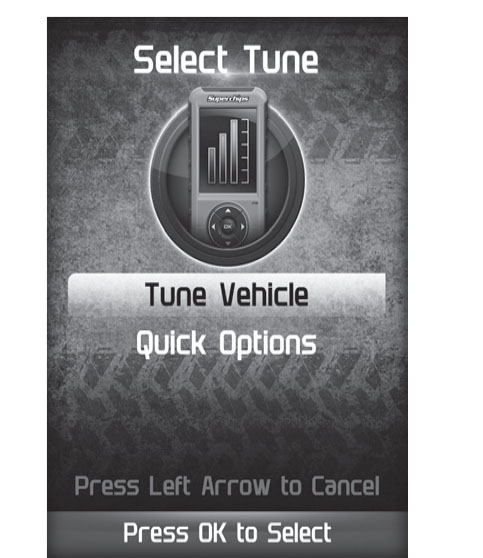
Use the UP/DOWN arrow buttons to highlight the TUNE VEHICLE option. Press the OK button to select it.
STEP 3
Follow the on-screen instructions.
NOTE: During the saving process, you will see your dash lights ashing. This is normal.
Once the stock file has been saved, the Flashpaq will inform you that your vehicle requires an un-lock to continue with the tuning process.
STEP 4
Unplug the Flashpaq from the OBDII port.
STEP 5
Continue to the Downloading Ignition section of this guide.
Downloading Ignition
In order to un-lock the Flashpaq for tuning, the device will need to be updated using the Ignition Update Software.

STEP 1
Using a windows based computer go to www.superchips.com
STEP 2
Select the UPDATES tab located at the top of the page.
STEP 3
Click the Download button.
STEP 4
Click the Run button on the pop-up menu.
STEP 5
Read and click the box to accept the license agreement terms.
STEP 6
Click the Install Button. Ignition will begin to download.
STEP 7
Then the Finish button once the download is complete.
STEP 8
Refer to the next section to unlock the device.
Connecting with Ignition
STEP 1
Double-click the Ignition Icon located on your desktop.
STEP 2
Fill out the registration information, then click Submit.
STEP 3
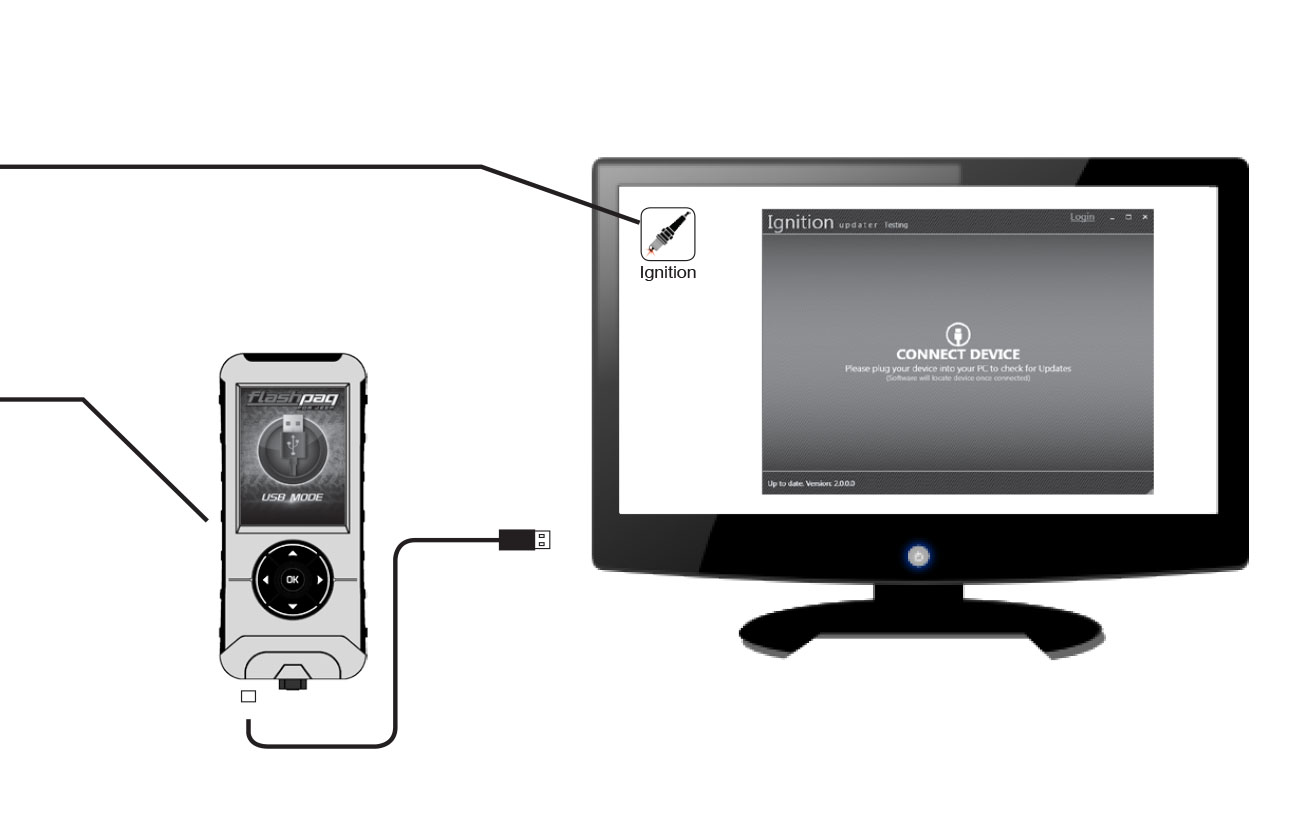
Connect your device to the computer via the USB cable. Ignition will automatically search for updates related to your device.
CAUTION: Do not unplug the USB while the device is being updated. Once the update is complete, you will be informed that it is safe to disconnect.
STEP 4
Click the Update button on the Ignition software. The update process will start and nish automatically.
STEP 5
Contact our Technical Support team and let them know that you have saved stock and updated the device in Ignition. They will then evaluate the information given and walk you through the “ECM Swap”. (see following section)
Superchips Technical Support
Toll Free: 888-227-2447 Monday-Friday_8:00am - 8:00pm EST
Removing the Stock ECM
STEP 1
Make sure the Key is in the OFF position.
STEP 2
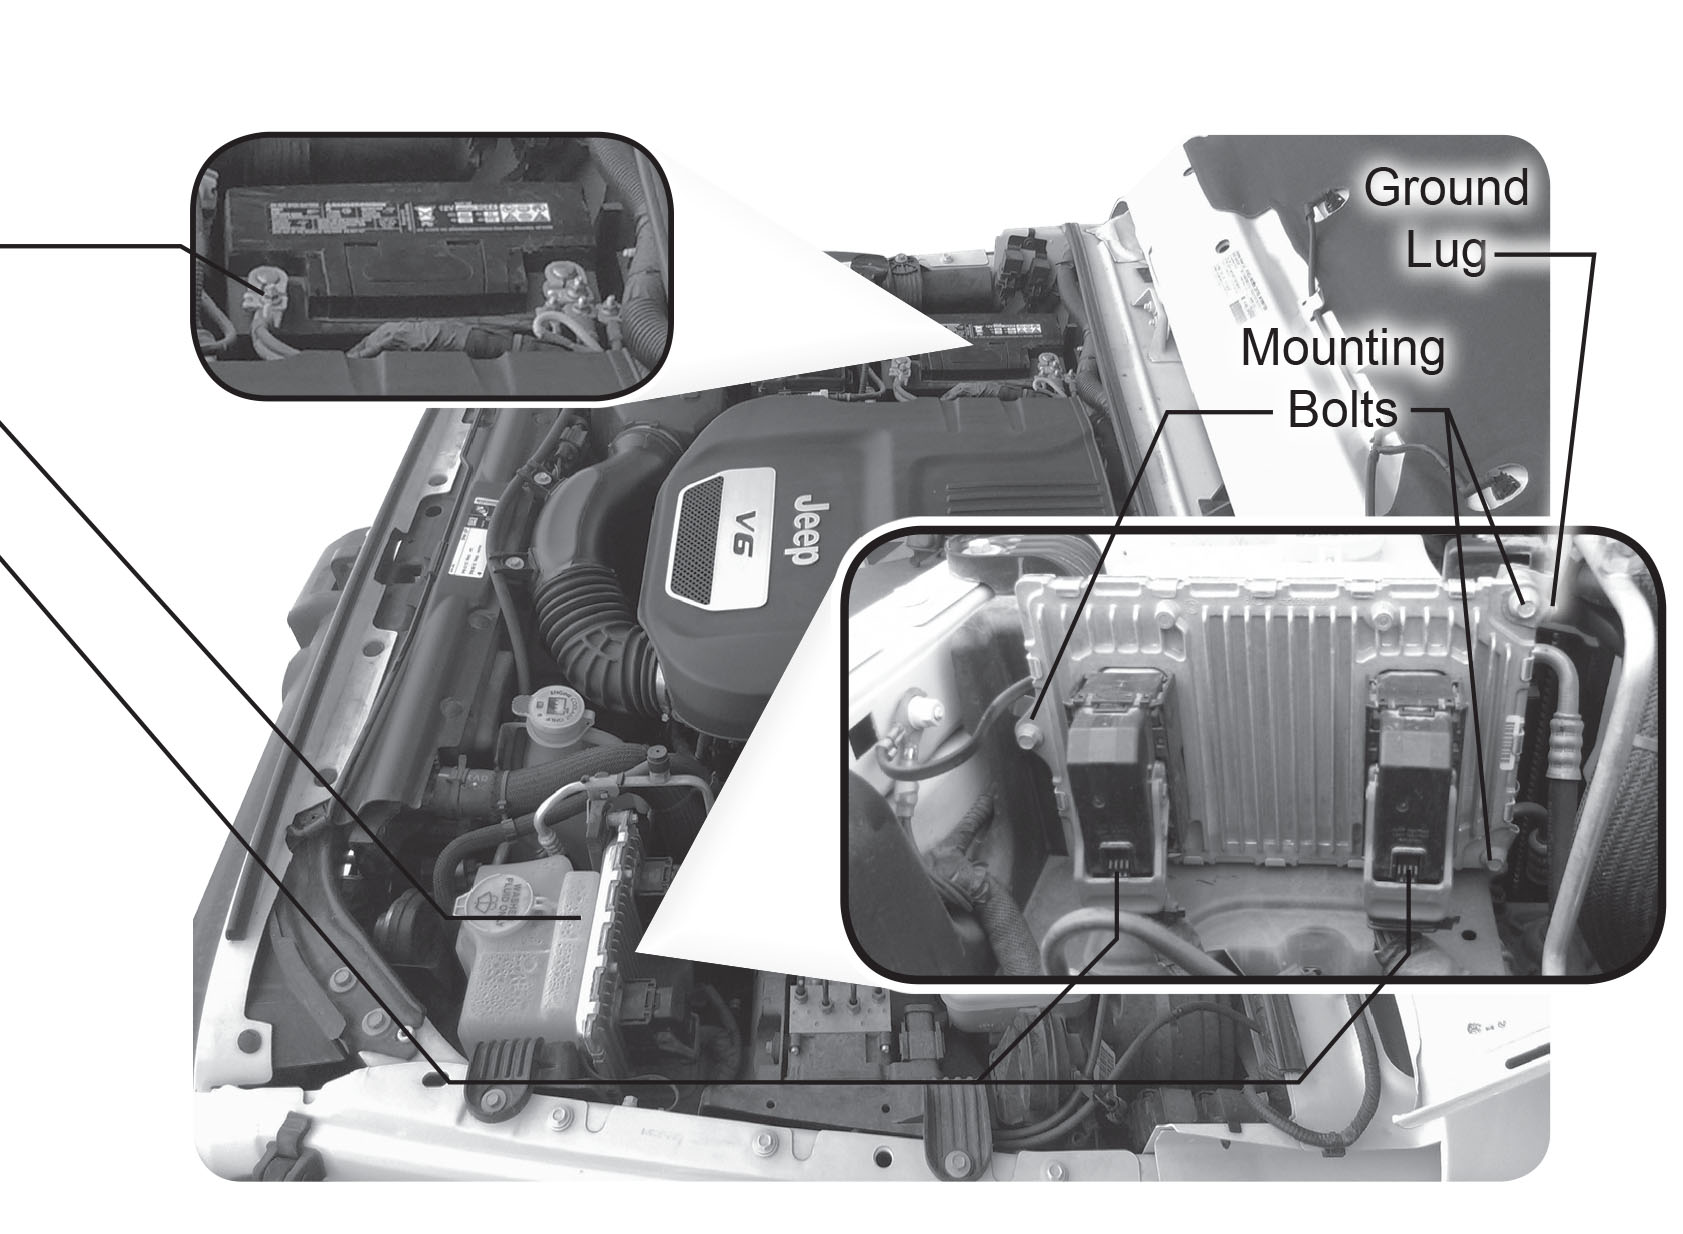
Disconnect the battery’s ground terminal using a 10mm socket.
STEP 3
Locate the ECM on the driver side of the vehicle near the windshield washer uid reservoir.
STEP 4
Remove the two connectors on the ECM by rst pressing down on the locking tab, then by rotating the red lever upward. If the lever is dif cult to rotate, gently wiggle the connector from side to side until the lever is able to move more freely.
STEP 5
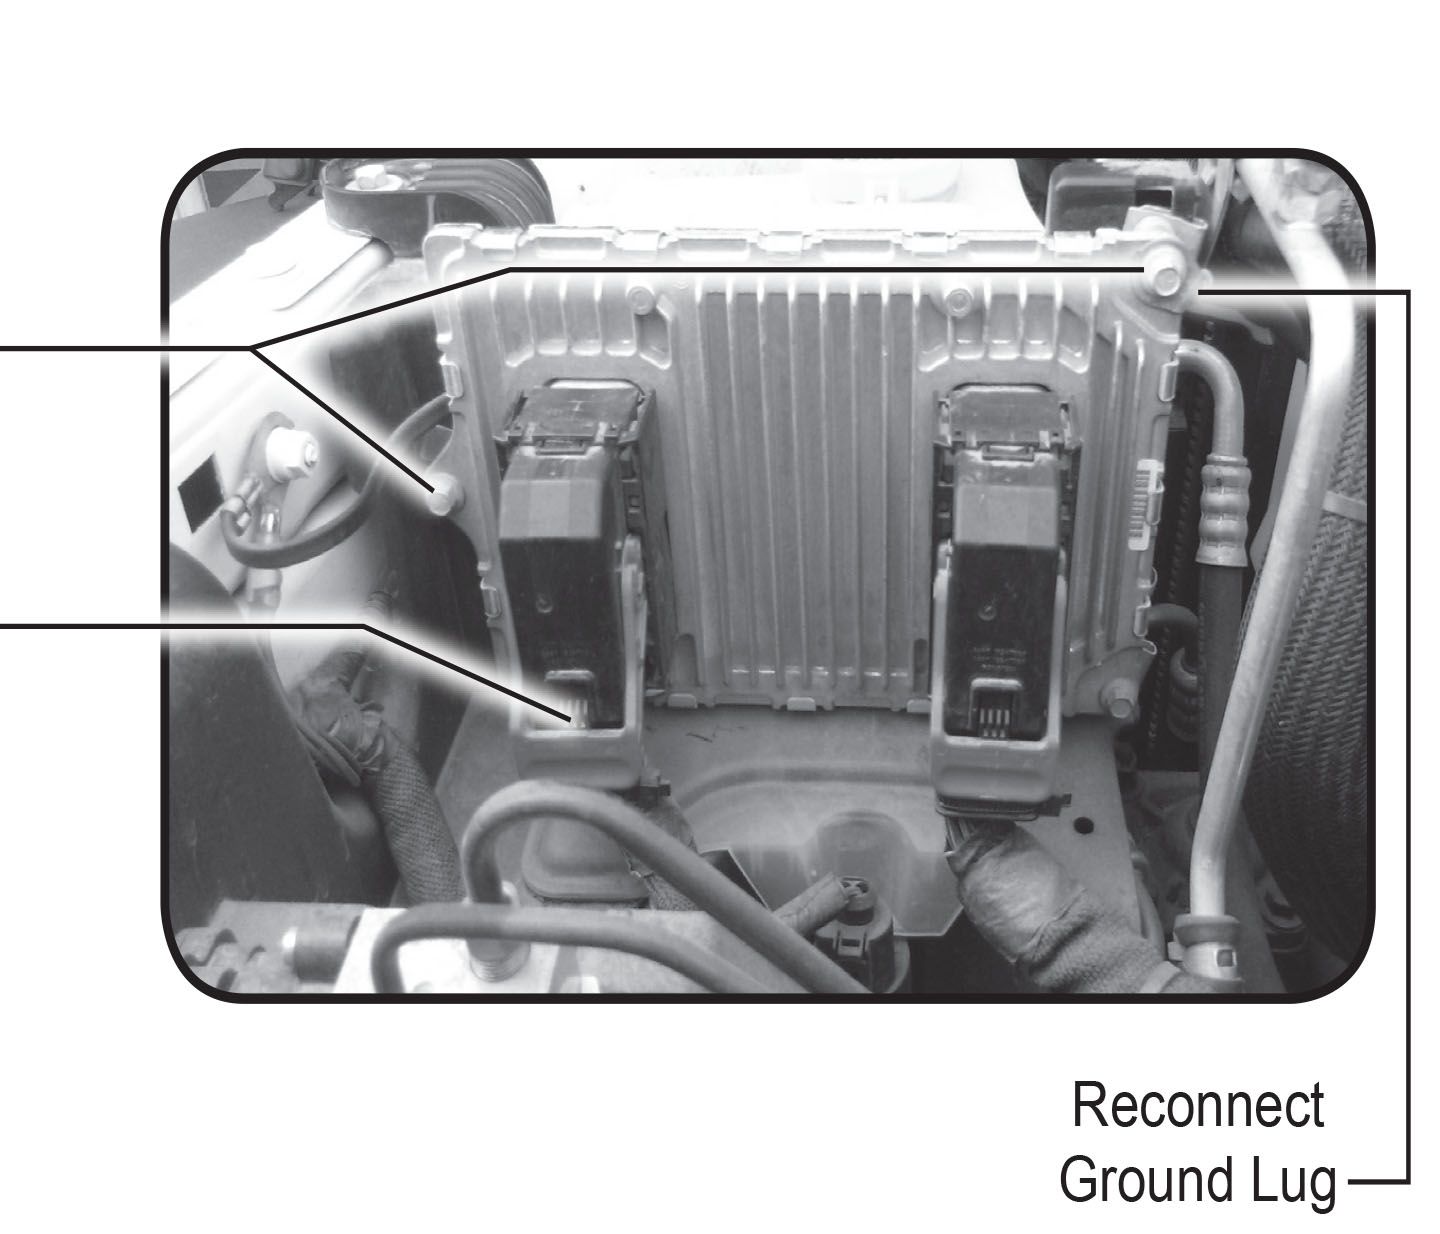
Remove the 3 mounting bolts using an 8mm socket. The top inner bolt has a ground wire that will need to be reconnected later during the re-install.
ECM Swap Options:
Option 1: Cross-ship ECM swap (subject to availability of ECMs)
Superchips will send you an unlocked ECM and provide a return shipper label to send us back your factory ECM.
Option 2: Send in your factory ECM to be unlocked
This free service will be available to you anytime. Once we receive your ECM, we will quickly unlock it and get it back to you.
Installing the new ECM
STEP 1
Install the unlocked ECM from Superchips into the vehicle using the same 3 mounting bolt locations. Make sure the ground has also been re-connected.
STEP 2
Plug the 2 ECM connectors into the Superchips ECM being careful not to damage the pin contacts. Rotate the lever to lock the connectors in place.
STEP 3
Reinstall the battery’s ground terminal.
STEP 4
You are ready to program. Please refer to the Tuning section in the Flashpaq User Manual.
ATTENTION
Upon installation of the unlocked ECM, you will likely see a check engine light. You may also experience elevated idle and no throttle pedal response on the rst startup. If you shut the vehicle down and wait approximately 1 minute and then restart the vehicle, it should resume normal operation. You can clear codes at this point to eliminate the check engine light and/ or tune the vehicle and that will also get rid of any lingering codes from the ECM swap.

