Installation Time
(approx) 1 Hour
Difficulty Level:
Light to Moderate mechanical skill required.
FREE 1 to 3-Day Delivery on Orders $119+ Details
$693.54 (each)
FREE Shipping + $99.00 Oversized Item Fee Market Price $810.99 You Save 14% ($117.45) Up to 10% off for Military & First Responders! See DetailsSaved - View your saved items
We're sorry. We couldn't save this product at this time.
Hey guys, so today I'm here with the Smittybilt XRC 9,500 pound winch with the recovery pack fitting all 1987 to 2020 Jeep Wranglers. So when you're out on the trail, you can have all the mods in the world, all the traction in the world. However, when you are stuck, you're stuck. And having a winch on the front is going to keep a little bit of peace of mind, and it's gonna act as some insurance while you're out on the trail, just in case if you get into a sticky situation. Now, this one by Smittybilt is going to be a really good option to take a look at if you're looking for something that's inexpensive, it's gonna come with a couple extra bells and whistles, and it's going to be pretty low maintenance.Now, there's a couple of things that you need to choose from in order to choose the right winch for you. So it's gonna be pulling capacity, line as well as a couple extra bells and whistles or odd and ends including waterproofing, wireless winch remotes or wired winch remotes, and so on. So this is going to be a 9,500-pound pulling capacity, perfect for a lightly armored Wrangler or something that's not really carrying a whole ton of cargo when going out on the trail. And usually how you can choose your pulling capacity is to take the loaded weight of your Wrangler and multiply that by one and a half and you'll get your pulling capacity that you need. So this is perfect for those lightly armored Wranglers or even those stock Wranglers that just want a bit of extra insurance up on the front. Now, this is also gonna have a steel line which is perfect for somebody who's looking for an inexpensive line and also one that doesn't need a whole lot of maintenance. So, usually when you upgrade from this to a synthetic line, that's not going to hold energy under load so it will be a little bit safer. However with this, you just need a weight on that line in order for it to not lash back, but this is not going to need a bunch of cleaning. This is going to be pretty fuss-free and it's also going to be pretty inexpensive at that. So this is also gonna be IP-67 rated, meaning that this is waterproof and dustproof. So if we do take a dunk with the front end of our Wrangler, this is going to be completely okay. And this also has a wired remote making sure that we don't need to change any pesky batteries while we're out on the trail if this was wireless.So not to mention, with all those features that this has, this is also going to be the recovery pack version. So this is not only gonna come with a winch, but you're gonna get two three-quarter inch D-ring shackles for the front of your Wrangler or even just to keep in your Wrangler as a recovery tool. You are getting some heavy-duty gloves because I always recommend that with a steel line. It is sometimes hard to handle when you're out on the trail, and having gloves is going to help you out. And then you also are getting a tow strap with this as an extra recovery tool. So this is overall a really good package if you're looking for a lot of recovery options for when you're out on the trail.Now, this is gonna be roughly $400, putting this at a really good price for what this comes with. This gonna be relatively inexpensive considering it is at a lower pulling capacity than some other options and it does come with the steel line. However, this is still gonna be a very well built winch. It is going to be waterproof and dustproof. It comes with all the extra bells and whistles that some other options don't even have. So I personally think that this is a really good setup. Now, if you are looking to upgrade from the line, you can go up to a synth line, that's gonna be a little bit more expensive or you can upgrade the pulling capacity, however, that might be a little bit more expensive. So usually the price goes off of how many extra bells and whistles are included. And even though this is pretty inexpensive, this is still going to get the job done, and it's going to be well built and look really good while doing it.So install is going to be pretty easy at a one out of three wrenches on the difficulty meter. I would recommend another hand when mounting this up just because you don't wanna scratch up your grille or anything and you need to route the wires and it is pretty heavy. So speaking of the install, let's jump into that now. The tools that I used for my install were a 10-inch extension, 18-millimeter open-ended wrench, three-eights-inch drive, and quarter-inch drive ratchet, 18, 14, 12, and 10-millimeter deep socket, the provided Allen key by Smittybilt, pair of needlenose pliers, 6-millimeter Allen socket, and a 16-millimeter swivel socket.So to start off this install, we do have to put some things together for our winch, we have to mount up our control box and we also have to wire that up to the back of our winch here. So the first thing that we're gonna do is unhook our wire or our cable so this back bar is able to come off so we can make sure that the cable is coming out the front, so we can run it through our fairlead. So I'm gonna take a 6-millimeter Allen key and remove the two Allen head bolts that are holding in our bar back here. There it goes. All right. And then, now that that kind of loosened up our cable, we can just tighten that up once we have our winch installed. So we can just re-install that bar with that 6-millimeter Allen socket. So now we can go ahead and mount up our control unit and mount up our attachment for it. Now, this is going to have a couple of different ways that it will attach to the top of the winch, you will get a couple of different brackets. I'm just going to do it the old fashioned way and mount it up on top, just flat on top of our winch here. So I have two of the brackets needed for that. They are gonna have the little hook up at the front and then the back tab that goes over this back bar at the back. I'm going to flip this over and we're gonna mount them up here. Now, we also have a spacer and provided Allen head bolts with this. And you wanna make sure that this is being pushed forward enough on here, so we're gonna mount it at the front-most mounting location. So you also will have a provided Allen key. And just gonna thread that in loosely. Do the same thing for the back one. Once you have both of those threaded in, we can tighten this down. Then we can do the same thing for the other side.So what we can do now is hook this onto our winch here. So there's gonna be a bar behind this little plate here in the back. We wanna make sure that we're hooked over. So after that's hooked onto the front we can take our provided Allen head bolts, thread those on, and this is gonna prevent this from coming up. Now we can use the same Allen key, thread those on. These are gonna be the shorter button head bolts.So now we're gonna have a couple of leads, the shorter leads are gonna go to the back of our winch, our longer lead here is gonna be our power wire that's gonna go to our battery. And then we're also gonna get another longer wire. This is going to ground to the bottom of the winch and then also ground on our battery. So I am just going to unhook this as well, get it ready to mount up to the bottom of the winch. Now you also have a smaller wire. This is going to attach that bottom ground too, this is just gonna be another ground for our winch. And these boots are going to cover up each of our terminals, which is going to give a little bit of protection, make sure that they're protected from the elements. Slide those on before we attach them.Now you can grab a 14-millimeter deep socket and we can remove each of the stud's hardware. So this is going to be color-coded. So what we're going to do is take our shorter leads and start attaching them. So what we can do is reattach the flat washer, lock washer, and nut. I'm not gonna completely tighten everything down right away, wanna make sure that all these wires are clearing each other before we tighten everything down. So now that all those are in place we can take that 14-millimeter deep socket and quarter-inch drive ratchet and tighten those up. Now we don't have to really crank on these. You don't wanna damage the stud here, you just wanna make sure that they're tight enough to have a good connection. Now we can flip this forward and you'll see that we have a terminal on the bottom. Again, this is gonna be our ground. I'm gonna take that same 14-millimeter socket, loosen that up. We're gonna attach this ground as well as our battery ground. Then we can thread that back in the bottom. Tighten that back up with that 14-millimeter socket. So the last thing we need to do before we head over to the Jeep to mount this up is attach the nuts inside our posts here. So these are just going to slip into each of the posts and make sure that we can tighten this down once it's mounted up to our Jeep. So at this point, we're ready to mount up our winch. I have my friend Joe here lowering this down into the winch plate while I route the wires to the side.So what we can do next is take our provided bolts and lock washers and thread them through our bumper or winch plate, whatever you're mounting your winch up to into the posts at the bottom. So you're gonna have four posts for mounting locations. And then once they are all threaded in, what we can do is tighten them up with a 16-millimeter socket. So because these are all kind of at an angle, this is a tight location, I'm gonna use a 16-millimeter swivel socket as well as an extension.So now we can fish our wires for our battery up through our inner fender liner behind our grille into our engine bay. So I'm gonna send this up through right at the corner here. Then we can do the same thing for our negative wire. So what I usually do is route these over the airbox kind of in this little crease here, sometimes even under this wire here. So what we can do now is attach our wires to our battery terminals. I'm gonna use a 12-millimeter socket to remove the accessory nut that's on our positive terminal. We can grab our positive winch terminal, place that down onto the stud there. Tighten that back up. Put a cover back on. Move over to the negative terminal with a 10-millimeter socket. We can tighten that down with just circulated power through it.So what we can do now is mount up our roller fairlead. Now there are gonna be two mounting locations on the back of this. There's gonna be a lower hole and an upper hole. We are going to line this up making sure caution is at the top. Going to stick our line through and it looks like we will be mounting this in the bottom location, so we're gonna grab our bolts. Take those through, then we can grab our provided hardware for the back and thread that on. So once that's threaded on what we can do is tighten that down with an 18-millimeter wrench and socket.So what we can do now is attach our hook and to take a pair of needlenose pliers, kind of straighten this pin out, take out the cotter pin. Take out that pin, hook this onto our line. Then we can go back, re-install that cotter pin. Then once that's reinstalled, we can take those needlenose pliers and bend that back, make sure that stays in there. And then what we can do is attach our D-ring. This is going to be what the hook is hooking onto. So now with that attached we can take our remote. This is on free spool right now. But since it's steel and it hasn't been unraveled yet it is a little difficult to get that up by hand. What I'm gonna do is attach our remote to the side of our control box. When that's in, we can make sure that it's either going in or out. We want out, so we're gonna grab our strap. Then what we can do then is hook this onto our D-ring, and we're all set to go. So when we wanna use the winch, gotta make sure that this is unhooked. You would have it on free spool or you can spool out. And then when you wanna spool back in, we're going to press down for in, making sure that there's tension on our line. Once you're finished, you can hook that back up to our D-ring.So that's gonna wrap it up for my review and install. Make sure you like and subscribe. And for more videos and products like this, always keep it right here at extremeterrain.com.
Subscribe to our YouTube Channel
Features, Description, Reviews, Q&A, Specs & Installation
Brand | Smittybilt |
Winch Capacity | 9500 lbs |
Winch Rope Type | Steel Cable |
Winch Remote Type | Wired |
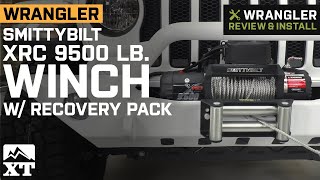
Off-Road Support for Winners. Navigate out of problematic situations where you’re stuck on the road with the Smittybilt XRC 9,500 lb. Winch with Recovery Pack. This kit includes an XRC winch rated up to 9,500 pounds, along with a pair of HRX heavy-duty gloves, two D-ring shackles, and a 20,000-pound tow strap to keep you fully equipped.
High Quality. This winch is constructed using only the highest quality materials for long lasting performance on the off-road. It is also IP67 waterproof rated to withstand torrential rainfall.
Medium Difficulty Installation. You should expect to take no more than an hour installing this unit, with a medium level of difficulty if you have light to moderate mechanical skills.
Limited Lifetime Warranty. A limited lifetime warranty covers any defects in materials and workmanship from the manufacturer. Any products that are altered or have received poor quality maintenance or installation will not be covered.
Application. The Smittybilt XRC 9,500 lb. Winch with Recovery Pack is compatible with 1966-2024 Jeep CJ and Wrangler models.
Smittybilt 97495P
CA Residents: WARNING: Cancer and Reproductive Harm - www.P65Warnings.ca.gov
Installation Info
Installation Time
(approx) 1 Hour
Difficulty Level:
Light to Moderate mechanical skill required.
What's in the Box
10 More Questions