Installation Time
(approx) 2 Hours
Difficulty Level:
Light to Moderate mechanical skill required.
Installation Guides
No guide available for this part yet.
 FREE 1 to 3-Day Delivery on Orders $149+ Details


$181.59 kit
CONFIRM THIS FITS YOUR VEHICLE!
Saved - View your saved items
We're sorry. We couldn't save this product at this time.
or use

Features, Description, Reviews, Q&A, Specs & Installation
| Brand | SkyJacker |
| Steering Stabilizer Type | Dual Stabilizer |
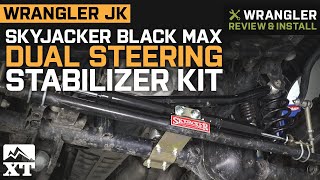
High Clearance Steering Solution. The SkyJacker Black MAX Dual Steering Stabilizer Kit enhances steering control by reducing vibration and bump steer during off-road driving. Specifically designed for lifted vehicles, this kit mounts above the tie rod to maintain optimal clearance and performance under rugged conditions. The dual dampers provide improved handling and greater driver confidence on rough terrain.
_x000D__x000D_Durable Build Quality. Constructed from high-strength materials with a corrosion-resistant black finish, this kit withstands harsh environments. It includes premium steering dampers, robust mounting brackets, and all necessary hardware for a secure, reliable installation.
_x000D__x000D_Installation Ease. Installation is straightforward, requiring only basic hand tools and no drilling, making it suitable for both experienced enthusiasts and professional installers.
_x000D__x000D_Application. Designed for 07-18 Jeep Wrangler JK models with at least 2 inches of lift, this kit does not fit stock height vehicles or aftermarket axles with 3-inch diameter tubes, ensuring correct fitment and optimal performance for lifted Jeep Wranglers.
SkyJacker 8203
CA Residents:  WARNING: Cancer and Reproductive Harm - www.P65Warnings.ca.gov
Installation Info
Installation Time
(approx) 2 Hours
Difficulty Level:
Light to Moderate mechanical skill required.
Installation Guides
No guide available for this part yet.
What's in the Box