 FREE 1 to 3-Day Delivery on Orders $149+ Details

How to Install Rugged Ridge XHD Reclining Front Seat on your 1997-2006 Wrangler

Shop Parts in this Guide
- Rugged Ridge High-Back Reclining Front Seat; Gray (97-06 Jeep Wrangler TJ)
- Rugged Ridge XHD Reclining Racing Seat; Gray (97-06 Jeep Wrangler TJ)
- Rugged Ridge XHD Reclining Racing Seat; Black (97-06 Jeep Wrangler TJ)
- Rugged Ridge XHD Reclining Racing Seat; Red (97-06 Jeep Wrangler TJ)
- Rugged Ridge High-Back Reclining Front Seat; Spice (97-06 Jeep Wrangler TJ)
- Rugged Ridge Sport Reclining Front Seat; Gray (97-06 Jeep Wrangler TJ)
- Rugged Ridge Sport Reclining Front Seat; Black Denim (97-06 Jeep Wrangler TJ)
- Rugged Ridge Sport Reclining Front Seat; Spice (97-06 Jeep Wrangler TJ)
- Rugged Ridge XHD Ultra Reclining Front Seat; Black (97-06 Jeep Wrangler TJ)
- Rugged Ridge XHD Ultra Reclining Front Seat; Gray (97-06 Jeep Wrangler TJ)
- Rugged Ridge XHD Ultra Reclining Front Seat; Black Denim (97-06 Jeep Wrangler TJ)
- Rugged Ridge XHD Ultra Reclining Front Seat; Spice (97-06 Jeep Wrangler TJ)
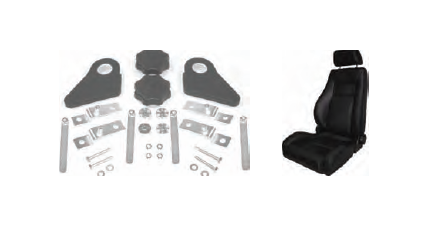
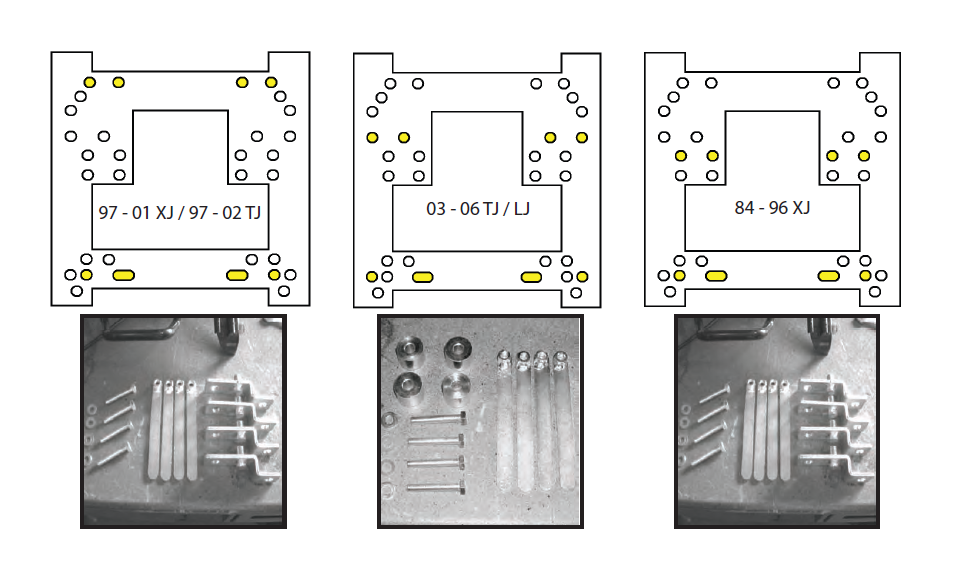
Contents:
(1) MultiMount Seat
(1) LH Plastic Adjuster Cover
(4) M13 Flat Washer
(1) RH Plastic Adjuster Cover
(4) M13 x 50mm Bolt
(2) Adjuster Knob
(4) Step Bracket
(4) M13 Nut Plate
(4) M13 Hex Nut
Please read instruction completely prior to installation. Confirmation of your model vehicle and seat configuration is needed for proper installation. Instructions will give general installation information. Specific vehicle information will be called out where needed.
Installation Instructions (all models)
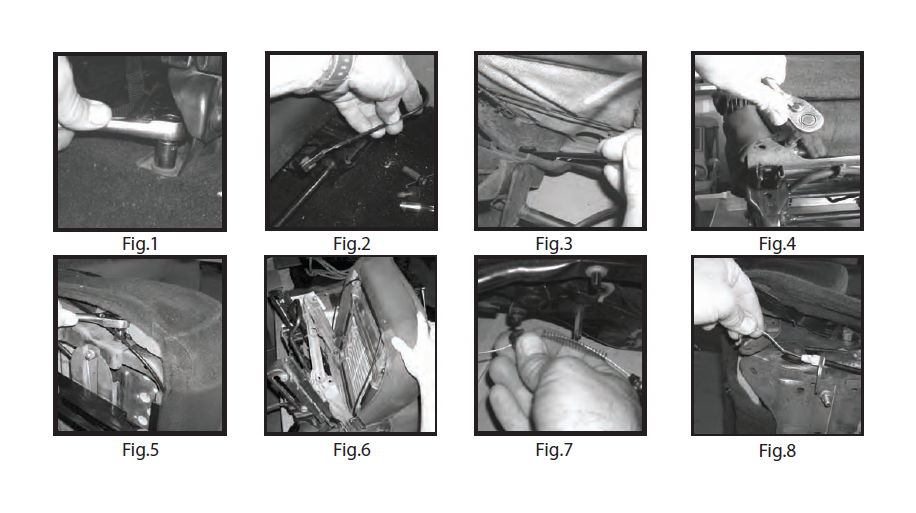
Step 1: Remove the (4) bolts holding factory seats and riser to vehicle. Do Not discard bolts. Bolts will be required to reinstall seat base to vehicle (Fig.1). Disconnect seat belt warning harness if equipped (Fig.2).
Step 2: Remove (4) M13 factory seat mounting nuts. These are the nuts used to secure the seat to seat riser. Do Not Discard nuts. Nuts may be used later to reinstall new seats to factory seat riser.
(96-01 XJ, 97 - 02 TJ) : (4) bolts located under seat secure seat to riser. (Fig.3)
(03 - 06 TJ/LJ) : (4) bolts secure seat cushion to lower seat frame. (2) Bolts are located on the back of the seat under seat fabric (Fig.4). (2) bolts are located on the sides of the seat under seat fabric (Fig.5). Lift lower seat cushion and remove (4) bolts securing seat to riser (Fig.6).
(84 - 96 XJ) : Disconnect lower seat cushion from rear of seat base. Flip lower seat cushion forward and remove 4 bolts holding seat and
seat base to riser.
Step 3: Disconnect factory seat adjuster cable from seat riser if equipped.
(97 - 02 TJ) : Pop seat cable plastic clip off seat riser connection (Fig.7).
(03-06) TJ/LJ): Push seat adjuster cable out of riser mounting bracket (Fig8). Disconnect cable from seat.
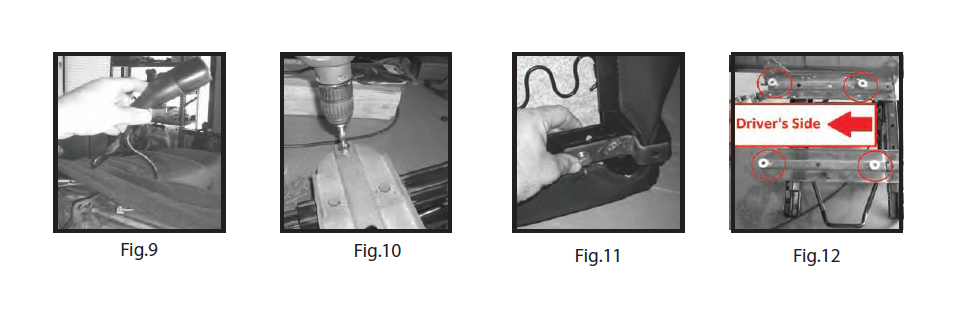
Step 4: (03 - 06 TJ/LJ ONLY)- disconnect seat belt from side of seat. Retain flat washers and wave washers. They will be reused to install seat belt to new seat base (Fig.9).
Step 6: (03-06 TJ/LJ ONLY) - Drill out the two outbound threaded seat mounts on factory riser (Fig.10). 21/64th drill bit will be needed. Supplied M13 bolts will be used in these two locations.
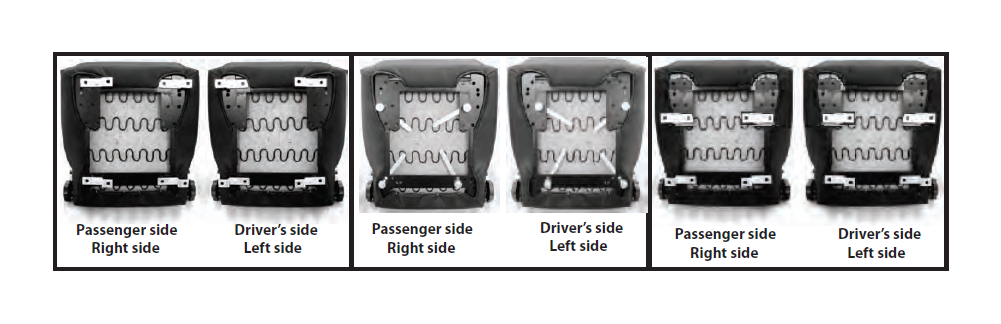
Step 5: Using supplied diagrams (page 4) locate mounting pattern and hardware configuration for your model vehicle. Seat mounting (Left or right) will be mirror images. All seats are mounted off-set of center.
(96 - 01 XJ, 97 - 02 TJ): Use (4) step brackets, (4) nut plates, (4) M13 bolts, and (4) M13 flat washers to mount step brackets to seat (Fig.11). Use supplied image of seat base to confirm brackets have been placed in the correct left, or right orientation. Do not tighten bolts until seat has been secured to factory seat riser. This will allow adjustment during installation.
(02 - 06 TJ/LJ) : Use (4) spacer, (4) nut plates, (4) M13 bolts, and (4) M13 flat washers to mount seats to factory riser (Fig. 12). Use supplied image of seat base to confirm spacers have been placed in the correct left, right orientation. Do not tighten bolts until seat has been secured to factory seat riser. This will allow adjustment during installation. Spacers, nut plates, and M13 bolts will need to be installed one at a time until seat is attached to factory riser.
(84 - 96 XJ) : Use (4) step brackets, (4) nut plates, (4) M13 bolts, and (4) flat washers to mount step brackets to seat. Use supplied images of seat base to
confirm brackets have been placed in the correct left, or right orientation. Do Not tighten bolts until seat has been secured to factory seat riser. This will allow adjustment during installation.
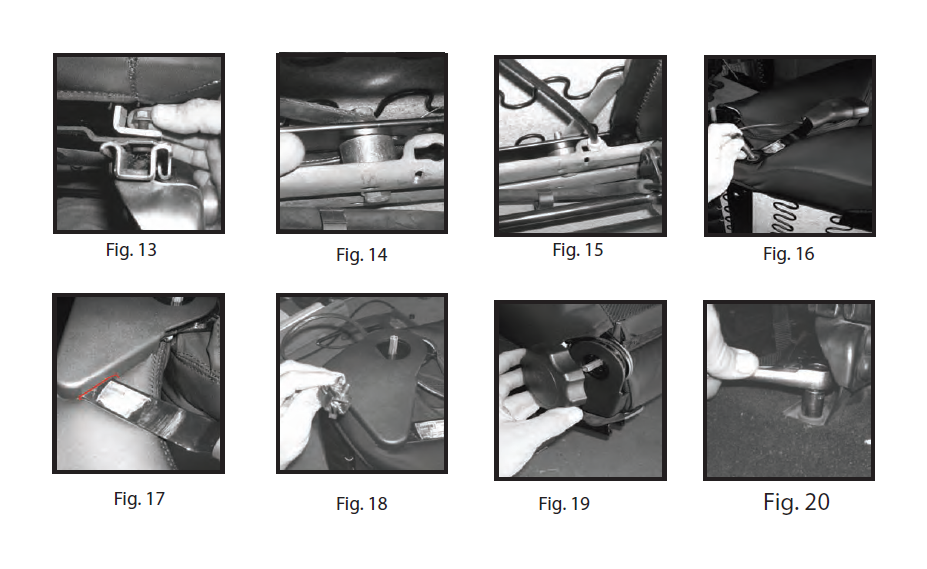
Step 7: With step brackets secured to seat and propper spacer location noted place new seat to factory riser.
(96 - 01 XJ, 97 - 02 TJ) : place onto factory seat riser. Secure new seat with step brackets to riser using (4) Original nuts removed in step #2. A small amount of thread lock should be placed on seat riser studs before tightening nuts to 27ft-lbs (Fig13). Install plastic side cover plates and adjuster knobs to seat (Fig.17).
(03 - 06 TJ/LJ) : Place (1) spacer between seat base and riser. Insert nut plate and secure riser to seat with (1) M13 bolt and washer. A small amount of thread lock should be placed onto M13 bolts. Repeat for other 3 locations making sure seat is positioned correctly before tightening bolts to 27ft-lbs (Fig.14). Move seat cable to new location on factory seat riser (Fig.15)
(84 - 96 XJ) : Place onto factory seat riser. Secure seat to base using (4) original nuts removed in step #2 and supplied M13 flat washers. (NOTE: riser will have mounting studs entering step brackets at an angle). A small amount of thread lock should be placed onto riser studs. Tighten all nuts and bolts to 27ft-lbs. Install plastic cover plate and adjuster knob to seat (Fig.18 - 19).
Step 8: (03-06 TJ/LJ ONLY) - Before installing seat into vehicle remove the front lower 7/16” caps head bolt from seat base (Fig.16). reinstall seat belt using flat washers and wave washer saved in step #4. Tighten to 30ft-lbs. Plastic seat frame cover will need to be cut to clear seat belt bracket (Fig.17). Install plastic side cover plate and adjuster knob to seat (Fig.18 - 19). Note: A 7/16” flat washer may be needed for some late TJ models. This washer will need to be sourced. Not supplied with seat hardware.
Step 9: Place new seat and seat riser into vehicle. Reinstall mounting bolts from step #1 and tighten to 30ft-lbs (Fig.18) Reconnect seat belt warning light if equipped (Fig.20). Repeat steps 1-9 for other side.
Note: TJ seat adjustment must be made from under seat. TJ seat adjustment levers can be purchased separately to allow full function of original seat base. Please order Rugged Ridge part number 13201.09 for model years 1997 - 2002. Adjustment levers are not needed for XJ models.
Note: TJ seat adjustment must be made from under seat. TJ seat adjustment levers can be purchased separately to allow full function of original seat base. Please order Rugged Ridge part number 13201.10 for model years 2003 - 2006. Adjustment levers are not needed for XJ models.
