FREE 1 to 3-Day Delivery on Orders $149+ Details

How to Install Rugged Ridge Replacement Soft Top Hardware Assembly on your 1987-1995 Wrangler

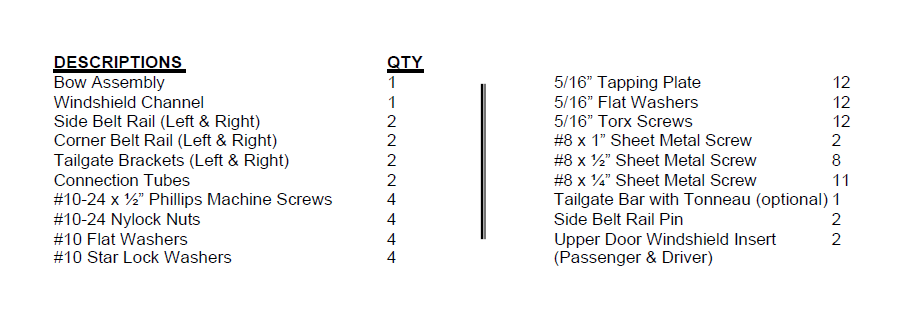
Shop Parts in this Guide
IMPORTANT NOTICE:
Carefully read instructions before attempting to install this product. Rugged Ridge is in no way responsible for any damage to the vehicle or personal injury that may occur during the installation or use of this product.
DRILLING REQUIRED
WARNING!
This product is designed to enhance the appearance of the vehicle and only for protection against the elements. Do not rely on this product to contain occupants within the vehicle or to protect against injury during an accident.
WEAR SEAT BELTS AT ALL TIMES

Replacement Top Hardware Installation Instructions
Windshield Channel Installation
1. Position Windshield Channel onto vehicle as shown in Figure 1.
2. Once in position, secure Windshield Channel using the included (11) - #8 x ¼” Sheet Metal Screws (Figure 1).
NOTE: In some cases the holes on the Windshield Channel will line up with existing holes. In this case, ensure holes are not too large to install the new screws included in the package. If holes are to big, you must replace the included screws with larger screws, found at any local hardware store.
If you are replacing a hardtop, use the Windshield Channel as a template to drill 1/8” holes.
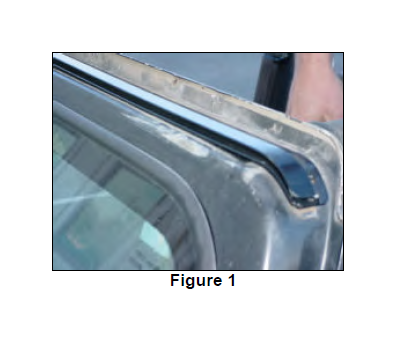
WARNING: Ensure Windshield Channel is properly secured prior to installing the Soft Top. Damage to the vehicle or personal injury may occur if Windshield Channel is not securely mounted. Omix-ada is not responsible for personal injury or damage to the vehicle if Windshield Channel is not secured properly.
Upper Door Windshield Insert Installation
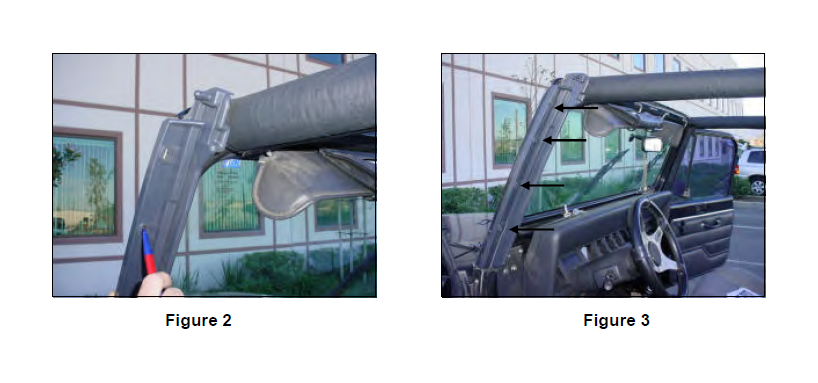
3. Locate Driver Upper Door Windshield Insert and position it on the side of the windshield.With Upper Door Windshield Insert in position mark the vehicle through the holes (Figure 2).
4. Remove Upper Door Windshield Insert and place aside. Carefully drill 1/8” holes on the marked locations.
5. Re-position Upper Door Windshield Insert and secure it by using the included (4) - #8 x 1/2” Sheet Metal Screws (Figure 3).
6. Repeat steps 3-5 for opposite side.
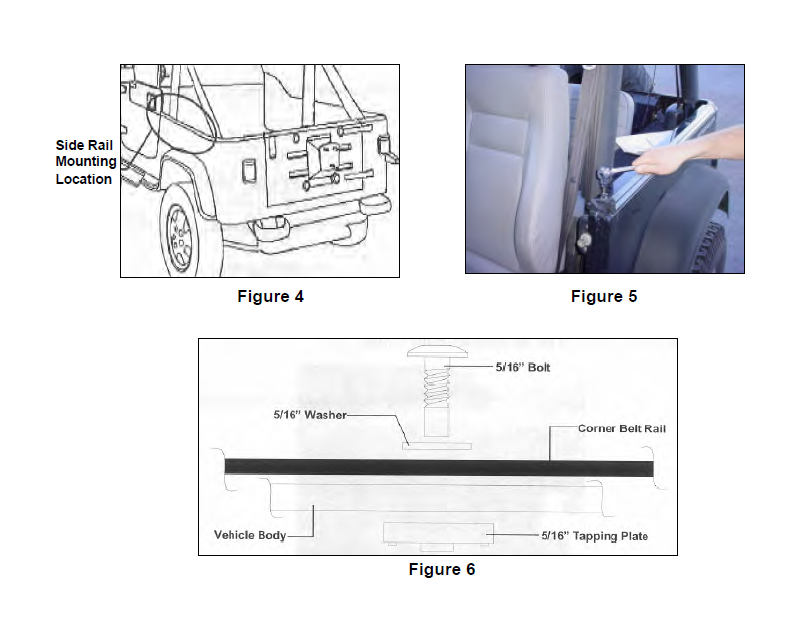
Side Belt Rail Installation
7. Locate Driver Side Belt Rail, (4) – 5/16” Torx Bolts, (4) – 5/16” Flat Washers, and (4) – 5/16” Tapping Plates.
Position Side Belt Rail onto vehicle and secure it using the hardware listed in this step (Figure 4 & 5). Repeat this step for opposite side.
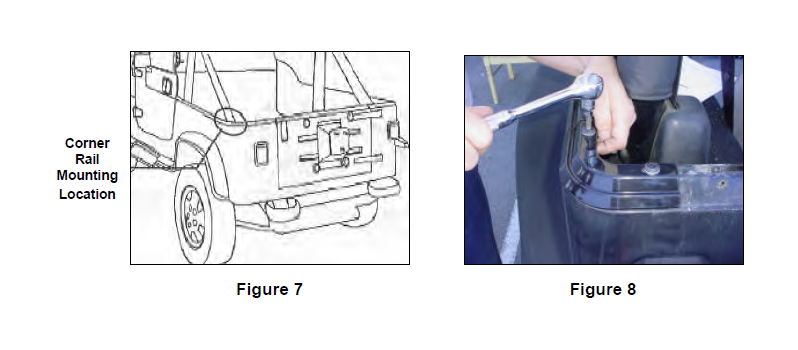
Corner Belt Installation
8. Locate Passenger Corner Side Rail, (2) – 5/16” Torx Screws, (2) – 5/16” Flat Washers, and (2) – Tapping Plates. Position Corner Side Rail onto vehicle and secure it by using hardware listed in this step (Figure 7 & 8). Repeat this step for opposite side.
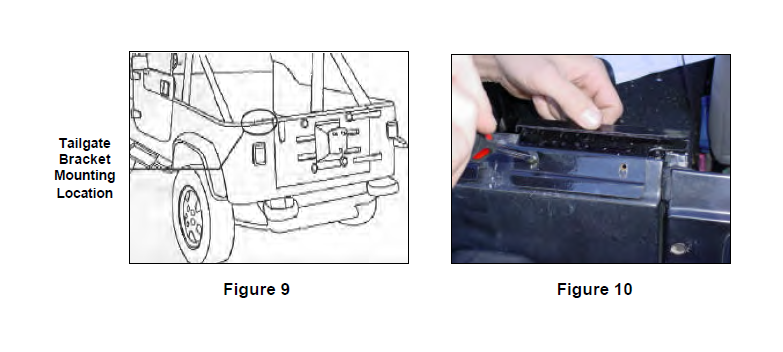
Tailgate Brackets Installation
9. Locate Passenger Tailgate Bracket, (2) - #10-24 x 1/2” Phillips Machine Screws, (2) - #10 star lock washers, (2) - #10 Flat Washers and (2) - #10-24 Nylock Nuts. In some cases the holes on the Tailgate Bracket will line up with existing holes. In this case, use the existing holes as pilots to drill 3/16” holes on the vehicle. NOTE: Carefully check under the drilling area to be sure you do not drill into any concealed wiring. NOTE: If you are replacing a hardtop, use the Tailgate Bracket as a template to drill 3/16” holes. Position Tailgate Bracket and secure it by using the hardware listed in this step (Figure 9 & 10). Repeat this step for opposite side.
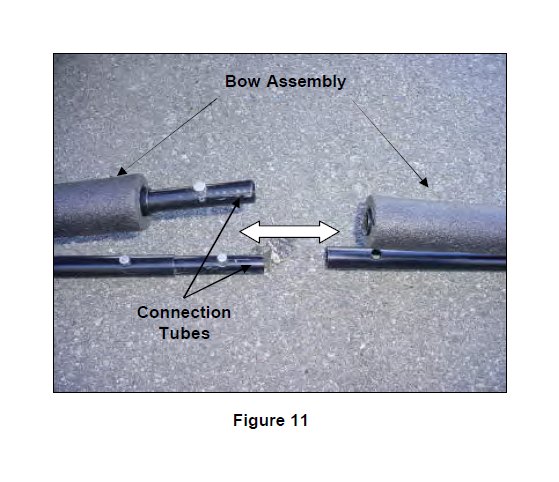
Bow Assembly Installation
10. Lay Bow Assembly on a flat clean surface and identify the Front and Rear Bow. NOTE: The Front Bow will include foam padding where as the rear will not.
11. Assemble the two halves of the Bow Assembly using the included Connection Tubes with push buttons (Figure 11). NOTE: It may be helpful to use a screw flat screwdriver to push down the buttons while sliding Bow halves together. Also, it may be helpful for two persons to slide both sides of the Bow Assembly forward simultaneously.
12. With the Bow Assembly secured together, slide the ends of the front and the rear bows into the tracks in the Side Belt Rails on each side of the vehicle (Figure 12 & 13). NOTE: Slide the Bow Assembly from the rear of the vehicle towards the front.
NOTE: DO NOT twist bow assembly when installing plastic ends into track.
The help of a second person is recommended. Slide the Bow Assembly
from the rear of the vehicle towards the front.
13. Insert Side Rail Pin all the way through on the hole located at the rear of the Side Rail (Figure 13).

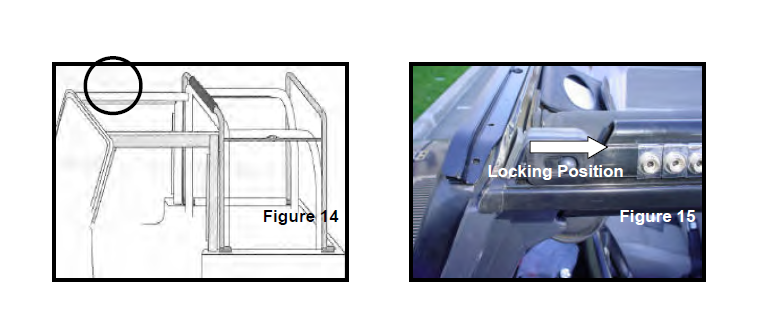
14. Unfold Passenger Upper Side Rail towards the front of the vehicle until it reaches the Passenger Upright Pin. Insert the plastic Upright’s Pin through the Side Rail’s hole and lock it in place by sliding the square clip to the opposite side (Figure 14 & 15). NOTE: Make sure the Upper Side Rail is properly secure prior to installing the soft top. Damage to the vehicle or personal injury can occur if not installed properly. Repeat this step for opposite side.
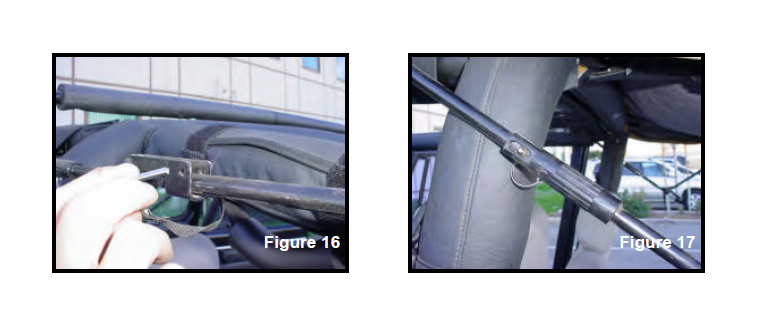
15. With the Bow Assembly in position, locate the Adjustable Spreader Bar. Secure it by inserting the steel pin through the hole of the spreader bar (Figure 16).
16. To loosen or tighten your soft top, locate the adjustable sleeve on the Spreader Bar and twist to tighten or loosen the soft top (Figure 17). NOTE: Ensure to adjust the spreader bar equally on both sides of the vehicle. The adjustable bar can be used to keep your soft top fabric tight in hot weather.
Tailgate Bar with Tonneau Installation (optional)
17. Locate Tailgate Bar and Rear Seat Tonneau Cover. Slide the extrusion on the Tonneau Cover into Tailgate Bar Rail as shown in Figure 18.
18. Insert Tailgate Bar into the top of the Tailgate Brackets (Figure 19).

19. Fold seat forward and pull straps to the mounting locations as shown in Figure 20. Use the hole on the strap as a guide to mark the drilling locations on the fender. NOTE: Carefully check the drilling area to be sure you do not drill into any concealed wiring. Place strap aside and drill 1/8” holes on the just marked locations.
20. Re-position Rear Seat Tonneau Cover and attach both sides to the just drilled holes by using the included (2) - #8 x 1” Sheet Metal Screws (Figure 20).

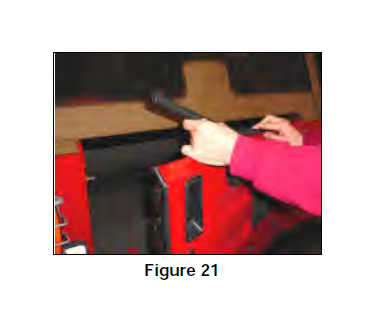
21. Locate the Channel on the Weather Strip and insert tailgate into channel (Figure 21). NOTE: Make sure the Weather Strip is fully engage to the tailgate before closing tailgate.