FREE 1 to 3-Day Delivery on Orders $149+ Details

How to Install Rubicon Express 2" Economy Lift Kit w/Shock Extensions on your 2007-2013 Wrangler

Shop Parts in this Guide
Safety Warning:
Suspension systems or components that enhance the off-road performance of your vehicle may cause it to handle differently, on and off-road, than it did from the factory. Care must be taken to prevent loss of control or vehicle rollover during sudden maneuvers. Failure to drive the vehicle safely may result in serious injury or death to driver and passengers. We recommend you always wear your seatbelt, drive safely and avoid quick turns and other sudden maneuvers. Constant maintenance is required to keep your vehicle safe. Thoroughly inspect your vehicle before and after every off-road use.
Installation Warning:
We recommend that certified technicians perform the installations of our products. Attempts to install these products without knowledge or experience may jeopardize the safety of the vehicle. These instructions only cover the installation of our products and may not include factory procedures for disassembly and reassembly of factory components. Read instructions from start to finish and be sure all parts are present before disassembling the vehicle. Included instructions are guidelines only for recommended procedures and in no way are meant to be definitive. Installer is responsible to insure a safe and controllable vehicle after performing modifications. Do not perform test drives on public roads with partially completed installations. Always double and triple check your work before use.
ESP WARNING NOTE: The 2007 Jeep Wrangler JK is equipped an Electric Stability Program (ESP). This system is designed to help control the vehicle in times of uncertain traction conditions and roll stability. Due to the complex nature of this program Rubicon Express strongly suggest that after lifting the vehicle it is returned to the dealer for a computer “flash” to re address tire size and proper ESP control settings. Rubicon Express also recommends that you become familiar with the ESP controls and how the different level of settings can help you to keep better control of your vehicle.
KIT CONTENTS:
1 RE1324 Front 2.5” coil spring spacer, pair
1 RE1326 Rear 1.75” coil spring spacer, pair
1 RE1380 Front 2” bump stops, pair
1 RE1387 Rear 2” bump pad, pair
1 RE2003 Front shock extensions, pair
1 RE2004 Rear shock extensions, pair
FRONT INSTALLATION:
1. Prepare for the front installation by removing the following items from the front of the vehicle. Tires, Shocks (at the axle only), Sway bar links (from the axle only), Brake line bracket from the frame only, and track bar (axle end only)
2. With the items removed, lower the front axle assembly and remove the front coil springs.
NOTE: Be careful not to overextend the front drive shaft into the exhaust or skid plate.
3. Mark the center of the lower spring bucket and drill to 5/16”. Pre-tap the hole using the supplied 3/8” self tapping bolt from the front bump stop kit. Do not install the bump stop at this time
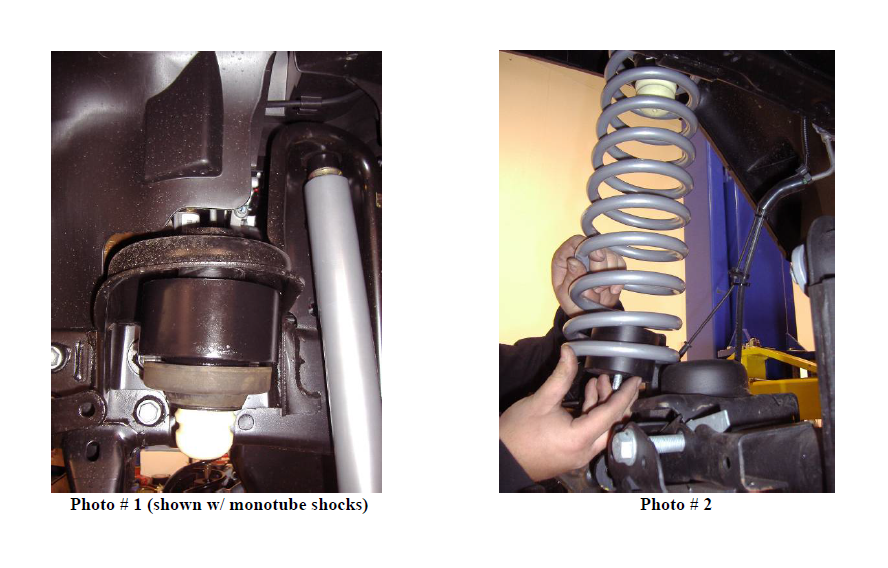
4. Slide the new front coil spring spacer on the upper tower with the lip facing down. The spacer can be installed either above or below the factory rubber isolator. (photo 1)
5. Reinstall the coil spring up into the vehicle’s upper spring tower while holding the bump stop spacer inside the coil. Place into the lower coil bucket and rotate the coil into position.
6. Install the 3/8” self tapping bolt thru the bump stop and into the axle bracket. (photo 2)
7. Raise the axle into place and install the new front shock extensions to the factory axle shock location with the supplied hardware.
8. Reinstall the factory sway bar links, track bar, and re-attach the brake line bracket to the frame.
Rear Installation
1. Prepare for the rear installation by removing the following items from the rear of the vehicle
Tires, shocks, sway bar links (from the axle only) brake line bracket from the frame only, and track bar (axle end only)
2. With the items removed, lower the rear axle assembly and remove the coil springs.
3. Install the lower bump stop pads (RE1387) on the axle housing with the supplied hardware.
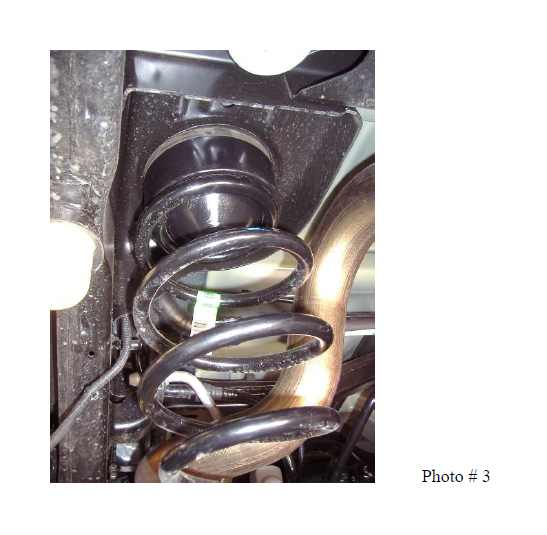
4. Place the new coil spring spacer and factory coil isolator on top of the stock coil, and raise into the upper coil mount and over the lower axle mount. (photo 3)
5. Reinstall the factory shocks using the RE2004 rear shock extensions at the frame mounting point.
6. Raise the axle into place and reinstall the shocks to the axle, factory sway bar links, track bar, and re-attach the brake line bracket to the frame
Installation review
1. Torque all bolts to factory specs and double check your work.
2. Test drive and note location of steering wheel.
3. Adjust drag link to center steering wheel.
4. Align vehicle as soon as practical to minimum factory caster and maximum factory toe-in specifications.
5. Recheck all bolts after 50 miles and again after every off road excursion.