 FREE 1 to 3-Day Delivery on Orders $149+ Details

How to Install Rough Country D Ring Kit on your 2007-2013 Wrangler
Tools Required
- 9/16" Socket/ Wrench
- 3/4" Socket / Wrench
- Drill Motor
- 15/32" Drill Bit
- T30 Torx Head Bit
- T55 Torx head
- 5/16" Allen Head Wrench
- Rachet

Shop Parts in this Guide
Kit Contents:
1057Box1
Bumper
1057Box2
Winch Plate
Frame Brackets
1057BAG1- 22-1/2” x 1 1/2” Bolt
22-1/2” Lock nuts
44-1/2” Flat Washers
4-7/16” x 4” Bolts
4-7/16” x 1 1/4” Bolts
14-7/16” Flat Washers
6-7/16” Lock Nuts 2-10mm x 35mm
2-10mm Flat Washers
2-12mm x 35mm Bolts
2-12mm Flange Lock nuts
1057BAG3-Accessrory Hardware Bag
14-1/2” X 1 1/2” Allen Head Bolts
14-Lock Nuts
INSTALLATION INSTRUCTIONS
1. Place vehicle on a flat surface and set emergency brake.
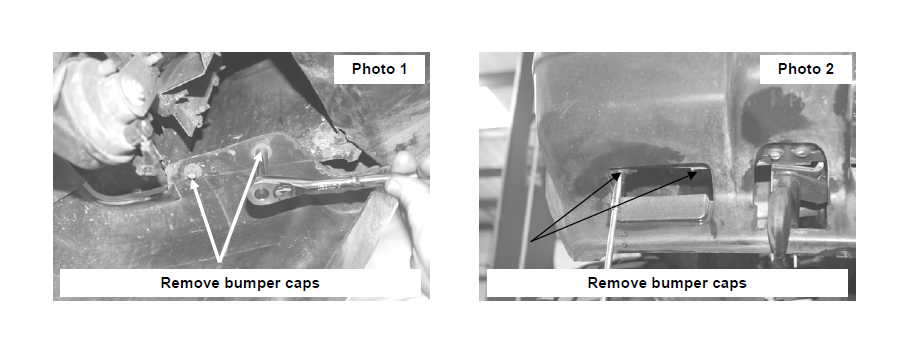
2. Remove the front bumper end caps as shown in Photo 1 & Photo 2 using a 10mm wrench and remove the cap from the bumper.
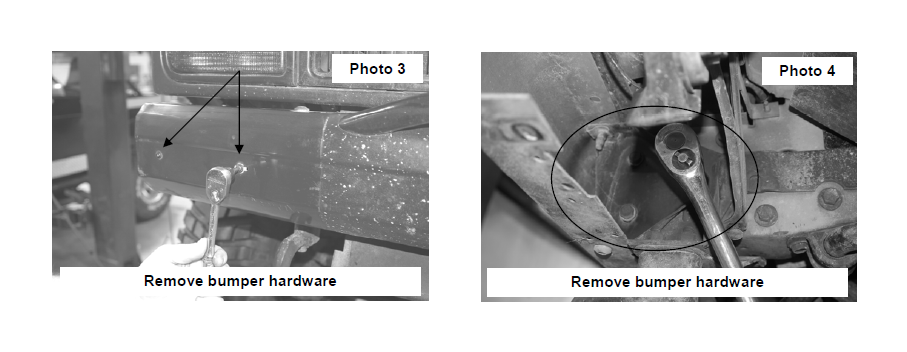
3. Remove the bumper as shown in Photo 3 by removing the bolts using a T30 torx head bit wrench.
4. Remove the bumper bolts ( three per side) as shown in Photo 4 from the uni-body using a 15mm socket.
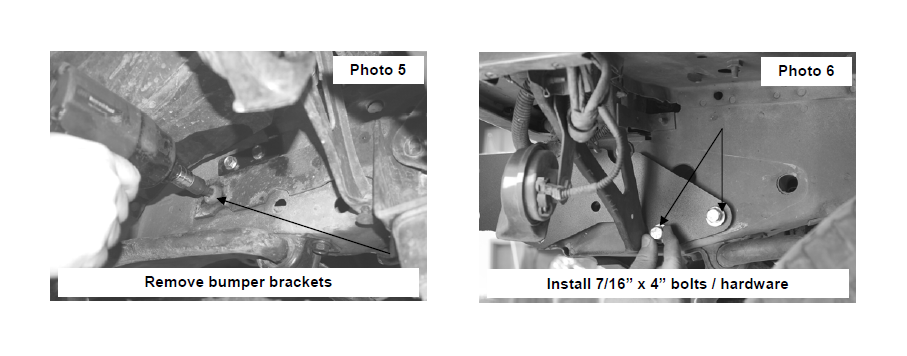
5. Remove the rear most bumper bolt from the uni-body using a T55 torx bit. See Photo 5.
6. Remove the bumper from the vehicle.
7. Install the bumper bracket on the frame as shown with the 7/16” x 4” bolts, washers and lock nuts on the driver side. See Photo 6. Do not tighten until all bolts have been installed.
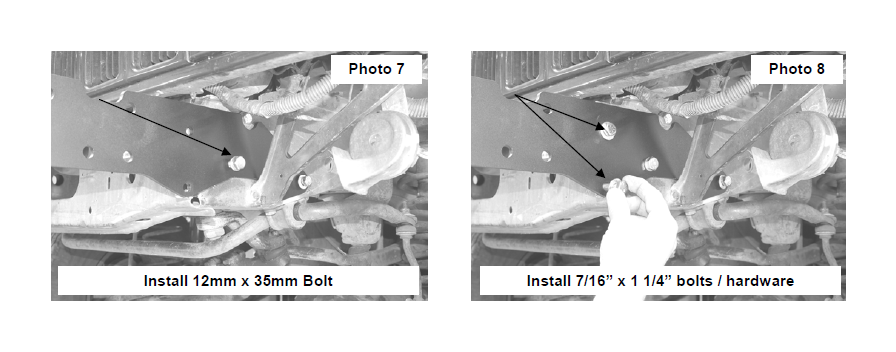
8. Install the supplied 10mm x 35mm bolts as shown in the bracket and threaded hole in the uni-body. (Driver Side Shown) Do not tighten until all bolts are installed in bracket. See Photo 7.
9. Install the supplied 7/16” x 1 1/4” bolts, washer and lock nuts as shown in Photo 8.
10. Proceed to pass side to install bracket.
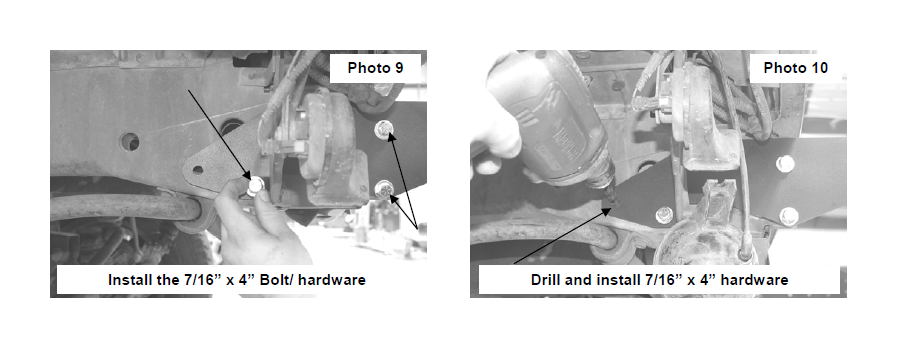
11. Place the bracket on the uni-body and install the forward 7/16” x 4” bolt, washers & lock nuts, the 10mm x 35mm bolt in threaded hole in uni-body and the two 7/16” x 1 1/4” bolts, washers and lock nuts. See Photo 9.
12. Drill the rear hole using a 15/32” drill bit and install the 7/16” x 4” bolts, washers and lock nut. See Photo 10.
13. Tighten the 7/16” hardware using a 9/16” socket/ wrench and the 10mm using a 17mm socket.
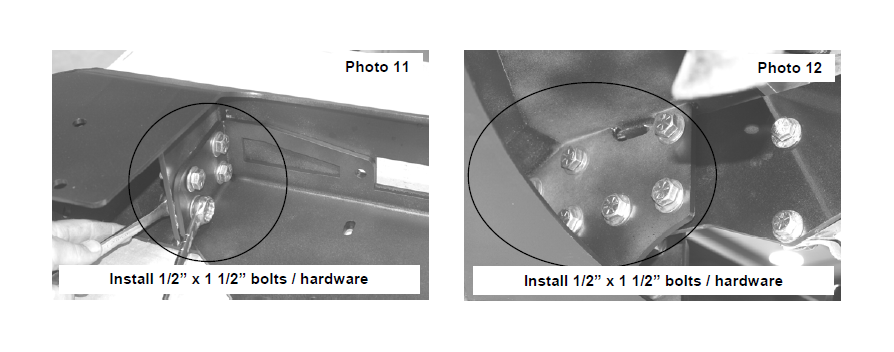
14. Install the winch plate in the bumper as shown with the supplied qty 8 (4 per side)1/2” x 1 1/2” bolts, washers and lock nuts. Tighten with a 3/4” socket / wrench only after both sides of the winch plate has been installed in the bumper. See Photo 11.
15. Install the bumper on the bumper brackets with the supplied qty 14 (7 per side) 1/2” - 1 1/2” bolts, washers and lock nuts. See Photo 12. Tighten using a 3/4” socket / wrench.
16. Included in this kit are bolts and nuts to mount the optional stinger, light-bar and d-ring kits. If these kits are not purchased with this bumper, the hardware can be installed to cover the accessory locations. If desired install the supplied 1/2” x 1 1/2” button head bolts in the top of the winch bumper and the front of the winch bumper.
17. Also included in this kit are 2 12mm x 35mm bolts for the roller fairlead. Hardware included with some winches do not supply hardware long enough to install through the plate and fairlead on this bumper. This can be installed during the winch installation process, but preferably before the winch is installed to easily gain access to this hardware.
MAINTENANCE INFORMATION
1. Failure to securely tighten all bolts on the winch plate, winch, and fairlead can result in product failure, which may result in vehicle damage or operator injury. Check that all bolts are securely tightened prior to use.
2. Inspect all nuts and bolts on the winch, winch mount, and related hardware prior to each use. Tighten all nuts that appear to be loose. Stripped, fractured, or bent bolts or nuts should be replaced.
3. Periodically check bolt for tightness.

