Installation Time
(approx) 30 Minutes
Difficulty Level:
Simple installation for anyone.
Guaranteed Free Delivery by 12/24! available on most items - Details
$949.99 (each)
FREE Shipping + $149.00 Oversized Item Fee Market Price $1,112.99 You Save 15% ($163.00)Add Local Shop Installation
Saved - View your saved items
We're sorry. We couldn't save this product at this time.
Hey, guys. Today I'm here with the RedRock 4x4 Full Length Roof Rack in texture black fitting all 2018 and newer four-door JL Wranglers equipped with that factory hard top. So storage solutions inside your Wrangler can get filled up pretty quick and investing in an exterior storage solution is always a great idea. As it says in the name, this is gonna completely cover the whole length of your hard top from the front windshield all the way back to the rear window hinges so you're getting a lot of space and surface area to work with as far as that large cargo goes or even for that rooftop mounted tent.This roof rack is going to be durable as well, made up of steel tubing construction and it's gonna have the weight capacity of up to 300 pounds which is pretty impressive for a hard top mounted roof rack. Not to mention the styling of this thing is going to be pretty sleek. It's gonna be really low profile in comparison to some other roof racks that you may be taking a look at on this site, especially for those hard top mounted ones and it's going to give you a little bit of better aerodynamics because of that wind dam in the front.As far as pricing goes, this is gonna be roughly $700 and I personally like that price considering what you're getting out of this kit. Now this is gonna give you a lot of surface area on top of your Wrangler for a lot of cargo, especially with it being so aerodynamic and low profile and being on the hard top. Now, if you're taking a look at other options on the site, those will usually consist of more expensive options with the big and bulky roof racks that are body mounted. Those are perfect for people who are looking for a higher weight capacity. However, they usually are going to require a little bit of drilling or modification to get those on. Now if you're taking a look at some of the less expensive choices, they're usually not gonna be for full rack so you may have just a basket or a half-rack in the back. So in my personal opinion, I think if you're looking for a roof rack with a lot of space to work with that's gonna be very functional and it's also gonna look sleek mounted up on top of your Wrangler, then this is gonna be a good choice.I would like to mention because this is a full length roof rack, this is going to cover the front freedom panels so you won't be able to take those off while you have this roof rack installed. Nonetheless, this is going to be a very fuss free roof rack. You will be able to very easily take it off and put it back on whenever you need to carry that extra cargo or whenever you want to take those freedom panels off. So as far as the install goes, I'm gonna give this a one out of three wrenches on the difficulty meter. You're gonna need a couple of basic hand tools and probably a couple of hours' worth of your time. So speaking of that install, let's jump into that now.Tools I used for my install are a flathead screwdriver, a 4 millimeter and 5 millimeter Allen socket, 10 millimeter and 13 millimeter deep socket, a 3 inch extension, 3/8 inch drive ratchet, 10 millimeter wrench and an impact wrench.So first step is to start on the ground. We do have to install our rubber spacers on the front and the back piece of our roof rack so what we're gonna do is actually flip the front and the back piece over and install our rubber spacers. You should have four of them. I would also recommend to have the hardware staged. It will be the 4 millimeter button head bolt and the flat washer that fits with that bolt and you're also gonna need a 4 millimeter Allen key or Allen socket and a ratchet.So it's a little bit easier to do this step while you're on the ground or on the floor or even on a table just because these pieces are large and heavy and you wanna make sure that you have everything ready before you head over to the Jeep. So after that's threaded in with that large washer there, we can tighten it up with that 4 millimeter Allen socket or Allen key. And you don't need to overtighten it. This is a pretty soft rubber so just wanna make sure that that's in there so this metal part doesn't scratch your hard top.What we can do now is attach our hinge brackets. Now we have to pop this cover off. I'm just gonna use a flathead screwdriver and pry off that cover. Should come off pretty easily. Get that out of the way and we're gonna do this one hinge at a time. There's 2 10 millimeter bolts that are holding the hinge to our hard top so I'm gonna use a 10 millimeter socket as well as a 3 inch extension to give myself a little bit of room because this glass is right here, we don't wanna damage it, and my hand ratchet. We're gonna remove those and sandwich our new bracket in between the hinge bracket and the bolts.So once those two bolts are out, we are going to reuse those. So keep those near. But now we can take our bracket, put that on top of our hinge there, line everything up and go ahead and tighten that back down. So I have somebody else holding the glass down. The glass might wanna fight the strut that's attached to it. So once you get those two bolts in, we can start to tighten them down with the same 10 millimeter socket. You also wanna tighten these down pretty evenly into the hard top. So after our hinge is on what we can do is just put our cover back on and do the same thing for the other side.So with the help of a friend, what we can do now is take the back piece and place it down on top of those studs. Before we move on to adding our other pieces of our roof rack, we're gonna secure this down using the flat washers, lock washers and provided nuts that are in the kit. Then we can tighten those up with a 13 millimeter socket. Gonna use a deep socket just because we have that stud there. So now we can install our middle piece and lay it into place so we can attach it to our back part of our roof rack.Now we can attach the back part of our roof rack to the middle part of our roof rack using the provided hardware which is gonna be two flat washers, split washer, a nut and the provided bolt. And then we can secure the other side in the front and then we can come back and tighten this down.All right. So once everything is together, what we can do is start to tighten everything down and that should straighten out the bars from the front to the middle to the back. So I'm gonna use a 10 millimeter socket as well as a 10 millimeter wrench. We can tighten those up.What we can do next is install our side mounting brackets. So this is going to have four threaded holes up at the top, that's gonna attach to the bottom our roof rack up here, and three threaded holes on the side and this is going to attach to our clamp that's going to basically clamp our rain sill or our rain gutter right here. So we're gonna actually lift up on our rack. This is gonna sit inside of here. Gonna grab our hardware, four bolts, flat washers and lock washers.So now that those are threaded in, what we can do is start working on the side here. This is gonna be attached with the button head hardware. We are gonna be using the longer mount or clamp for the front. As you can see, this has a little bit of a ridge here or an elbow that's gonna go underneath this side of the hard top. So we can place that on. And thread in our hardware. Now I wanna get everything lined up. We wanna get the rest of the clamps and brackets installed before we tighten anything down. So after these are threaded in, we can repeat that process for the other three mounts and clamps.So now that all of our mounting brackets and our two front clamps are installed, what we can do is tighten up all of our mounting brackets and then the clamps up at the front. So I'm using a 13 millimeter socket as well as my impact wrench and a 3 inch extension to give myself some room. So for the button head bolts on the side for the clamps into the mounts I'm gonna use a 5 millimeter Allen key. Then you can do the same thing on the other side. So we can install our rear clamps with the same 5 millimeter button head bolts. We can tighten them down with the same 5 millimeter Allen socket. Then you can repeat that process on the other side and you're all set to go.So that's gonna wrap it up for my review and install. Make sure you like and subscribe and for more videos and products like this, always keep it right here at extremeterrain.com.
Subscribe to our YouTube Channel
Features, Description, Reviews, Q&A, Specs & Installation
Brand | RedRock |
Rack Type | Roof Rack |
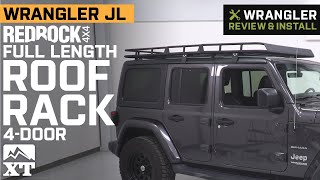
Sleek Design and Practical Functionality. The RedRock 4x4 Full Length Roof Rack is ideal for 2018-2023 4-door hardtop JL Wranglers as it offers a sleek appearance and practical functionality. This Roof Rack features a more streamlined design that adds an aerodynamic element to your Jeep’s roofline. This Roof Rack includes a built-in wind deflector that works with the Rack’s low profile design to reduce wind noise for a more pleasant driving experience. More importantly, this Roof Rack is capable of carrying loads of up to 300 pounds, allowing you to carry extra cargo and supplies without surrendering interior room.
Heavy-Duty Build Quality. The RedRock 4x4 Full Length Roof Rack is manufactured from high-grade tubular steel measuring 1.5-inches thick for maximum durability. This Roof Rack is machine-formed and welded for added rigidity and precise fit when installed. Lastly, the Rack is completed in a durable textured black powder coated finish for superior corrosion resistance and aggressive good looks.
Fast No-Mod Install Procedure. RedRock 4x4's Full Length Roof Rack installs with no drilling or modifications required. This Roof Rack mounts to your Jeep’s rain gutters using the included brackets. Installation can be completed in under an hours time.
Application. This RedRock 4x4 Full Length Roof Rack is designed to fit 2018-2023 Jeep Wrangler JL 4-door Hard Top models.
Fitment:
RedRock J130926-JL
CA Residents: WARNING: Cancer and Reproductive Harm - www.P65Warnings.ca.gov
Installation Info
Installation Time
(approx) 30 Minutes
Difficulty Level:
Simple installation for anyone.
What's in the Box
10 More Questions