Talk to a Wrangler Sales Tech
1-877-870-8556
M-F 8:30A-11P, Sat-Sun 8:30A-9P
Logo Image
$20K Sweeps! 10 Chances to Win! Enter Daily >

RedRock HD Tailgate Mounted Tire Carrier (18-24 Jeep Wrangler JL)

Item J127065-JL
Verify parts fit and get product recommendations.
Wrangler Sales Techs: Connect Now M-F 8:30A-11P, Sat-Sun 8:30A-9P
$0.00
On Sale

$141.99 (each)

FREE Shipping Market Price $176.99 You Save 20% ($35.00) Up to 10% off for Military & First Responders! See Details

Will this fit your Vehicle?

Select a different vehicle Help?
Update or Change Vehicle
Ship to: Ashburn - 20149
Sorry, please enter a valid US or CA postal code
We're sorry, zip can't be updated at this time.
Recommended Install Shops
How It Works
Install Shops are available near Ashburn - 20149

Add Local Shop Installation

Total cost of service $249.00
    Create a list
    Add to New List

    Saved - View your saved items

    We're sorry. We couldn't save this product at this time.

    or use

    Get a $30 Prepaid Visa Card!

      Product Videos

      This RedRock 4x4 HD tailgate mounted tire carrier is for anyone with the 2018 and up JL, that's looking to be able to mount a larger spare tire in the factory spare tire location, and in fact, use that factory spare tire carrier, but wants to be able to move it up and out a little bit, so that you have a little bit more clearance with the bumper. This is going to be a nice easy one out of three wrenches for the installation, just bolting right in place, you don't even have to do any wiring to move the third brake light, and we're gonna show you how to get that done in just a second.So, when you mount a larger and heavier spare tire on the back of your Jeep than the factory one, you're gonna run into a couple of different issues, and one of those is just gonna be clearance between the bumper and the tire itself. And this is going to help with that by moving everything up a little bit. If you're mounting a wider tire on a wider wheel, or a wheel with a different backspacing from factory, you can also end up with an issue of the back of the tire hitting the tailgate before your lug nuts get tight. This is also going to help with that by moving everything away from the tailgate a little bit. So you're going to have those two issues alleviated, or at least made better, by this bracket.Now, there are also some issues with mounting a heavier tire in the factory spare tire location that this is not going to help with, and those issues can be anything from the hinges on your tailgate wearing out, the welds of the tailgate itself coming apart, or the tire carrier, that factory tire carrier, can actually wear, fatigue, and breakdown over time with that additional weight. And this bracket is not going to help with that by itself. If you pair this bracket with the RedRock 4x4 HD tailgate reinforcement kit, it does help with those issues. But again, just this part is only going to help with the space issue and not with the weight issue. But if that's all you're looking to do, this is gonna be a really nice choice. Again, it moves things out and up just a little bit for you, giving you some more clearance. Even if you are mounting a pretty big tire on here, and your factory third brake light mount would be hidden behind the tire, it does give you the bracket and everything you need to get your third brake light mounted in the center of the spare tire, which is a pretty good look, and it's also going to keep you legal, of course, you need to have that third briefly visible in order to remain legal on the street. And, overall, it's a very simple piece, it installs simply, but it is going to get the job done for you.This comes in at right around $110, which, I think, is a pretty fair price for what it does. Now, if you're looking at this compared to some of the other solutions that will take care of the weight and the space issue, they're really not a fair comparison, because those other options are gonna be a lot more expensive, but they're also going to do a lot more for you. So, if you're just looking for something that's going to allow you to clear that bigger tire and not have it hit the bumper, this is gonna be a good choice at a pretty good price. Like I said before, one out of three wrenches for the installation, let me show you how to do it.For this installation, we used a couple of different sockets, a 13-millimeter deep well and standard depth, we also used a 22-millimeter socket, and for our lug nuts, we needed a 13/16-inch, but your lug nuts may be a little bit different. We also used a T25 Torx bit, and the T40 Torx that comes out of the Jeep tool kit, along with an extension, all driven by our 3/8 electric impact. Finally, we used a trim removal tool, but if you decide to trim the vents on your tailgate, you'll need a sharp knife as well.And of course, the first step in installing an adapter bracket for the tire carrier is going to be getting the tire and the factory carrier off the Jeep, and we'll start doing that by removing the cover for the camera. This is something that covers the camera, but it also is a little bit of a security feature, because it will keep anybody from accessing this lower lug nut. Of course, we need to get to that to get the tire off, so we're gonna use the T40 Torx that's included in your Jeep tool kit, with every Jeep. If you don't have the tool kit, any T40 Torx will work just fine. And all we need to do is, let's stick that in, give it about a quarter turn counterclockwise, and this will come right off. With the camera cover out of the way, we'll remove the three lug nuts and get the spare tire off the mount. Of course, we have aftermarket lug nuts, so we'll need this adapter and a slightly different sized socket, but we'll get those removed to get the spare tire out of the way.The next step is to open the tailgate and pop off the plastic trim piece on the inside so that we can unplug the two wires that go from the inside of the tailgate to our tire carrier, that's going to be the camera wires and the third brake light wires. Once they're disconnected, we can remove all the bolts and get the carrier off the Jeep. So as you can see, there are three connectors in here that we exposed when we removed that trim piece, we're just gonna have to disconnect this white connector, which is the camera one, and the two-wire connector for the third brake light. This one here is for the locking mechanism on the tailgate, and you can leave that one alone. So, we'll just just pinch and pull to get these connectors apart. This one here has the red locking tab, like a lot of the other electronic connectors on your Jeep, so pull the tab, then you can pinch and pull. Now we can jump back to the outside of the tailgate and get the tire carrier off. So, back on the outside of the tailgate here we can pull this rubber grommet, and pull our two connectors through, and now all that's holding the tire carrier on are these eight 13-millimeter bolts that we're gonna remove now.Now that we have the tire carrier on the table, we can finish with the disassembly of it before we move on to assembling our new carrier. And what's left to do is remove this third brake light assembly, and then remove the third brake light itself from the assembly. We don't need any of this apparatus, because your new tire carrier allows you to mount just the light itself in the center of your spare tire, it gives you the bracket and everything you need for that. So, a little bit of disassembly first. What we're gonna be doing is removing all of these T25 Torx around the outside of this piece, we can pull the plastic cover off, unbolt the light itself, unplug it, set it aside, and then there are two more on either side here of the same T25 Torx that we'll remove to get the rest of the light mount out of the way. Now, go ahead and unplug the third brake light, just to get the wiring harness out of the way. Now we can remove these last two Torx bolts, and that will allow us to get the light out of the rest of this trim.So, we're gonna set our third brake light aside over here because we are going to be reusing that piece. This piece of trim from the third brake light holder, we're not reusing, so we'll set that over here. And we're gonna remove our last four Torx bolts on the carrier to get the rest of the third brake light trim out of the way. And again, we're not using any of that stuff. Of course, we are going to be reusing the main body of the tire carrier. Now we're gonna set the factory spare tire carrier aside and start doing some assembly on our new bracket.So, the first thing we're going to do, assembly wise, is mount our third brake light that we just removed onto its bracket. And what that allows us to do is mount the third brake light in the center of the spare tire. So, regardless of how big your spare tire is, you're not going to have any interference issues with the light and your spare. So, we're gonna bolt these two pieces together using the factory hardware.The last bit of assembly we're gonna do here on the table, before we jump over and start the installation on the Jeep, is to install these bolt plates through the backside of our bracket. And they just get clipped into place with these small plastic retainers. These are going to be what holds our factory tire carrier onto our new bracket, and the plastic retainers just ensure that they're not going to slide out while we're moving the bracket around, getting it installed onto the Jeep. So, they just slide up from the backside here, and we'll slide our plastic retainers over top.We brought the carrier over to the Jeep to start with the install, and we realized that we had a little bit of a fitment issue. So, these plastic vent covers here just fill in the holes in your tailgate, and if you wanted to leave them in place, what you could do is just take a sharp razor knife, and just nip the outside ears off the bottom of these. that will give you the clearance you need to install your tire carrier. Now, since we don't want to permanently modify our Jeep, we're going to be putting it back to stock after we show you guys how to get this install done, we're just gonna remove these vents entirely. Of course, that is gonna leave a big hole in the tailgate, but, like I said, just for demonstration purposes, that's gonna be just fine. So, gonna pop the tailgate open, and from the inside I'll use my trim removal tool to press down the tabs and get these out of the way.With your tailgate vents trimmed or, in our case, completely removed, we're ready to bolt our tire carrier up to the tailgate. Now, because we're just installing the tire carrier, we're going to be using all four of the spacers that are included in the kit. If you're installing this with RedRock's tailgate reinforcement kit, you're only going to be using the spacers on the left side, because the reinforcement kit will add that thickness that you need on the right. But again, we're gonna be using all four of these. Now, it is a little bit of a balancing act, holding up the entire carrier itself, getting the spacer started, getting the bolts through. But it's really only difficult for the first couple of bolts. Once you have the tire carrier hanging on the tailgate, it becomes a little bit easier to get the rest of them started. Of course, as usual, we're gonna leave everything loose until all eight bolts are started, then we'll tighten them down. With everything started by hand, we can get our impact and tighten it all down.Now, we can get our tire carrier bolted onto our bracket, and it's just gonna slide over the studs that we installed previously. You just wanna make sure you don't pinch your wiring here, it has this nice, large slit to lay in. But again, make sure you don't pinch that down, and we're gonna secure everything with the washers and the nuts that are included in the kit. Once you have all the nuts started, we can go back and tighten them down.Now that the tire carrier is secretly bolted back onto the Jeep, we can reconnect our wiring. So, we're gonna push our plug ends back through the tailgate up to the grommet, open the tailgate, plug everything in, and then pop our plastic cover back onto the inside of the tailgate.Now, we're down to the last couple of steps of the installation. We're gonna put the tire back onto our tire carrier, but instead of using those lug nuts that we took off, we're going to be using two of the lug nuts that come in the kit, and a third factory lug nut. So that's going to allow us to have the mounting location for our third brake light. So, once we get the tire mounted up, we'll move on to getting that third brake light bolted on.Now we're gonna bolt our third brake light on our new bracket up to our new lug nuts, that are set up with the threaded holes in it. Before we do that, we are gonna pull our wire through one of the holes in the wheel, and get the third brake light plugged in. It just makes it a little bit easier to do out here than when it's already bolted up. Now that we have our third brake light all plugged in, we can get it bolted down with the included 13-millimeter bolts, lock washers, and flat washers. Once you have those bolts tightened down, that's gonna be it for the install.So, if you are looking for a bracket that's going to push your tire away, and up a little bit from its factory mounting location, so you can put a larger than factory spare on that tailgate, I would recommend taking a look at this option from RedRock 4x4, that you can find right here at extremeterrain.com.

      Product Information

      Features, Description, Reviews, Q&A, Specs & Installation

      Features & Specs

      • Tailgate Mounted Tire Carrier
      • Perfect Resting Spot for Your Spare Tire
      • Constructed Using Premium Steel
      • Takes Pressure off of Your Factory Mounting Points
      • Tubular Steel Construction
      • Textured Black Powder Coated Finish
      • Rust and Abrasion Resistant
      • Will Not Affect Your Tailgate’s Operation
      • High Manufacturing Standards
      • Easy to Install
      • Compatible with the 2018-2024 Jeep Wrangler JL

      Description

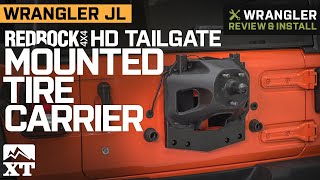
      OEM Quality Tire Carrier. The RedRock 4x4 HD Tailgate Mounted Tire Carrier is the perfect resting spot for your spare tire, constructed using premium steel to take pressure off of your factory mounting points. It is constructed using tubular steel, complemented by a textured black powder coated finish for rust and abrasion resistance.

      Bolt-On Style. This unit is designed to be a bolt-on installation with no cutting or drilling required. Note, it will not affect your tailgate’s operation. It is constructed in adherence to the highest manufacturing standards for outstanding support on the trails.

      Installation. Installing this product take no more than 60 minutes, with a medium degree of complexity if you have light to moderate mechanical skills.

      Application. The RedRock 4x4 HD Tailgate Mounted Tire Carrier is compatible with the 2018-2024 Jeep Wrangler JL.

      RedRock 4x4

      Fitment:

      RedRock J127065-JL

      CA Residents: WARNING: Cancer and Reproductive Harm - www.P65Warnings.ca.gov

      Installation & What's in the Box

      Installation Info

      What's in the Box

      • (1) Tailgate Mounted Tire Carrier
      4.6

      Customer Reviews (14)

        Questions & Answers

        10 More Questions