Installation Time
(approx) 1 Hour
Difficulty Level:
Light to Moderate mechanical skill required.
FREE 2 or 3-Day Delivery on 10,000+ Items. Details
$279.00 (pair)
FREE Shipping Market Price $320.99 You Save 13% ($41.99)Open Box from $83.70
Saved - View your saved items
We're sorry. We couldn't save this product at this time.
or use
Hey, guys. So today, we're checking out Morimoto GEN2 XB LED Turn Signals with a Smoked Lens, fitting all 2018 and newer JL Wranglers excluding the Sport models. So, if you are in search of a stealthier look to the front of your Jeep, you're looking for small mods that are going to accomplish that, then this choice is going to do a great job. Now, this will completely replace your factory turn signal with a smoked lens and a fully LED setup and it's going to be a lot more functional than your factory turn signals.Now as you can see, it does have the smoked lens on the front. It is going to be a little bit stronger. Perfect for anybody who's taking their Jeep off-road a lot and wants something that's gonna be durable and is going to hold up. But inside, we're gonna have two strips of LEDs. Now the LEDs are going to be bright, they're gonna be a lot more noticeable making you more noticeable on the street for safety purposes but it's also gonna add a lot of style and make it look a lot more modernized than the factory turn signal.Now, the top LED bar is going to be a bright white color and the bottom LEDs are going to be a bright amber. Now the turn signal is also going to have a sequential function which is going to be a big step up, again, adding a lot of style. Now I would like to mention that this is just going to come with the turn signal by itself and will not come with the marker light over on this side. You will be reusing your factory marker light. Just to let you guys know because there are many options available on the page that do come with a new side marker light.Now with that being said, this is going to be one of the more affordable choices on the page with that being one of its reasons why coming in at roughly $300. Now there are other options available in the category that are gonna be set up pretty similar to this with the smoked appearance. Some other options may not come with the sequential function. Some of those choices may come with that sequential function but may be set up a little bit differently as far as the LEDs are concerned. And then there are those options that are a little bit more expensive that may come with the marker light around the side included in the kit.Now again, I personally am a fan of this option. It's got a good quality construction. It's sealed very tight. Perfect for anybody who's taking their Jeep off-road and sticking to the streets. These are definitely going to hold up for a very long time and they are going to look very good while doing it. So again, overall, the quality of the construction, the ease of install which I'll show you guys in just a second, and the overall look I think that these are well worth the money.Now speaking of the install, I'm gonna give this a two out of three wrenches on the difficulty meter just because this is going to take a decent amount of time, about an hour to get both of these turn signals in. However, you don't have to do any wiring. Everything is completely plug and play. So, you're just gonna need some pretty basic hand tools and again, about an hour's worth of your time to get the job done in the driveway. Speaking of the install, let's jump into that now.The tools that I used for my install were an electric ratchet, a trim removal tool, a couple extensions, a 10-millimeter and 8-millimeter socket, and a T30 and T25 Torx socket. So, in order to access our turn signal, we will have to peel back or completely remove our inner fender liner to make it a little bit easier for you guys to see. I'm gonna completely remove it. So that consists of a couple of screws and clips. I'm gonna start by taking off the couple of clips up at the front.So, there's gonna be a clip up in the corner and there's gonna be one in the corner over by the body mount. I'm gonna take out this one first using a trim removal tool. Now we can take off the inner one. Using the same trim removal tool, we can take off the inner clip. Then we can move to the screws up at the front. Next, we can use an 8-millimeter socket to remove the two screws that are holding in the inner fender liner up at the front. In the upper middle part of our fender liner, we're gonna have a 10-millimeter bolt. I'm gonna use a 10-millimeter socket to remove that. So right next to the 10-millimeter bolt, there is gonna be another one in the center. I'm gonna use a 10-millimeter socket to remove that one as well.Last but not least, we're gonna have two clips down at the back of our fender. Now as you can see, we are missing one but I'm gonna use that same trim removal tool to remove the other one. Now we can remove our inner liner. What we can do at this point, you're gonna take a trim removal tool or, like, a soft pry tool and kinda pry on this. There's a couple of rivets on the side of the fender that you may have to kind of pry the inner liner off of. It is pretty much stuck in there so you kinda have to bend it out of place. So, after you've kind of pried the edges out with a trim tool, we can just pull down and wiggle this out of place.So, in order to access the bolts for our turn signal, we do need to remove this plastic piece. So, we're gonna start by removing the 10-millimeter bolt down at the bottom here. This is a welded piece that's connected to the body of the Jeep and then there's also gonna be one at the top. That's gonna allow us to pull the fender away and kind of wiggle this plastic piece out. So, I'm gonna use a 10-millimeter socket to remove those two bolts. Same with the top one.So once that is disconnected, we can pull our fender away. Now you may have to kinda give this a good pop because it is held on by a clip there. But once this plastic piece clears, we can drop this down and we'll be able to access the bolts that are holding in our turn signal. So, the bottom ones are a T25, so you'll need to switch it up from the T30 from the bolts up at the top.So, after the lower bracket is flipped out of the way, we need to remove the upper one. So, there are three bolts that are holding it in. I'm gonna use a T30 Torx in order to remove those. And there's gonna be one over at the side that may be a little bit difficult to see here. One in the middle. And there's gonna be one over on the outer edge.And what we can do with that then is pull this out and wiggle this out of the way. And that'll give us full access to the bolts that we need to remove for the turn signal itself. So now we have full access to the turn signal. So, I'm gonna take a T25 Torx socket and we can remove the four bolts that are holding that in. Now the two up at the top may be a little bit difficult to see. You may need a small extension for the one up at the back.Give this a good twist, pull back, disconnect this harness here. So, because our turn signal and our marker light are connected, we do have to take out our marker light first. So, there is a T30 Torx bolt, maybe a little bit difficult to see but it's right on the side here. I'm just gonna take a T30 Torx socket and remove that. Once that's out, we can pop this out of place by just pushing forward. And then we can disconnect this connection here, pop this out to the side, then we should be able to remove our turn signal.So, before we hop into the install, I do wanna step down and tell you guys a little bit more about these new turn signals, especially in comparison to the factory one, show you some of the similarities and the differences between the two. And now starting off is just a brief overview of our factory turn signal. As you can see here, it's gonna have a standard black plastic housing on the back. We're gonna have a clear lens upfront and this is going to be out of the LED package so you can expect an LED light out of these turn signals from the factory. Now, this is also going to have a chrome look to it. Very stock application, very stock function, and very stock look. However, that's not gonna be the case when moving over to our new option by Morimoto. Now as you can see, this is going to have a very smoked look. We're gonna have a smoked polycarbonate lens on the front so this one actually will be a lot more durable than the factory one which is great if you take your Jeep out on the trail and you want a lens that's going to hold up from any kickup on the street or even on the trail. This is gonna have an injection molded AVS black plastic housing on the back. So that is going to be durable as well. Very similar to our factory one. However, this is going to have a direct fit just like our factory one.Then on the inside, we're going to have OSRAM LEDs. We're gonna have two separate light bars or two separate operations or functions when it comes to the lighting itself. This top light bar with the OSRAM LEDs, those are going to have a white color so they are going to be a bright white when it comes to the color temperature. And then the turn signal on the bottom is going to have an amber color. Now that overall is going to be a lot more noticeable, a lot brighter than the factory one and overall, this is going to give a more modernized and complete look to the front end of the JL.Now overall, I personally really like this option. It's gonna give a sleek and stealthy look and it's going to be a big upgrade in functionality. So, what do you say we go ahead and install our new turn signal? So, what we can start off with is mounting up our new light using our factory hardware. So, we're gonna pop this into place making sure that the studs are aligning just where they need to go. We're gonna push it up into place. Then we can grab our T25 Torx screws and screw those in. I'm also using an extension here just to give myself some reach. So you can just make sure that those are tight.What we can do next is add our marker light. Now, this is gonna be our factory marker light and we're gonna secure it down with our factory hardware. So, this should just slide right into place. And once we tighten up our hardware, it should slide right in.Once that's on there, we can plug in our wiring harness for the marker light, and then what we can do before we start putting everything back together is get our new wiring harness in order. So, on the wiring harness that comes with our new light, we have a couple of free LEDs. Now, depending on if you have a factory LED or a factory non-LED package is how you are gonna plug these in. Now if you have the non-LED package, you are just going to plug red to red and you can tie these two up and out of the way. Make sure that you cap these or put some tape over the ends. But if you have the factory LED package, you will be using all four. So we're going to put the white to red. Make sure that that is in there. And then we're gonna do red to green. White to red, red to green.So once that is done, what we can do is also add our resistor. So, this is just going to plug in. Make sure you hear a click. And then we can wrap this underneath our fender similar to our factory harness and plug this into our factory connector. Now, this does come with some large heat shrink or heat wrap that you can put on here and shrink to the size of the wiring harness to make sure that this is all together. Now I'm not gonna put that on there. However, you can slip this over or slip that over and then heat shrink it with a heat gun. I am just gonna use a couple of zip ties and we can plug this in and get this tucked up and out of the way. So, what I'm gonna do is just lift up on the fender and just kind of place this behind.And once it's tucked up and out of the way, we can plug it into our factory harness and we can plug this into our factory harness. Make sure that that clicks. We can put that clip back in place. And then what you wanna do at this point before we kinda go ahead with anything else is just make sure that that wire is tucked up out of the way and out of the way of any other mounting points. Then we can go ahead and install our bracket and put everything back together.Next, what we can do is reinstall our main bracket here. This is gonna go in the inner wheel well here. And then tuck up to our fender mount. Just wanna make sure that these wires are out of the way from any mounting locations. And then we can install the three T30 Torx screws. And use our T30 Torx socket to tighten them up.Then what we can do after that's tightened up is flip this protective cover back up in place. And then we can secure the two 10-millimeter bolts that are holding on our fender. After those are on, we can reinstall our inner wheel well inner liner. Next, we can pop our inner fender liner in place. And we can secure it down with the factory hardware. So, we can install our clips on both the front and the back. And we can install our 8-millimeter screws upfront using an 8-millimeter socket to tighten that up.Then we can secure the two 10-millimeter bolts holding in the top of our inner fender liner. All right. And so, after the inner fender liner is on and you're all set to go, you can repeat that same process on the other side.So that's gonna wrap it up for my review and install. Make sure you like and subscribe for more videos and products just like this. And always keep it right here at extremeterrain.com.Now, the LEDs are going to be bright, they're going to be a lot more noticeable making you more noticeable on the street for safety purposes, but it's also going to add a lot of style and make it look a lot more modernized than the factory turn signal. Now, the top LED bar is going to be a bright white color, then the bottom LEDs are going to be a bright amber. Now, the turn signal is also going to have a sequential function which is going to be a big step up, again, adding a lot of style. Now, I would like to mention that this is just going to come with the turn signal by itself and will not come with the marker light over on the side. You will be reusing your factory marker light. Just to let you, guys, know because there are many options available on the page that do come with a new side marker light.Now, with that being said, this is going to be one of the more affordable choices on the page with that being one of its reasons why, coming in at roughly $300. Now, there are other options available in the category that are going to be set up pretty similar to this with the smoked appearance. Some other options may not come with the sequential function. Some other choices may come with that sequential function, but maybe set up a little bit differently as far as the LEDs are concerned. And then there are those options that are a little bit more expensive that may come with the marker light over on the side included in the kit. Now, again, I personally am a fan of this option. It's got a good quality construction. It's sealed very tight, perfect for anybody who's taking their Jeep off-road and sticking to the streets. These are definitely going to hold up for a very long time and they are going to look very good while doing it.So, again, overall, the quality in the construction, the ease of install, which I'll show you guys in just a second, and the overall look, I think that these are well worth the money. Now, speaking of the install, I'm going to give this a two out of three wrenches on the difficulty meter just because this is going to take a decent amount of time, about an hour to get both of these turn signals in. However, you don't have to do any wiring. Everything is completely plug-and-play. So, you're just going to need some pretty basic hand tool and again, about an hour's worth of your time to get the job done in the driveway. Speaking of the install, let's jump into that now. The tools that I use for my install were an electric ratchet, the trim removal tool, couple of extensions, a 10-millimeter and 8-millimeter socket, and a T30 and T25 Torx socket. So, in order to access our turn signal, we will have to peel back or completely remove our inner fender liner. To make it a little bit easier for you guys to see, I'm going to completely remove it. So that consists of a couple of screws and clips. So, I'm going to start by taking off the couple of clips up at the front.So, there's going to be a clip up in the corner and there's going to be one in the corner over by the body mount. I'm going to take out this one first using a trim removal tool. Then we can take off the inner one. Using the same trim removal tool, we can take off the inner clip. Then we can move to the screws up at the front. Next, we can use an 8-millimeter socket to remove the two screws that are holding in the inner fender liner up at the front. Then the upper middle part of our fender liner, we're going to have a 10-millimeter bolt. I'm going to use a 10-millimeter socket to remove that. So, right next to the 10-millimeter bolt, there is going to be another one in the center. I'm going to use a 10-millimeter socket to remove that one as well. Last but not least, we're going to have two clips down at the back of our fender. Now, as you can see, we are missing one, but I'm going to use that same trim removal tool to remove the other one. And then we can remove our inner liner.What we can do at this point, you can take a trim removal tool or like a soft pry tool and kind of pry on this. There's a couple of rivets on the side of the fender that you may have to kind of pry the inner liner off of. It is pretty much stuck in there, so you kind of have to bend it out of place. So, after you've kind of pried the edges out with a trim tool, we can just pull down and wiggle this out of place. So, in order to access the bolts for our turn signal, we do need to remove this plastic piece. So, we're going to start by removing the 10-millimeter bolt down at the bottom here. This is a welded piece that's connected to the body of the Jeep. And then there's also going to be one at the top. That's going to allow us to pull the fender away and kind of wiggle this plastic piece out. So, I'm gonna use a 10-millimeter socket to remove those two bolts. Same with the top one. Once that is disconnected, we can pull our fender away.Now, you may have to kind of give this a good pop because it is held in by a clip there. But once this plastic piece clears, we can drop this down and we'll be able to access the bolts that are holding in our turn signal. So, the bottom ones are a T25, so you'll need to switch it up from the T30 from the bolts up at the top. So, after the lower bracket is flipped out of the way, we need to remove the upper one. So, there are three bolts that are holding it in. I'm going to use a T30 Torx in order to remove those. And there's going to be one over the side that may be a little bit difficult to see here. One in the middle. And there's going to be one over on the outer edge. What we can do with that then is pull this out and wiggle this out of the way. And that'll give us full access to the bolts that we need to remove for the turn signal itself. So, now we have full access to the turn signal. So, I'm going to take a T25 Torx socket, and we can remove the four bolts that are holding that in. Now, the two up at the top may be a little bit difficult to see. You may need a small extension for the one up at the back. Give this a good twist, pull back, disconnect this harness here.So, because our turn signal and our marker light are connected, we do have to take out our marker light first. So, there is a T30 Torx bolt, maybe a little bit difficult to see, but it's right on the side here. We're just going to take a T30 Torx socket and remove that. Once that's out, we can pop this out of place by just pushing forward. And then we can disconnect this connection here, pop this out to the side, and then we should be able to remove our turn signal. So, before we hop into the install, I did want to stop down and tell you guys a little bit more about these new turn signals, especially in comparison to the factory one, show you some of the similarities and the differences between the two. And now, starting off is just a brief overview of our factory turn signal. As you can see here, it's going to have a standard black plastic housing on the back, we're going to have a clear lens upfront, and this is going to be out of the LED package. So you can expect an LED light out of these turn signals from the factory.Now, this is also going to have a chrome look to it, very stock application, very stock function, and very stock look. However, that's not going to be the case when moving over to our new option by Morimoto. Now, as you can see, this is going to have a very smoked look. We're going to have a smoked polycarbonate lens on the front. So this is going to actually will be a lot more durable than the factory one, which is great if you take your Jeep out on the trail and you want a lens that's going to hold up from any kick-up on the street or even on the trail. This is going to have an injection-molded ABS black plastic housing on the back. That is going to be durable as well. Very similar to our factory one. However, this is going to have a direct fit, just like our factory one. Then on the inside, we're going to have Oznium LEDs, and we're going to have two separate light bars or two separate operations or functions when it comes to the lighting itself.This top light bar with Oznium LEDs, those are going to have a white color as they are going to be a bright white when it comes to the color temperature. And then the turn signal on the bottom is going to have an amber color. Now, that overall is going to be a lot more noticeable, a lot brighter than the factory one, and overall is going to give it more modernized and complete look to the front end of the JL. Now, overall, I personally really like this option. It's going to give a sleek and stealthy look, and it's going to be a big upgrade in functionality. So, what do you say we go ahead and install on your turn signal? So, what we can start off with is mounting up our new light using our factory hardware. So, we're going to pop this into place, making sure that the studs are aligning just where they need to go. We can push it up into place. And then we can grab our T25 Torx screws and screw those in. I'm also using an extension here just to give myself some reach. You can just make sure that those are tight.What we can do next is add our marker light. Now, this is going to be our factory marker light, and we're going to secure it down with our factory hardware. So this should just slide right into place. And then once we tighten up our hardware, it should slide right in. Once that's on there, we can plug in our wiring harness for the marker light. And then what we can do before we start putting everything back together is get our new wiring harness in order. So, on the wiring harness that comes with our new light, we have a couple of free leads. Now, depending on if you have a factory LED or a factory non-LED package is how you are going to plug these in. Now, if you have the non-LED package, you are just going to plug red to red and then you can tie these two up and out of the way, make sure that you cap these or put some tape over the ends. But if you have the factory LED package, you will be using all four. So, we're going to put the white to red. Make sure that is in there.And then we're going to do red to green. White to red, red to green. So, once that is done, what we can do is also add a resistor. So this is just going to plug in, make sure you hear a click. And then we can route this underneath our fender similar to our factory harness, and plug this into our factory connector. Now, this does come with some large heat shrink or heat wrap that you can put on here and shrink to the size of the wiring harness to make sure that this is all together. Now, I'm not going to put that on there. However, you can slip this over or slip that over and then heat shrink it with a heat gun. I am just going to use a couple of zip ties, and we can plug this in and get this tucked up and out of the way. So, what I'm going to do is just lift up on the fender and just kind of place this behind. Now, once it's tucked up and out of the way, we can plug it into our factory harness. Then we can plug this into our factory harness, make sure that that clicks. We can put that clip back in place.And then what you want to do at this point before we kind of go ahead with anything else is just make sure that that wire is tucked up out of the way and out of the way of any other mounting points, and then we can go ahead and install our bracket and put everything back together. Next, what we can do is reinstall our main bracket here. Now, this is going to go in the inner wheel well here and then tuck up to our fender mount. Just want to make sure that these wires are out of the way from any mounting locations. And then we can install the three T30 Torx screws and use our T30 Torx socket to tighten them up. Then what we can do after that's tightened up is flip this protective cover back up and put into place. And then we can secure the two 10-millimeter bolts that are holding on our fender. After those are on, we can reinstall our inner wheel well liner. Next, we can pop our inner fender liner into place. And we can secure it down with the factory hardware.So, we're going to install our clips on both the front and the back. And then we can install our 8-millimeter screws upfront using an 8-millimeter socket to tighten that up. Then we can secure the two 10-millimeter bolts holding in the top of our inner fender liner. All right. So, after the inner fender liner is on, then you're all set to go. You can repeat that same process on the other side.So, that's gonna wrap it up for my review and install. Make sure you like and subscribe for more videos and products just like this, and always keep it right here at extremeterrain.com.
Subscribe to our YouTube Channel
Features, Description, Reviews, Q&A, Specs & Installation
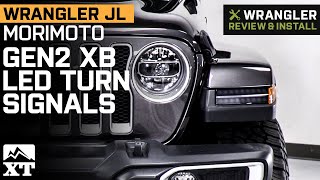
Enhanced Visibility and Style. Ensure a safer driving experience by installing the Morimoto GEN2 XB LED Smoked Turn Signals on your JL. Aside from giving your Jeep a more aggressive exterior, the bright LEDs will ensure your vehicle’s visibility, especially when preparing to change directions.
High-Strength Construction. These LED Turn Signals are sealed for all-weather protection. The housings are made of durable black ABS with smoked polycarbonate lenses for long-lasting functionality. This combination also enhances your JL’s visual appeal. Moreover, these lights are designed for an OEM-fit with plug-and-play harnesses for a hassle-free installation.
Plug-and-Play Installation. Each of the LED Turn Signal connects to your factory wiring and bolts directly to the factory mounting locations of your Jeep. The installation process completes with light mechanical and electrical skills required.
Limited Warranty. A 5-year limited warranty is offered by Morimoto for these GEN2 XB LED Smoked Turn Signals against factory defects in materials and workmanship. Some exclusions may apply; please check the terms and conditions for full details.
Application. These Morimoto GEN2 XB LED Smoked Turn Signals are intended for use on 2018-2023 Jeep Wrangler JL's, excluding Sport models.
Fitment:
Morimoto LF513
CA Residents: WARNING: Cancer and Reproductive Harm - www.P65Warnings.ca.gov
Installation Info
Installation Time
(approx) 1 Hour
Difficulty Level:
Light to Moderate mechanical skill required.
What's in the Box
10 More Questions