Talk to a Wrangler Sales Tech
1-877-870-8556
M-F 8:30A-11P, Sat-Sun 8:30A-9P
Logo Image
$20K Sweeps! 10 Chances to Win! Enter Daily >

3-Row Full Aluminum Radiator (87-06 Jeep Wrangler YJ & TJ)

Item J143113
Verify parts fit and get product recommendations.
Wrangler Sales Techs: Connect Now M-F 8:30A-11P, Sat-Sun 8:30A-9P
$0.00
Our Price

$159.99 (kit)

FREE Shipping Market Price $184.99 You Save 14% ($25.00) Up to 10% off for Military & First Responders! See Details

Open Box from $72.00

Will this fit your Vehicle?

Select a different vehicle Help?
Update or Change Vehicle
Ship to: Ashburn - 20149
Sorry, please enter a valid US or CA postal code
We're sorry, zip can't be updated at this time.
Recommended Install Shops
How It Works
Install Shops are available near Ashburn - 20149

Add Local Shop Installation

Total cost of service $249.00
    Create a list
    Add to New List

    Saved - View your saved items

    We're sorry. We couldn't save this product at this time.

    or use

      Product Videos

      Merideth: If you're in search of some better cooling for your 1987 to 2006 YJ or TJ Wrangler, this 3-Row Full Aluminum Radiator is a great pick. Now, this will be a great option if you're looking to increase your cooling capacity with a larger radiator, if you're currently having cooling issues with your factory one. This will also just be a great choice if you need to do some maintenance on your Jeep, and would rather upgrade to a heavier-duty or a bigger option at a pretty affordable price point compared to some other choices. This will have a three-row construction that will increase the amount of space for coolant flow, keeping the temps down in your Jeep, which will be especially helpful if your factory one isn't cutting it, especially for trail use. Now, this will also feature a full aluminum build, as it says in the name, with aluminum end caps, which will prevent any cracking or leaking, unlike the factory-style plastics. The radiator will also have a factory-style fit, so you won't have to do any fabricating or modification in order to drop this in place, making the install or the fitment very straightforward.Getting into the price, this will come in at roughly $200, which is a pretty good price point. Now, comparing it to other choices, this will have a direct fit, and will have three rows, for increased capacity over the two or one-row systems. Now, other more expensive systems may come with a larger capacity, or just have some small differences, including hardware or extra components in the kit. Now, I think if you're just looking for a larger and higher-quality cooling setup for your Jeep, then this is a great place to start. When it comes to the install, this will be a three out of three wrenches on the difficulty meter, so I would recommend a little bit of experience when tackling this job. Now, you'll also need about three hours worth of your time, and tools on hand in order to get the job done, as well as some additional coolant, to make sure you're filling back up the system. Now, speaking of the install, one of our customers here has installed this on their Wrangler, and is gonna walk you through that process step by step. So, that wraps it up for my review. Let's go ahead and get into the install.Man 1: Here are the tools that I use. I use a 5/8 to remove the fittings from the transmission line to the radiator, a extension, to make sure we could reach, a gear wrench, a 11-millimeter and a 10-millimeter, and pliers. The pliers were used to open the clamps. The 10-millimeter was used for the radiator. The 11-millimeter was used for the cover of the radiator.First step is drain your radiator. You're gonna twist this until it opens up. One of the steps you're gonna do is remove the cap, by pressing it down, twisting it, and lifting it up. The next thing we're gonna do is we're gonna remove the coolant reservoir by removing here, hard. You're gonna press in the middle. There's a button. You're gonna press hard, and pull it upwards. I'm gonna remove it to the side.Man 2: [inaudible 00:03:15]Man 1: You're gonna get some pliers, and you're gonna go with the long pliers, [inaudible 00:03:25]. And you're gonna squeeze the pressure clamps. Get it out of the way. Some come with pressure clamps. Some of them come with screw clamps. Once you do that, you're gonna pull it out, and move it out of your way. Now you're gonna remove the fan cover. There's four screws around it. There's one here, one down here, and two on this other side. You're gonna use a drive and an extension with a 11-millimeter. You could also access this screw by the bottom. I just prefer to do it through the top. Now you're gonna repeat it on the other side. We'll remove the ones from the passenger side, using a drive extension and an 11-millimeter. Same process on the other one, one on the top and one on the bottom. For the bottom one, we're gonna go through the bottom. From the bottom one, we're gonna go to the bottom, and we're gonna use it right here in the corner. We're gonna use the same drive extension and 11-millimeter.Now we're gonna remove the fan cover out of the way. One of the things you wanna do is you wanna move to the side a little bit the filter cover, and then just lift it, and that will be it. It's out of the way. Okay. Now we're gonna remove the under water hose and the two transmission hose. This one also with pressure clamps, and we're gonna be using the same jaw pliers. We're gonna start with this one right here. I'm gonna squeeze it, and move the clamp away. I'm gonna squeeze it and move the clamp away. I'm gonna open it. I'm gonna squeeze, and move the clamp away.We're gonna be now removing the radiator. It has three screws on the right-hand side, and three screws on the left side. They are 10 millimeters. We're gonna be using the drive extension and the 10-millimeter cup. There's three holes that you could put your tools through it, and just twist to it. And you're gonna repeat it. All three screws has the hole, so you will go through it. I recommend doing the two from the top, and two from the bottom. Using the same tools, drive, extension, and 10-millimeter, we're gonna remove the two top screws from the driver's side. Here it's open, so you don't need to worry about using the extension. You could. I use it because it's easier for me.On the driver side, I would recommend to do all three from the top. It's a little bit easy access than from the passenger side. The passenger side has a better access from the bottom to the last screw than the one on the passenger side. The last screw from the bottom on the passenger side will be through this hole right here. All right. Once you take all those screws out, you just gotta lift it up. Move the cover fan, and it will come out. From the old radiator, you wanna take out the transmission oil cooling lines fittings. I'm gonna be using a 5/8 wrench. Once you take it out, you're gonna try them on yours. Okay. So, this is the fitting for the transmission oil lines, for the cooling system. I'm gonna go right here. In my scenario, they didn't fit. This part here crashed with the bottom part, so I went ahead and bought new ones. They don't have the bottom part. And we're just gonna go ahead and place them there. And we're gonna use the 5/8. And we're gonna tie them as possible without breaking them. In my scenario, I had to get two of those.So, I took the whole line out. You go under the vehicle, where the transmission lines come out. It's also a pressure clamp. I took it out. And I have the other end here. Since this end doesn't fit that, I went ahead and bought a new line. So, we're gonna use a new line. We're gonna reuse the clamps. And we're gonna use the new fitting transmission cooling lines. I'm gonna put it in. Using the pliers, we're gonna squeeze it. If these ones are too big for your hose and fitting, I recommend using the one that are screwed in, so you have a better tight pressure. If you are like me, that will have to move the transmission line to change the oil cooling fittings, here are the both transmission lines. They use either pressure clamp or screw clamp. You could just squeeze, move the clamp out of the way. You could use your pliers, and then just pull, and they will come out. And that's the same way you're gonna replace them is pushing them back in, all the way to the back, and clamp them back in. Make sure you clamp it in the back, so you have better protection.So, I would recommend when you're installing it back, have all the fittings removed, and also the plug, then remove the plug, so you avoid any breakage of the plugs, since it's plastic, or any bending on the fittings. All right? All right, now we're gonna go ahead and install the radiator. You're gonna do it from the top to the bottom. You're gonna notice there is the AC lines there, so you wanna play with this opening area here, tilting it to the side, and then coming back in, so you'll be able to make it in fast. So, we're gonna go in. As soon as you get to the AC line, you're gonna tilt it in, and bring it back in. Make sure you're aligned with your screws. My recommendation is just put one first, and one on the other side. Don't tie them, so you can play and wibble them as needed. And it's in place. Remember that when we take it out, it was six screws to the chassis of the Jeep. So we're gonna go ahead and put them back. So, we're gonna go one here, one there, one in the bottom, one here, and one in the bottom. So, a total of six. All right?All right. So, once you're gonna tie everything in, make sure you have your tube back in place, and then just tie everything up all the way down, the same both sides. All right. Now let's go back and put the cover, the fan cover again. You're gonna align it with the holes. Remember this side, you have the filter cover. So you wanna align it with the hole. You got the screws. Remember, this is only four screws here. So, we're gonna go ahead and align it. Once we have it in place, remember, it's an 11-millimeter. Don't super-tie it, so you could do the other side first. Okay? Now you're gonna put the hose, the top hose back, push it back in, and then you're gonna go here, push it back in also, with your pliers. Remove the pressure clamp all the way to the location that it should be at.All right. We're gonna put the front hose now, the top one. Push it until it stops. Push it here until it stops also. Now you're gonna use your pliers and use your pressure clamps. Make sure it's well put. And now we're gonna go to the bottom ones. Now we're gonna put the transmission cooling fluid fittings first. Make sure they're not on the transmission line first. You're gonna use a 5/8 to tie it. Tie it pretty neat, without breaking. Once you have tied it, you're gonna put the hose in place, and you're gonna tie your clamp. Of course, without the line attached to it, so you have better maneuver. Same process. Same tool, the 5/8. You wanna tie it into it's pretty tight, but not enough to break it.Once you have done that, then you're gonna go ahead and put your line back in. And you wanna go ahead and tie your line now. Once you tie it, you wanna make sure it doesn't come out. All right, both lines are in. Now you're gonna put the bottom water hose into place. And we're gonna use the pliers for the pressure clamps, and just put it in place. All right. Don't forget to put the plug, the drain plug. Here there ain't no tool. This is, like, a hand, because it's plastic. You don't wanna break it. Squeeze it enough with your hand. And that's it. Now fill it up with your coolant. And now it's installed. I put a gallon and a half of coolant. And there you go.Merideth: So, that is going to wrap it up for my review and the install of the 3-Row Full Aluminum Radiator, fitting all 1987 to 2006 YJ and TJ Wranglers. For more videos and products just like this, remember to always keep it right here at extremeterrain.com.

      Product Information

      Features, Description, Reviews, Q&A, Specs & Installation

      Features

      • Premium Radiator Assembly
      • Excessive Engine Cooling
      • Powerful 3-Row Coolant Tubing
      • Negates Overheating
      • Imperishable Steel Composition
      • Limited Product Warranty
      • Complex Installation
      • Fits All 1987-2006 Jeep Wrangler YJ & TJ Models

      Description

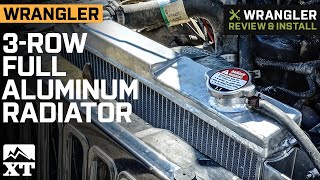
      Excessive Engine Cooling. The 3-Row Full Aluminum Radiator is exactly what you'll require if you ever want a replacement radiator that can handle the high standards of your heavy-duty Jeep. With the help of this efficient cooling equipment, keep your engine compartment consistently cold and operating at its ideal temperature, ensuring higher performance and increased economy.

      Imperishable Steel Composition. The 3-Row Full Aluminum Radiator is entirely made of bulwarked 6061-T6 aluminum steel that has been polished and CAD-welded to guarantee lifelong functioning and satisfactory performance even after many years of use. To prevent rust and corrosion from tainting the coolant fluid it stores, it even comes anodized with zinc and coated with a silver finish.

      Installation. This product may require professional installation and would take roughly 3 hours to mount.

      Warranty. This product comes with a limited manufacturer warranty from the date of purchase that covers any manufacturer flaws or damages prior to installation. Some limitations may apply to this warranty.

      Application. The 3-Row Full Aluminum Radiator fits all 1987-2006 Jeep Wrangler YJ & TJ models.

      Fitment:

      CA Residents: WARNING: Cancer and Reproductive Harm - www.P65Warnings.ca.gov

      Installation & What's in the Box

      Installation Info

      What's in the Box

      • (1) Radiator Unit
      • (1) Radiator Cap
      • (1) Drain Plug
      4.7

      Customer Reviews (56)

        Questions & Answers

        10 More Questions