 FREE 1 to 3-Day Delivery on Orders $149+ Details

How to Install DV8 Off-Road Front Aluminum Inner Fenders - Black (2018 Jeep Wrangler JL) on your Jeep Wrangler
Installation Time
60 minutes
Tools Required
- Trim Removal Tool
- Ratchet (1/4” and 1/2")
- Wrench (3/8”)
- Sockets (8, 10 and 22mm and a 3/8”)
- Hex (Allen) Key (1/8”)
- Floor Jack
- Jack Stand
- Torque Wrench

Shop Parts in this Guide
Note: Park the vehicle on a safe and leveled surface and wear protection gear. If you are planning to color match any parts of the inner fender liner with the theme in your JL, you should do so before starting the installation process for better results.
Installation Instructions:
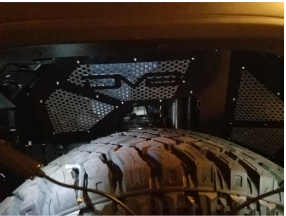
1. Using the provided hardware, install the aluminum meshes on the inner fender panels. The meshes have pre-drilled holes that align to the corresponding panel.
a. Insert the screw from the outward side of the panel so the head of the screw is facing to the visible part of the panel once installed (first image below).
b. Insert the washer and the nut from the other side and secure loosely (second image below).
c. A total of 9 screws are needed for the rear portion of the inner fender and 12 for the front portion. Once all hardware have been installed, tight using the 3/8” socket and the 1/8” hex key. The third picture shows the front and rear portions of the inner fender panel for the driver’s side.
d. Repeat these steps for the inner fender liner of the passenger’s side.

2. Lift the vehicle using the floor jack and place the jack stand in the jack points according to manufacturer suggestion.
3. If your vehicle is equipped with factory wheels and lug nuts, use a 22mm socket to remove the tire on the side in which the installation will be performed. A different socket might be needed if aftermarket wheels are installed.
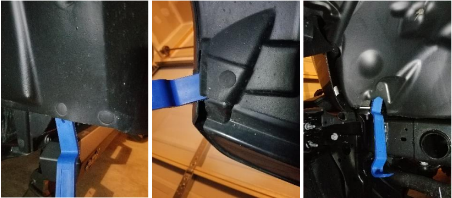
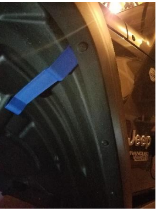
4. Using the trim removal tool, remove the factory installed inner fender liner. A total of 4 clips (two in the rear of the fender and one in the front towards the edge of the fender and one in the lower inward section) will be removed in this step. Place the trim removal tool behind the inner fender liner (Driver’s side shown).
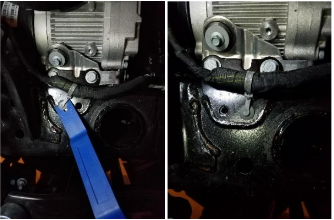
5. Using an 8mm socket, remove the 2 bolts in the front of the factory inner fender liner (Driver’s side shown).
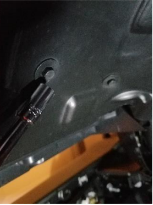
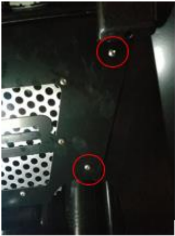
6. Using a 10mm socket, remove the 2 bolts in the top of the factory inner fender liner (Driver’s side shown).
7. With all the bolts removed and using the trim removal tool, pop out the remaining 3 clips in the top of the factory fender liner. Insert the trim removal tool between the fender and the fender liner as shown below (Driver’s side shown).
8. Release the inner fender liner from the 4 remaining clips in the rear of the fender. The clips should remain in place once the inner fender liner is detached.
9. Now you call pull out the inner fender liner.
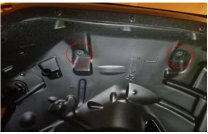
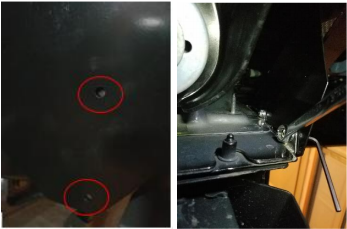
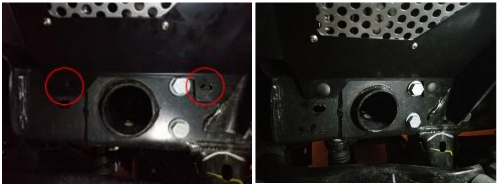
10. Using the trim removal tool remove the plastic trim in the lower rear portion of the fender. Two clips needs to be removed as shown below. Note the two holes on which the clips were attached to as these will be used to secure the rear portion of the new inner fender liner in a later step. (Driver’s side shown).

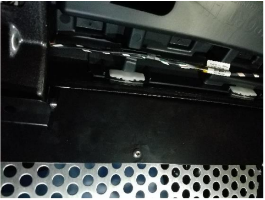
11. When working on the passenger’s side, remove the grey plastic clip holding the line attached to the frame using the trim removal tool. The clip can be relocated (loosely) to the hole that is about one inch in front of original. This step won’t apply when working on the driver’s side.
12. Now the rear portion of the inner fender liner can be installed. Insert the tab on the rear end of the panel between the fender and the body of the vehicle. Note that the panel have cutouts for the signal light cable and the arm holding the fender. Make sure the inner fender panel aligns with both and that the signal light cable is fitting loosely in the panel cutout.

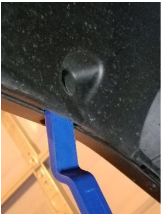
13. Using the provided hardware, the 3/8” socket and the 1/8” hex key, secure the bottom of rear portion of the inner fender to the two mounting holes in the body. You might have to maneuver the inner fender panel to ensure alignment with the mounting holes (Driver’s side shown).
14. Now install the front portion of the inner fender liner. Make sure that the tab on upper portion of the panel gets inserted behind the body panel (Driver’s side shown).
15. Using the provided hardware and the 3/8” socket, secure the front portion to the rear portion of the inner fender liner (Driver’s side shown).
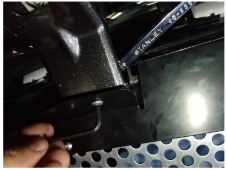
16. Using the provided hardware, the 3/8” wrench and the 1/8” hex key, secure the upper side of the front portion of the inner fender to the bracket on the fender (Driver’s side shown).
17. Using the provided clips, secure the lower side of the front portion of the inner fender to the frame (Driver’s side shown).
18. Reinstall the wheel and repeat all steps in the other side.
Installation Instructions Written by ExtremeTerrain Customer Duamel Santiago 11/20/2018

