Installation Time
(approx) 4 Hours
Difficulty Level:
Mechanical expertise or professional installation required.
FREE 2 or 3-Day Delivery on 10,000+ Items. Details
$119.99 (each)
FREE ShippingSaved - View your saved items
We're sorry. We couldn't save this product at this time.
or use
0:00:01.170,0:00:06.930this transfer case shift cables for0:00:03.389,0:00:08.969anyone with the 2007 to 2018 JK that are0:00:06.930,0:00:10.950looking to replace your factory shift0:00:08.969,0:00:13.049cable for that transfer case with one0:00:10.950,0:00:15.749that for all intents and purposes is0:00:13.049,0:00:17.910going to be Om but doesn't come with0:00:15.749,0:00:19.740that Mopar pricing this is going to be a0:00:17.910,0:00:21.450part that is a three out of three0:00:19.740,0:00:22.890wrenches for the installation you do0:00:21.450,0:00:24.120have to pull the center console out of0:00:22.890,0:00:26.070the Jeep there is going to be quite a0:00:24.120,0:00:28.530bit of disassembly in order to get into0:00:26.070,0:00:30.270this piece and swap it out but we will0:00:28.530,0:00:31.710show you how to do that in just a second0:00:30.270,0:00:33.870so if you are looking to replace your0:00:31.710,0:00:35.790factory transfer case shift cable you0:00:33.870,0:00:38.010can of course go to a dealership you can0:00:35.790,0:00:39.180order one from Mopar and what you're0:00:38.010,0:00:41.130going to get out of the box is0:00:39.180,0:00:42.420essentially the same thing that I have0:00:41.130,0:00:44.370in front of me here but it's just gonna0:00:42.420,0:00:46.560be a little bit more expensive so if0:00:44.370,0:00:50.130you're looking for something that is om0:00:46.560,0:00:52.230style it is going to look function fit0:00:50.130,0:00:53.820and just like that factory piece would0:00:52.230,0:00:56.100have but to save a couple of dollars0:00:53.820,0:00:58.770this is going to be a great choice for0:00:56.100,0:01:00.149you this is going to be right around 1200:00:58.770,0:01:01.410dollars so like I said a little less0:01:00.149,0:01:03.360expensive than going directly to a0:01:01.410,0:01:05.040dealership or pretty much the same piece0:01:03.360,0:01:06.540and it is going to be a little bit of an0:01:05.040,0:01:08.430involved installation but we'll show you0:01:06.540,0:01:09.930how to do it now tools required for this0:01:08.430,0:01:12.270installation are going to be some0:01:09.930,0:01:14.820flathead screwdrivers a 3/8 drive with0:01:12.270,0:01:17.840an extension an 18 millimeter socket a0:01:14.820,0:01:20.729t30 Torx bit trim panel removal tool0:01:17.840,0:01:23.100needle nose pliers optional is going to0:01:20.729,0:01:24.510be this impact and not driving all right0:01:23.100,0:01:26.460so we've done a few things that you0:01:24.510,0:01:28.110don't have to do in order to install0:01:26.460,0:01:29.850your transfer case shift cable I've0:01:28.110,0:01:31.200removed my driver's seat you don't have0:01:29.850,0:01:32.520to do that I just wanted to show you how0:01:31.200,0:01:34.290easy it is to get your center console0:01:32.520,0:01:38.270apart so I'm gonna put my key in the0:01:34.290,0:01:38.270ignition turn to the ACC mode0:01:39.049,0:01:42.509shift the transmission into neutral0:01:41.369,0:01:45.210now after that I'm gonna shut the0:01:42.509,0:01:49.079transfer case into neutral as well and0:01:45.210,0:01:51.179pull off that ship lever so this0:01:49.079,0:01:52.979transfer case ship lever if you haven't0:01:51.179,0:01:54.810pulled it off already you may need to0:01:52.979,0:01:58.579get on top of it and twist it however0:01:54.810,0:02:00.390mine should come off and pretty easily0:01:58.579,0:02:01.229make sure you don't have your face in0:02:00.390,0:02:03.689front of that you'll want to hate0:02:01.229,0:02:06.119yourself alright so with that off we're0:02:03.689,0:02:09.509going to put our parking brake all the0:02:06.119,0:02:10.649way up as far as we can bring it and0:02:09.509,0:02:13.950we're also going to lift our center0:02:10.649,0:02:16.769console lid see why in a second if I0:02:13.950,0:02:20.010didn't do that that would hit that so0:02:16.769,0:02:22.049with it up and out of the way we can0:02:20.010,0:02:24.000remove our center console put that off0:02:22.049,0:02:26.040to the side now we're gonna shift up0:02:24.000,0:02:28.319transmission back in the park and turn0:02:26.040,0:02:30.120our key into the off position all right0:02:28.319,0:02:32.430so we're going to do next is remove the0:02:30.120,0:02:34.739four bolts securing our center console0:02:32.430,0:02:36.630to the floor so there's gonna be two on0:02:34.739,0:02:39.030the driver side and two on the passenger0:02:36.630,0:02:41.700two in the back and then two in the0:02:39.030,0:02:49.829front I'm gonna go ahead and remove this0:02:41.700,0:02:51.420side and these are a t30 Torx bit bolt0:02:49.829,0:02:53.280and I just have that on the end of my0:02:51.420,0:02:55.139nut driver but while we're over here0:02:53.280,0:02:57.420we're also going to remove this rear0:02:55.139,0:03:00.000section of our center console and I'm0:02:57.420,0:03:02.190just gonna get a non-marking trim panel0:03:00.000,0:03:05.880removal tool just behind this piece0:03:02.190,0:03:08.190wherever I can you can see there's a0:03:05.880,0:03:12.470couple of Clips there we're just going0:03:08.190,0:03:16.410to disconnect our window switches and0:03:12.470,0:03:17.700our little auxilary light here all right0:03:16.410,0:03:19.200let's get the other screws off on the0:03:17.700,0:03:21.209other side alright so I'm just gonna0:03:19.200,0:03:24.440remove this last bolt securing our0:03:21.209,0:03:24.440center console to the floor0:03:29.849,0:03:37.480I'm gonna come around here and lift up0:03:33.219,0:03:38.650on that center console just like that we0:03:37.480,0:03:40.569don't have to completely remove it we0:03:38.650,0:03:42.189just need to get up we just need to get0:03:40.569,0:03:44.920the center console up far enough that we0:03:42.189,0:03:47.109can get to our transfer case cable right0:03:44.920,0:03:48.489here on the end of our shifter so as you0:03:47.109,0:03:50.200can see we are underneath the Jeep0:03:48.489,0:03:51.909you're going to take down this transfer0:03:50.200,0:03:56.019case skid plate I've got an 180:03:51.909,0:04:04.510millimeter socket on my impact this is0:03:56.019,0:04:05.439only on my four bolts alright now that0:04:04.510,0:04:06.939we're underneath the Jeep of the0:04:05.439,0:04:08.439transfer case skid plate out of the way0:04:06.939,0:04:11.109we can get a pair of needle nose pliers0:04:08.439,0:04:14.680in here and just grab one of these ears0:04:11.109,0:04:17.560and pull down on each side as even as0:04:14.680,0:04:18.549you can and it'll release that shift0:04:17.560,0:04:20.109cable out of that bracket0:04:18.549,0:04:22.419alright so now I'm bringing a long0:04:20.109,0:04:25.150flat-head screwdriver in and I'm going0:04:22.419,0:04:27.400to remove the shift cable from the0:04:25.150,0:04:31.990transfer case and here I'm just gonna0:04:27.400,0:04:32.979open up the screwdriver and slide that0:04:31.990,0:04:35.320off just like that0:04:32.979,0:04:37.539alright now we're back on the inside and0:04:35.320,0:04:39.490we're looking at our transfer case shift0:04:37.539,0:04:41.889lever right here and what we're gonna do0:04:39.490,0:04:43.419is take this this end off and I just did0:04:41.889,0:04:47.409the same thing take your screwdriver and0:04:43.419,0:04:52.139just open it up alright next step is to0:04:47.409,0:04:54.580remove our little housing block here0:04:52.139,0:04:59.949this should just slip right out just0:04:54.580,0:05:01.780like that let's shift our way0:04:59.949,0:05:03.789right here is the grommet where these0:05:01.780,0:05:05.550ship cable actually runs through so0:05:03.789,0:05:11.319we're just going to push that through0:05:05.550,0:05:12.969the underside it's like that aren't in0:05:11.319,0:05:14.289order to get our ship cable through0:05:12.969,0:05:16.620we're actually got to remove this little0:05:14.289,0:05:20.219map holder I'm just gonna pull it back0:05:16.620,0:05:20.219release those clips0:05:25.920,0:05:30.250all right so with your map holder out of0:05:28.120,0:05:32.110the way what we're going to do is pull0:05:30.250,0:05:34.150the shift cable out through the0:05:32.110,0:05:39.610passenger compartment not through the0:05:34.150,0:05:40.780bottom so just take your time here make0:05:39.610,0:05:42.910sure that the bottom sides not getting0:05:40.780,0:05:44.380caught up on anything all right my0:05:42.910,0:05:46.360transfer case cable was hitting0:05:44.380,0:05:49.240something on the bottom side so I freed0:05:46.360,0:06:09.030that up and now I'm going to pull it the0:05:49.240,0:06:11.980rest of the way through pressure right0:06:09.030,0:06:14.470and there you have it there is our0:06:11.980,0:06:16.450transfer case shift cable all right so0:06:14.470,0:06:19.600let's get our new shift cable into place0:06:16.450,0:06:22.030we're gonna do the same but opposite of0:06:19.600,0:06:25.180our uninstall we're gonna slip this0:06:22.030,0:06:28.090through underneath our trim and our0:06:25.180,0:06:32.320dashboard and get that end into the hole0:06:28.090,0:06:34.090in our floor board all right let's go0:06:32.320,0:06:37.870ahead and slide the rest of our cable0:06:34.090,0:06:42.360through that grommet hole be tough to0:06:37.870,0:06:45.400get those bigger pieces through just0:06:42.360,0:06:47.500maneuver it around a little bit and0:06:45.400,0:06:49.120you'll get a problem0:06:47.500,0:06:52.150let me go underneath because it feels0:06:49.120,0:06:55.660like I'm hitting something there so just0:06:52.150,0:06:58.380pull this through and here is our end0:06:55.660,0:07:01.570here I'm just gonna stake it back0:06:58.380,0:07:04.960towards the area it needs to be so we0:07:01.570,0:07:07.510get the rest of the slack through all0:07:04.960,0:07:08.440right come back over the top alright now0:07:07.510,0:07:10.230we're gonna get this rubber piece0:07:08.440,0:07:16.110through that ground it holds well0:07:10.230,0:07:19.840followed up by our grommet itself let's0:07:16.110,0:07:22.560push that through first sure it gets all0:07:19.840,0:07:22.560the way through the hole0:07:26.090,0:07:29.590and then our grommet0:07:30.430,0:07:35.420alright so with our shift cable through0:07:32.750,0:07:38.690and our grommet in place we're gonna0:07:35.420,0:07:39.920move to get this top on as you see this0:07:38.690,0:07:42.770has a little couple little ridges you0:07:39.920,0:07:50.420want them facing out then you slip this0:07:42.770,0:07:55.010onto that block all right now we're0:07:50.420,0:07:57.800gonna hook up our shifter that's just0:07:55.010,0:08:00.260going to be right here make sure it0:07:57.800,0:08:01.760seats in there nice and we're gonna make0:08:00.260,0:08:04.490sure that this is in neutral so when we0:08:01.760,0:08:06.290attach it to our transfer case where I0:08:04.490,0:08:09.170can have any weird play all right so0:08:06.290,0:08:13.550we're gonna do next is put our orange0:08:09.170,0:08:15.800clip over this transfer case cable here0:08:13.550,0:08:20.000and then we're gonna slip it into our0:08:15.800,0:08:21.580transfer case mount right above that0:08:20.000,0:08:26.050[Music]0:08:21.580,0:08:26.050make sure it goes in there nice and even0:08:27.700,0:08:32.720all right so one less step to do is to0:08:30.350,0:08:34.280actually connect the shift cable to your0:08:32.720,0:08:35.120transfer case and make sure it clicks in0:08:34.280,0:08:36.229just like that0:08:35.120,0:08:38.390alright so just wanted to show you0:08:36.229,0:08:40.520something before we go back into the cab0:08:38.390,0:08:42.500of the Jeep and that's this rubber0:08:40.520,0:08:44.810sleeve right here and what this is for0:08:42.500,0:08:47.270is to protect your transfer case shift0:08:44.810,0:08:49.130cable from your transmission ship cable0:08:47.270,0:08:51.110so you can see we have it in the exact0:08:49.130,0:08:52.790spot that our stock one was and that's0:08:51.110,0:08:54.110what's gonna protect us chafing or0:08:52.790,0:08:56.450rubbing alright what we're going to do0:08:54.110,0:08:59.560next is make sure that our grommet is0:08:56.450,0:09:05.270situated on our transmission tunnel and0:08:59.560,0:09:08.690seated properly you should feel it click0:09:05.270,0:09:10.220in just like that and then we can go0:09:08.690,0:09:11.720ahead and get our center console all put0:09:10.220,0:09:15.260back together alright let's go ahead and0:09:11.720,0:09:17.410get our carpet situated I used a socket0:09:15.260,0:09:19.880it's actually hold up with the console0:09:17.410,0:09:22.490we're gonna drop our console back into0:09:19.880,0:09:23.810place and I'm gonna start a couple of0:09:22.490,0:09:27.040our0:09:23.810,0:09:27.040Torx head screws0:09:34.330,0:09:37.320do that on both sides0:09:57.220,0:10:01.920we're gonna go ahead and put this back0:09:58.840,0:10:01.920piece back in as well0:10:07.740,0:10:11.899all right let's get our map holder back0:10:09.180,0:10:11.899into place here0:10:17.460,0:10:22.320alright lastly we're gonna bring our0:10:19.080,0:10:30.529center console in again we're out to0:10:22.320,0:10:33.390lift our arm rest up and I'll go through0:10:30.529,0:10:40.410again fixing my carpet make sure that0:10:33.390,0:10:41.670trend goes over top alright now we're0:10:40.410,0:10:44.010going to put our transfer at the case0:10:41.670,0:10:45.540shift handle back on I'm gonna put a0:10:44.010,0:10:47.490little downward pressure you can hear it0:10:45.540,0:10:49.350click in and then we're going to test it0:10:47.490,0:10:55.560out I'm gonna make sure that we have it0:10:49.350,0:10:56.310in neutral first there's neutral there's0:10:55.560,0:11:01.050for low0:10:56.310,0:11:06.060there's neutral up - for high right0:11:01.050,0:11:07.589there and then - ill perfect alright now0:11:06.060,0:11:09.690we're back underneath the Jeep the last0:11:07.589,0:11:16.110step underneath here you just put our0:11:09.690,0:11:17.970skid plate back into place I'm just0:11:16.110,0:11:20.390going to start there start these bolts0:11:17.970,0:11:20.390in the from0:11:24.010,0:11:28.000and then get the bolts back0:11:33.330,0:11:38.510I'm gonna use my impact with my 18 mil0:11:45.200,0:11:51.000and that's gonna wrap up my install of0:11:49.320,0:11:53.580the transfer case shift cable for your0:11:51.000,0:11:55.560Jeep JK for all things Wrangler keep it0:11:53.580,0:12:03.190here at extremeterrain.com0:11:55.560,0:12:05.250[Music]0:12:03.190,0:12:05.250you
Subscribe to our YouTube Channel
Features, Description, Reviews, Q&A, Specs & Installation
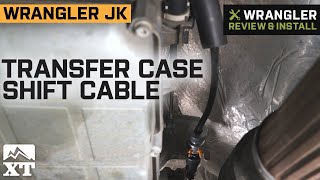
OE Style Transfer Case Shift Cable. You can never resist pushing your Wrangler to its limits whenever you go 0ff-roading. However, with this intensity comes wearing out and malfunctioning of some parts particularly the Transfer Case Shift Cable. This Transfer Case Shift Cable is designed to secure the perfectly secure into place just like the stock part. This guarantees optimal performance of your rig for a memorable off-road experience. Its OE specs allows you to install it as an upgrade or as a replacement for your worn out, misplaced or malfunctioning stock part.
Top Grade Construction. This Transfer Case Shift Cable features a meticulous design and tough build matching OE specs to provide a snug fit just like the stock part. It is made from high strength material that delivers unparalleled endurance even in the most demanding situations to guarantee long lasting performance.
Installation. This Transfer Case Shift Cable is built to match all OE specs which ensures that it makes a direct and straightforward fit without any modifications. With the right skills and tools, installation should take 4 hours. However, with the sensitivity of the process, we recommend using a professional.
Warranty. Backed by their impressive record, Manufacturer assures that this Transfer Case Shift Cable is free from poor quality materials and sloppy manufacturing. They also provide their signature 12 Month/ 12,000 Mile warranty.
Application. This Transfer Case Shift Cable is compatible with all 2007-2018 Jeep Wrangler JK models.
Fitment:
CA Residents: WARNING: Cancer and Reproductive Harm - www.P65Warnings.ca.gov
Installation Info
Installation Time
(approx) 4 Hours
Difficulty Level:
Mechanical expertise or professional installation required.
What's in the Box
10 More Questions