Talk to a Wrangler Sales Tech
1-877-870-8556
M-F 8:30A-11P, Sat-Sun 8:30A-9P
Logo Image
$20K Sweeps! 10 Chances to Win! Enter Daily >

Driveshaft CV Joint Repair Kit; Front or Rear (07-18 Jeep Wrangler)

Item J150754
Verify parts fit and get product recommendations.
Wrangler Sales Techs: Connect Now M-F 8:30A-11P, Sat-Sun 8:30A-9P
$0.00
Our Price

$144.99 (kit)

FREE Shipping Market Price $167.99 You Save 14% ($23.00) Up to 10% off for Military & First Responders! See Details

Will this fit your Vehicle?

Select a different vehicle Help?
Update or Change Vehicle
Ship to: Ashburn - 20149
Sorry, please enter a valid US or CA postal code
We're sorry, zip can't be updated at this time.
    Create a list
    Add to New List

    Saved - View your saved items

    We're sorry. We couldn't save this product at this time.

    or use

      Product Videos

      Meredith: What's up, guys? Meredith with extremeterrain.com, and today we are checking out the Driveshaft CV Joint Repair Kit for the front or the back, fitting all 2007 to 2018 JK Wranglers. Now, the Rzeppa joint on the JK is probably one of the most failed components for a couple of different reasons, one being if you have lifted your Wrangler and have not upgraded the drive shaft, the harder angle will wear out the boot over time, which can fling grease and allow dirt in and debris in to damage the joint, especially if you take your Jeep off-road. Now, it can also just fail due to normal wear and tear and age. However, this repair kit will be an affordable solution to fix that issue compared to replacing the drive shaft, lift kit, or not, to regain that function and protection to the joint.Now, once this is put together and installed on your JK, this will bring back the function that you may not even thought you were missing with the factory drive shaft by allowing free and smooth movement. Now, the design here won't just allow for revitalized functionality, but also upgraded protection to the joint inside, which will ultimately extend the life of your current setup.Now, this will include everything that you need in order to swap your current Rzeppa joint in the kit and will have an OE style construction. Now, the joint housing here is going to be made of a steel material. It is gonna be a little bit thinner and basically sandwich the joint in, protecting the ball bearings inside from the elements. Now, the boot that will protect the joint will also be made of a flexible rubber material to allow good movement within the system. Now, as you can see, this is going to be the joint here. This will be made from a super thick and heavy-duty steel. And on the inside, it will have ball bearings and low-friction grease included in the kit in order to allow that free movement. Now, you're also gonna get OE style hardware out of the kit, including the bolts, alignment plates, you're gonna get gaskets, and also the boot seal.Now, this will come in at roughly $200, which is fairly affordable for what it is compared to other options available on the page. Now, this will require a little bit of assembly compared to other choices that may come fully assembled. However, if you don't mind the assembly, it should be no hassle to you. Now, this again will also be a much more affordable solution compared to replacing the entire drive shaft, whether you don't want to spend the extra cash or if you don't have an aggressive lift that requires one.The install here will require some mechanical experience, so this will get a three out of three wrenches on the difficulty meter. But if you do have the experience and the right tools, you should be able to get this done in about three hours front to back. Now, speaking of the install, one of our customers here has installed this on their JK and is gonna walk you through what that process looks like step by step. So that is going to wrap it up for me. Let's go ahead and get into it.Man: So here's the tools that we use for this project. In order to take the the drive line off, we start with this eight-millimeter socket. I used a whole bunch of extensions because it's kinda hard to get up behind the... right next to it, next to the... between the crossmember and the transfer case. If you have a bent head ratchet, you can get up in there pretty good. You don't have to have all these sockets or extensions. To put them back, it's an Allen head. It's a six-millimeter Allen head. That's what comes with the new part. To take the front end of the drive line off, I just use this swivel socket on an impact gun. Once we had it out, we used the snap ring pliers to get them out. These ones are not quite big enough, so I pulled out my other ones that were bigger. But I wanted to show that these can work even though it's a smaller set. You can get them on and off. I just use that one because they're easier. I used a couple of battery-powered drills, impact gun. You can use a ratchet for everything. There's a steel hammer and a dead blow, a chisel or a punch, a flat head screwdriver, and the puller if you need it. Sometimes they come off pretty easy, other times you have to pull them off with a puller.Today we're gonna change this CV joint on the end of the front drive line on a Jeep JK. So to do that, we're gonna have to take the entire drive line out, which will consist of these bolts here on the front axle and then these bolts here. These are eight-millimeter that go into the yoke on the front of the transfer case. Just as a note, it is easier to jack the front axle up so you can rotate your drive line around, but if you do that, make sure you block the wheels. Don't pull any drive line out without checking your wheels and making sure that it's locked in. Don't just rely on the brakes or the transmission to hold it in place. We start with these eight-millimeter bolts in the front flange of the transfer case. And just rotate your drive line around to where your tools can match up on the bolts. It is a little bit of a bind because of the angle here, so you have to stay up on the top side of this joint. Sometimes some of these are a little bit tough because there is a thread locker put in from the factory, so you may have to use a ratchet to break some of those loose. Okay, that's all the bolts loosened up on the transfer case end. Next we'll go and take the front end apart.Okay, so the front end, we'll just take these four 15-millimeter bolts out. It's on the yoke. Just a little bit of tap to get that off of there and release that. Then we're gonna go to the front. We've got the front the already [inaudible 00:08:08.304]. We're gonna to put a pry bar in here. And we may have to get a hammer [inaudible 00:08:22.583]. Sometimes you have to pound this up here a bit to break loose. And if that comes off, we put a [inaudible 00:08:48.479] pry bar in here. It's not stuck tight but it is kind of awkward to get up into it. And then slide it out right there. And as you can see right here, this boot right here is what breaks and allows all the of grease to come out of there. And that's what takes these CV type joints out. So here is the new joint. It comes with grease, new bolts, and some clips. It's got some gaskets. And then it's got one of the shields, and the joint itself, and the other one.So to take this off, right here on this edge right here, and just pop this cover off. You can see in here the grease is pretty dry and crusty. It's not that healthy. And that's what takes this bearing out. It can't keep lubricating. So then if you come around here, you can see that there's this snap ring right here and we have to pull that out. Pull that out. And I think we have to save this and reuse it on the new. So if you look right here, you can see that there's a lot of movement in this here. And that's what happens when they run out of grease. The boot rips, the grease falls out, it dries out, it gets crusty and it can't properly lubricate. And so this is a bad joint right here. So we took the snap ring off and then we're going to have to snap on it just a little. We may have to get a bearing puller on there. But we'll see if we can get it out. We try in here. That's becoming a little bit... So not every option you'll have where the boot is completely broken free, so you may not be able to get a chisel or a punch in there. So you can also use a puller and pull this on here. Then with a puller, that will also pull it right off of there.So now if you look, it came off this direction here. So you look at the... We'll have to line this up this way because there are two different sides. Let me pull it out of the plastic. So there's two different sides. It has this groove, and this side, the cage is a little bit thicker and more pronounced on this side. So the side with the groove, this is the groove for the gasket. That side goes away from the drive shaft. So we'll put it on this way. But what we have to do first, we have to cut this off. If your boot is not completely torn off, you'll have to cut this before you pull the boot off. Otherwise, just rip the boot and pull it off because this comes with the new boot anyways. Okay, we're gonna see if we can get this off. We'll come in here and... That's out of there. [inaudible 00:13:43.245]. And if you can, sometimes you can get in there and cut these, but sometimes they're tighter than what that allows, so we'll see if we can get this to... So, it popped right off. Then we put the rest of the way off. And then I'm going to wipe this off and clean it up because it's got all that dry, nasty grease in there. And just make sure that it's the right spline. Fits on them just nice, so that will be good there.So that's clean, this fits good. We've got the grease here. My experience with grease and bearings is it's easier to do it in your hands. I know. A lot of information of "Just put it on there and squirt it in there," but I found that it's just easier to do it while it's in your hand. You can tell when the grease is actually pushed all the way through. You wanna do that until you can see it squishing out the back side. So we'll squirt grease and fill. You can see it starting to come through on this back side. So we'll just keep going until we have solid grease throughout the bearing and the cage. Keep checking that till you make sure that you've got no air bubbles or anything on the back side. Looks like we need just a little bit more on this spot right here. So just a little bit more there, and that filled it up. And also, you kind of put a little bit of grease right on here. That just helps the boots slide over, helps the splines line up and everything. That way, when we put this on... So, let's sit that down right there. Slide. Oh, we need to... Don't forget the ring. Put the ring on the boot before you slide it on. And then slide the new boot about to this spot. Leave it like that.So now that we have that glued on, we can slide this on. Remember, this is the side that goes out towards the end of the drive shaft. And that goes up in there. It'll slide in until it fits and... There's that. So you gotta line these bolt holes up with your through holes here. So just take an old bolt, slide one in there or two or whatever you want. But we have to get that lined up. And then with the gasket, we put a little grease on there, it bolts up or it seats around the bolt holes. So right here I'm gonna put another set in directly opposite just to help make sure that everything lines up. And then we'll slide the outside cover on. There is that. Okay, we got a lot of grease everywhere, and that's probably a better way to do it than what I did, but this is how I've done these. If you play with grease, you get it on your face.So you have that there, and now this here... Now, this is not on permanent. We still have to put the retaining ring on there, but I put it on here just to kind of keep things cleaned up a little bit. So let's put that on there now. So, let's see if the new hardware [inaudible 00:19:57.032]. So I'm going to switch these snap ring pliers out for these. They make them with a little bit wider opening that we can get around the shaft a little bit better. And that's around the shaft. Let's take a screwdriver, chisel, something to make sure it's clear up into the seat to the ring. And then sometimes you need to tap a little bit on the back just to make sure that it goes in, but that one there looks nice and seated all the way around. So there's that. Now we can put... You put this cap on for the final time, and then we'll switch out to the new hardware and go from there. So we'll pull these placeholder bolts out, put them away and put some new bolts back in. And it's just about ready to fit this. Tighten that band.So now we're gonna work on this band clamp here. Need to make sure that this boot is pushed up in to the shoulder. Just kind of give it a little nudge. There's enough grease and everything on there. It should move pretty good. And I don't have the specific tool to tighten this, but we can do a pretty good job with it. Right there. So if you kind of hold it here, you can get that to pull in tight and then you can bend those tabs over, just to where it holds it pretty good. So we'll give one more little crank on this. You stick a screwdriver in here to hold it in place a little bit. You get just a little bit more bite on it. [inaudible 00:23:36.707] And put a little [inaudible 00:24:07.624] and that holds it pretty good. And then you want to cut this off. And tap these corners down in so they're not left up. Then we check and make sure that when comes over, that you're not getting into your boot with that tail, and should be good.Okay, so now we have the boot on, everything's in here, the ring is on the end of the shaft, the grease is in there. That's the last thing before we go put it in. So let's go slide it up under there. If you can get just one started, that'll kind of hold it in place. And then we'll grab a ratchet. I'm gonna see if we can get these... like everything with a radial bolt pattern, you don't tighten everything up from one side here. So the last step is just to hook the front of the drive line up. Just line it up on there. You gotta get the bolts lined up. And spin it around [inaudible 00:27:50.878]. And that's that. That ain't going anywhere.Meredith: So that's gonna wrap it up for my review and the install of this Driveshaft CV Joint Repair Kit for the front or the back, fitting all 2007 to 2018 JK Wranglers. And you can find this kit right here at extremeterrain.com.

      Product Information

      Features, Description, Reviews, Q&A, Specs & Installation

      Features & Specs

      • All-in-One Solution for Jeep Wrangler Owners
      • Designed to Replace Worn Out or Damaged Joints
      • Heavy-Duty Steel and Automotive-Grade Plastic Construction
      • Straightforward CV Joint Repair
      • Advanced Mechanical Skills Required
      • Sold as a Kit
      • Grease Included for Low Friction
      • 12-Month Limited Warranty
      • Fits the 2007-2018 Jeep Wrangler, Including YJ and JK

      Description

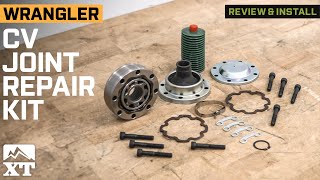
      Full Repair Kit. Over time, driveshaft CV joints tend to wear out and need to be replaced to keep your vehicle running properly. Crown Automotive Jeep Wrangler Driveshaft CV Joint Repair Kit offers an all-in-one solution for worn-off or damaged joint replacement. It includes joint assembly, end caps, gasket, clamps, snap ring, and bolts to give your Wrangler’s driveshaft a new life.

      Heavy-Duty Construction. Each part of this Crown Automotive Jeep Wrangler Driveshaft CV Joint Repair Kit is rigorously tested for quality compliance to ensure durability. Only top-quality steel and automotive-grade plastic were used in manufacturing to keep your Wrangler’s driveshaft functioning flawlessly for years to come. The kit includes grease to reduce friction.

      Advanced Skills Required. Replacing the driveshaft joints is a complex task requiring advanced mechanical skills. We highly advise users without driveshaft joint replacement experience to choose professional installation. Please ensure that the manufacturer’s instructions are being followed to maintain your warranty.

      12-Month Limited Warranty. All Crown Automotive products are covered by a 12-month or 12,000-mile limed liability warranty. Crown Automotive is obliged to repair, replace, or refund damaged or malfunctioning parts if the issue is proven to be the manufacturer’s fault.

      Application. This driveshaft joint repair kit was constructed for all 2007-2018 Jeep Wrangler models, including YJ and JK.

      Installation Time. Driveshaft joint replacement takes 2-4 hours on average, depending on the vehicle model and user’s experience.

      Difficulty Level. The driveshaft joint replacement process is complex and requires advanced mechanical skills.

      Fitment:

      CA Residents: WARNING: Cancer and Reproductive Harm - www.P65Warnings.ca.gov

      Installation & What's in the Box

      Installation Info

      What's in the Box

      • (1) CV Joint Assembly
      • (2) End Caps
      • (1) Gasket
      • (2) Clamps
      • (8) Bolts
      • (1) Snap Ring
      • (1) Grease
      5.0

      Customer Reviews (4)

        Reviews of similar Drivetrain products have an average rating of 4.8 out of 5

          Questions & Answers

          10 More Questions