 FREE 1 to 3-Day Delivery on Orders $149+ Details

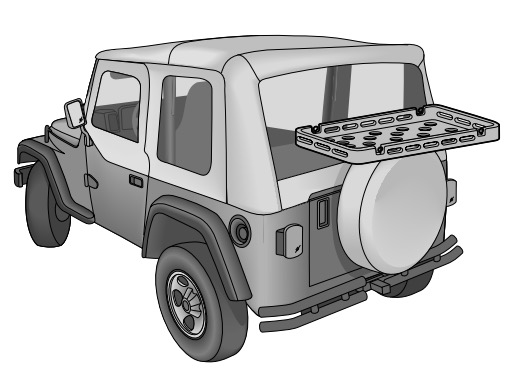
How to Install a Bestop Tailgate Rack Bracket on your 1987-2006 Jeep Wrangler YJ & TJ
Tools Required
- 10mm Wrench
- 12mm Wrench
- 9/16 Wrench
- 7/16 Wrench
- 1/2" Wrench
- T30 Torx Driver
- Safety Glasses
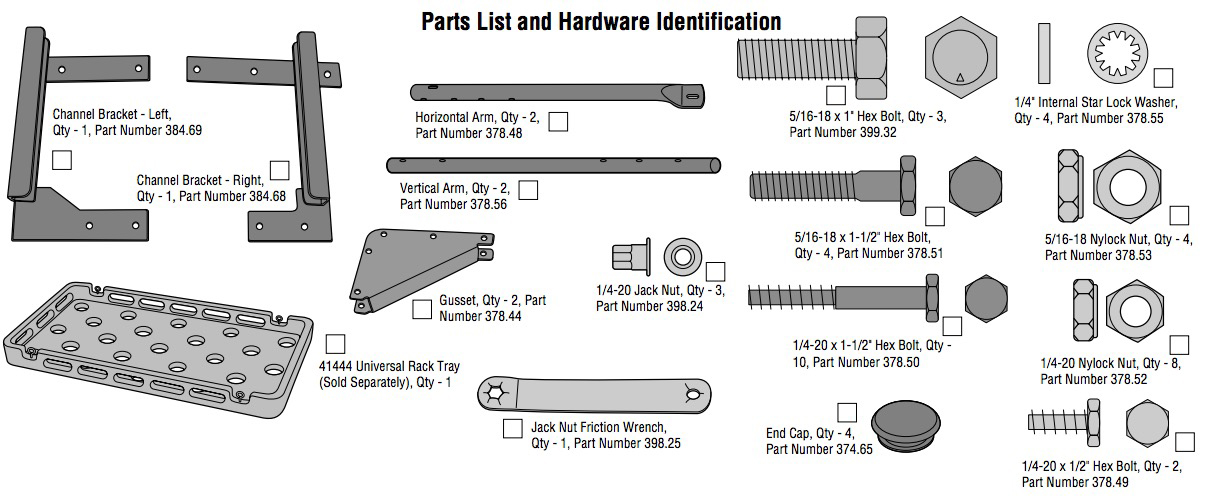
Shop Parts in this Guide
WARNING
This product is designed to enhance the appearance of the vehicle. Do not rely in any way on the components of this product to contain occupants within the vehicle, or to protect against injury or death in the event of an accident. Never operate vehicle in excess of manufacturer’s specifications
WEAR SEAT BELT AT ALL TIMES
Read and follow, precisely, all installation instructions provided when installing this product. Failure to do so could place occupants of the vehicle in a potentially dangerous situation. After installing or reinstalling, check to make sure it has been properly installed.
Installation
Step One
REMOVE SPARE TIRE AND TIRE CARRIER
Remove the spare tire from the vehicle.
If you have a factory tire carrier, use a T30 Torx to remove the rubber bumpers on the tailgate. Save the fasteners to be used to install the rack.
If you no longer have the original bolts from the factory tire carrier, use the three 5/16-18 x 1" Hex Bolts in the parts kit.
If you have a Bestop Tire Carrier, remove the tire carrier hinges, brake light bracket and any bumpers on the tailgate. Save the fasteners to be used to install the rack.
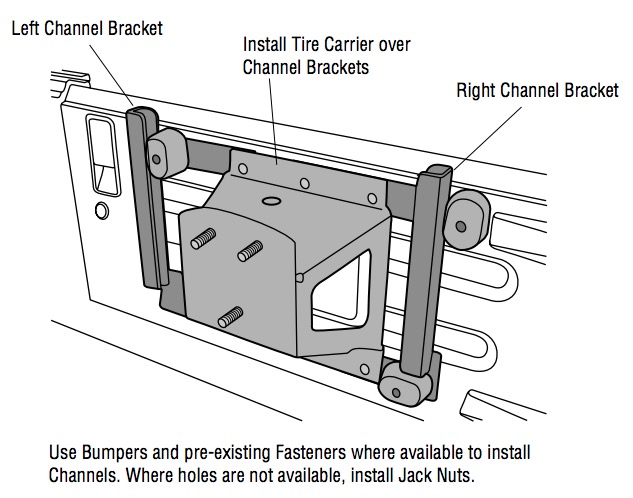
Step Two – 2002 and Older Vehicles with Factory Tire Carrier
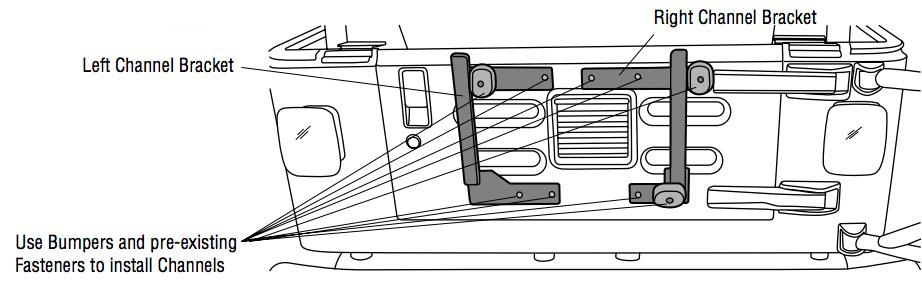
INSTALL CHANNEL BRACKETS
Locate the Left and Right Channel Brackets in the parts kit. Orient the brackets on the tailgate and use the bumpers and fasteners removed in Step One to install the brackets on the vehicle. Reinstall the spare tire.
Step Two – 2003 and Newer Vehicles with Factory Tire Carrier
INSTALL CHANNEL BRACKETS
2003 and newer vehicle owners will have to drill holes in the tailgate at the locations of the lower outboard mounting holes in the Channel Brackets. Orient the brackets on the vehicle aligning the holes in the brackets with the existing holes in the tailgate. Use the brackets as templates to mark the locations of the lower outboard holes. Center punch and drill a 7/16" hole at each location.
Insert a 1/4-20 Jack Nut in the hole. Hold the Friction Wrench over the Jack Nut with the bumps on the wrench against the nut. Insert a 1/4-20 x 1" Hex Bolt through the wrench into the nut. Tighten the bolt until the nut is pulled tight against the back side of the tailgate. Remove the bolt and wrench. Repeat this with both holes.
Use the 1/4-20 x 1" Hex Bolts that were used to install the Jack Nuts to secure the Channel Brackets to the Jack Nuts.
Use the bumpers and fasteners removed in Step One to re-install the Tire Carrier on top of the Channel Brackets. Reinstall the spare tire.
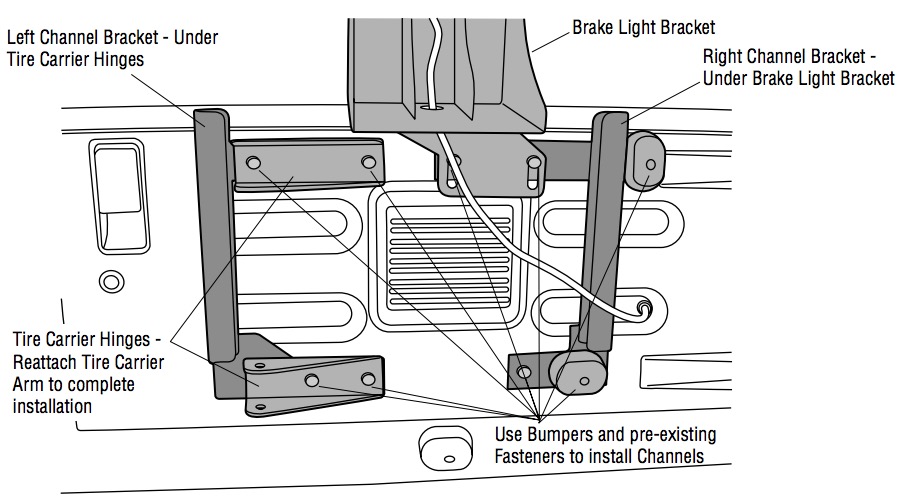
Step Two – Vehicle with Bestop Tire Carrier (61950)
INSTALL CHANNEL BRACKETS
Orient the Right Channel Bracket on the vehicle. Use the bumpers and fasteners removed in Step One to install the bracket. Re-install the Brake Light Bracket over the top of the Channel Bracket.
Orient the Left Channel Bracket on the vehicle. Place the bracket against the tailgate with the Tire Carrier Hinges on top of the bracket and reinstall the fasteners removed in Step One.
Reattach the Tire Carrier Arm to the Hinges.
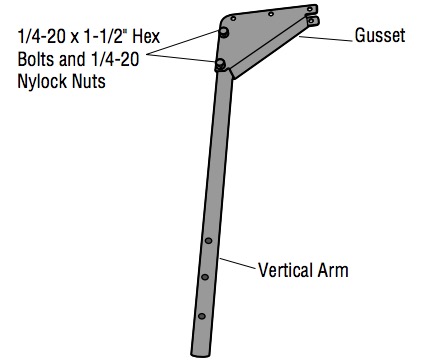
Step Three
ASSEMBLE VERTICAL SUPPORT ARMS
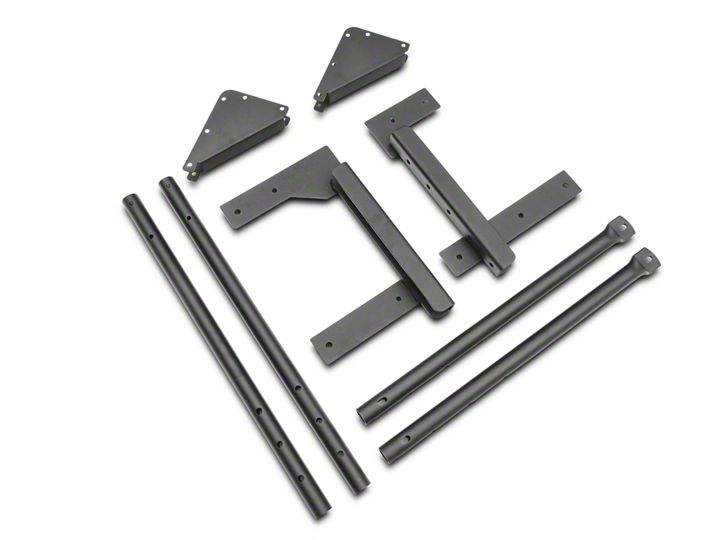
Locate the Vertical Arms and Gussets in the Parts Kit.
Orient the Vertical Arms with the two holes toward the top. Press an End Cap into this end of each Vertical Arm.
Use two 1/4-20 x 1-1/2" Hex Bolts and two 1/4-20 Nylock Nuts to attach a Gusset to the top end of each Vertical Arm.
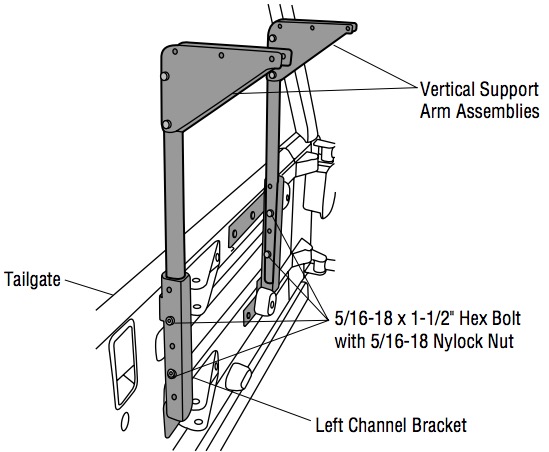
Step Four
INSTALL VERTICAL SUPPORT ARMS IN CHANNEL BRACKETS
Slide a Vertical Arm Assembly into one of the Channel Brackets. Adjust the arm up or down to the desired height and until two holes are aligned. Install a 5/16-18 x 1-1/2" Hex Bolt and a 5/16-18 Nylock Nut in each hole to secure the arm. Repeat this with the other Vertical Support Arm Assembly.
Caution
Do not overtighten the bolts. This may strip the aluminum inserts in the Tray.
Step Five
ATTACH HORIZONTAL ARMS TO TRAY
Press an End Cap into the open end of each Horizontal Arm. Use a 1/4-20 x 1/2" Hex Bolt and Star Lock Washer to attach the flattened end of each Horizontal Arm to the bottom of the Tray. Use a 1/4-20 x 1-1/2" Hex Bolt and a Star Lock Washer to attach the other end of each arm to the Tray.
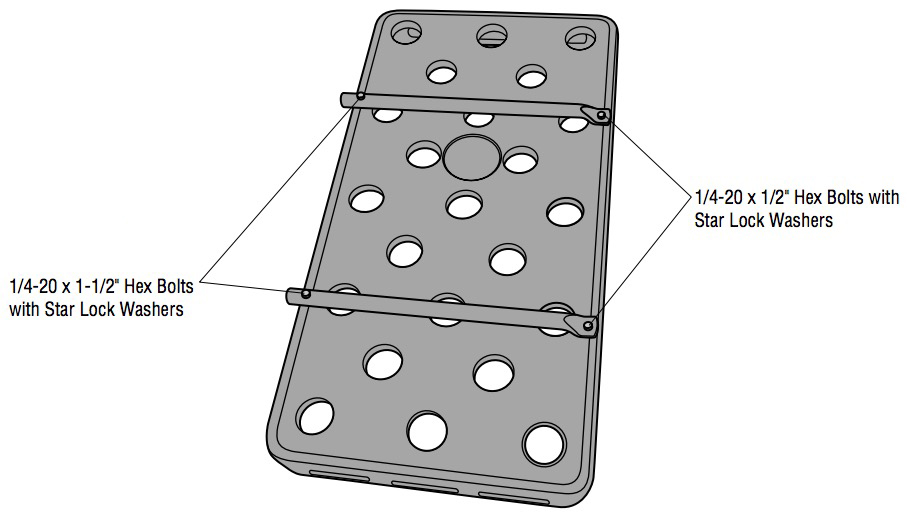
Caution
If you are installing this product on a vehicle with a Hard Top, you will need to install it in the rearmost position to allow clearance for the lift glass. DO NOT load the tray with more than 50 lbs. in this position.
Step Six
INSTALL TRAY ASSEMBLY
There are multiple holes in the Gusset and the Horizontal Arm to allow you to adjust the Tray’s fore/aft position.
Place the Tray/Arm assembly over the spare tire and into the top of the Gussets. Line up the holes in the Gusset and the Horizontal Arm that place the Tray in the desired position. Install two 1/4-20 x 1-1/2" Hex Bolts and two 1/4-20 Lock Nuts to secure each Horizontal Arm to the Gusset.
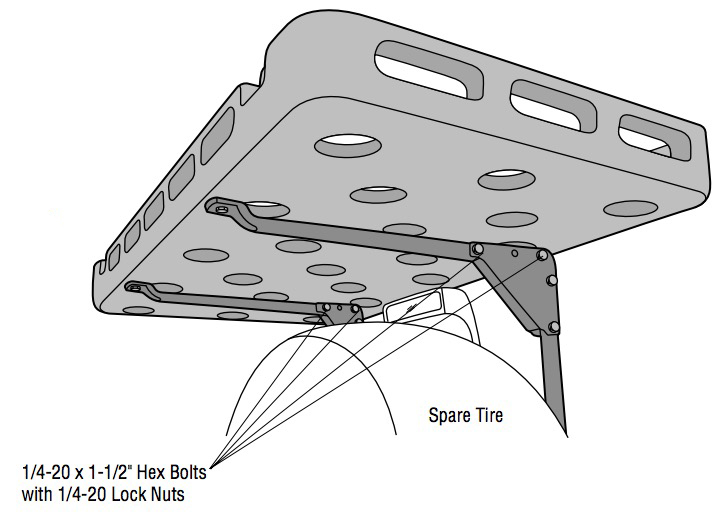
Caution
Do not load the tray with more than 75 evenly distributed Pounds. Be careful when operating the vehicle because the loaded tray may affect handling. Remember that the tray extends beyond the spare tire when backing.
LIMITED WARRANTY
We warrant our product to be free from defects in material and workmanship, for terms specified below, provided there has been normal use and proper maintenance. This warranty applies to the original purchaser only. All remedies under this warranty are limited to the repair or replacement of any item or items found by the factory to be defective within the time period specified.
If you have a warranty claim, first you must call our factory at the number below for instructions. You must retain proof of purchase and submit a copy with any items returned for warranty work. Upon completion of warranty work, if any, we will return the repaired or replaced item or items to you freight prepaid. Damage to our products caused by accidents, fire, vandalism, negligence, misinstallation, misuse, Acts of God, or by defective parts not manufactured by us, is not covered under this warranty.
THE WARRANTY TIME PERIOD IS AS FOLLOWS: ALL “HARD GOODS” MANUFACTURED BY OUR COMPANY (USING PRIMARILY VINYLS, PLASTICS, AND/OR FOAM): ONE YEAR FROM DATE OF PURCHASE.
ANY IMPLIED WARRANTIES OF MERCHANTABILITY AND/OR FITNESS FOR A PARTICULAR PURPOSE CREATED HEREBY ARE LIMITED IN DURATION TO THE SAME DURATION AND SCOPE AS THE EXPRESS WRITTEN WARRANTY. OUR COMPANY SHALL NOT BE LIABLE FOR ANY INCIDENTAL OR CONSEQUENTIAL DAMAGE.
Some states do not allow limitations on how long an implied warranty lasts, or the exclusion or limitation of incidental or consequential damages, so the above limitations or exclusions may not apply to you.
This warranty gives you specific legal rights, and you may also have other rights which vary from state to state.
For further information or request for warranty work, please contact:
Bestop Inc.
Customer Service
(800) 346-3910
(303) 465-1755

