FREE 1 to 3-Day Delivery on Orders $149+ Details

How to Install Barricade Removable Hard Top Roof Basket on your 07-18 Jeep Wrangler JK; 2018 Jeep Wrangler JL

Shop Parts in this Guide
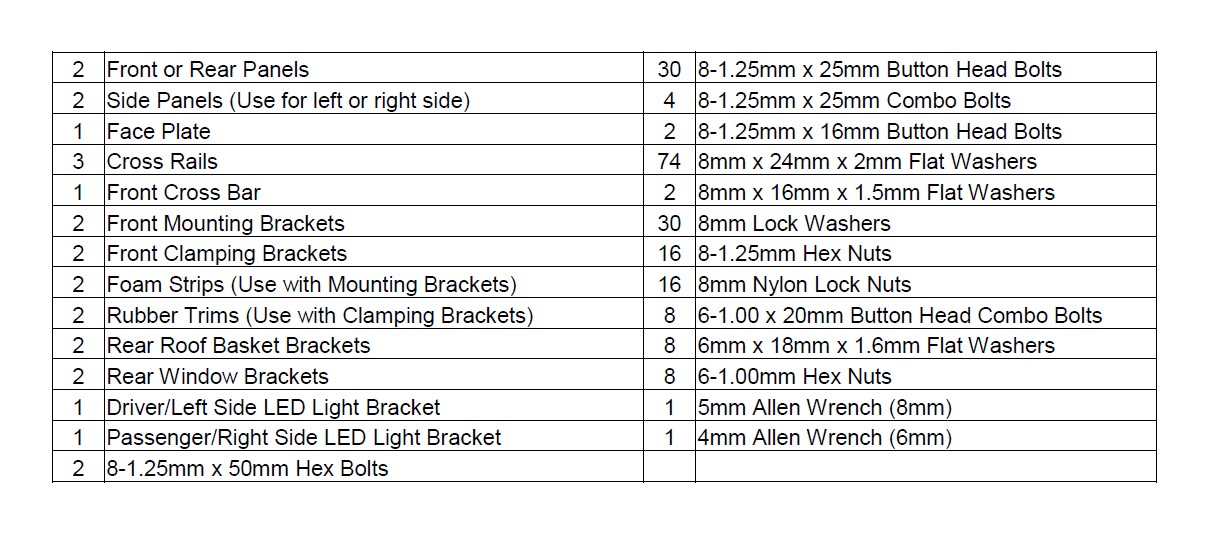
PARTS LIST:
CAUTION: Recommended load rate is 150 lbs. for Basket only, too much weight will greatly reduce the stability of the vehicle and increase the vehicle’s tendency to overturn or damage roof. The manufacturer makes no representation or warranty as to the amount of weight that the vehicle can safely carry. For guidance, we recommend that you consult the vehicle manufacturer. Secure all payloads properly for safe transportation.
PROCEDURE:
REMOVE CONTENTS FROM BOX. VERIFY ALL PARTS ARE PRESENT. READ INSTRUCTIONS CAREFULLY BEFORE STARTING INSTALLATION. NO DRILLING REQUIRED. ASSISTANCE IS RECOMMENDED.
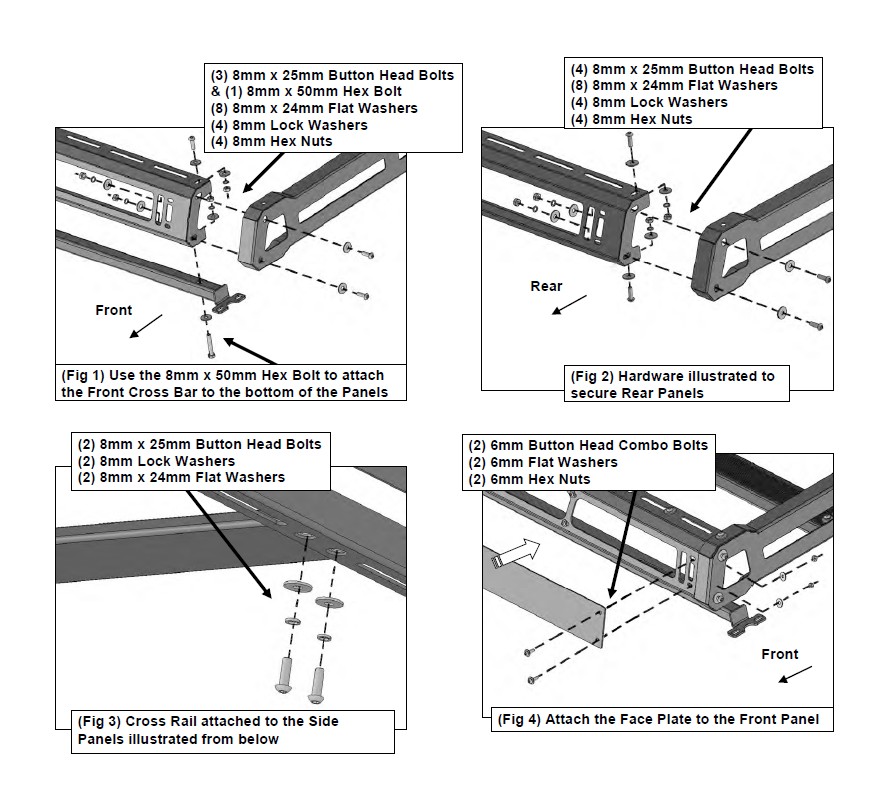
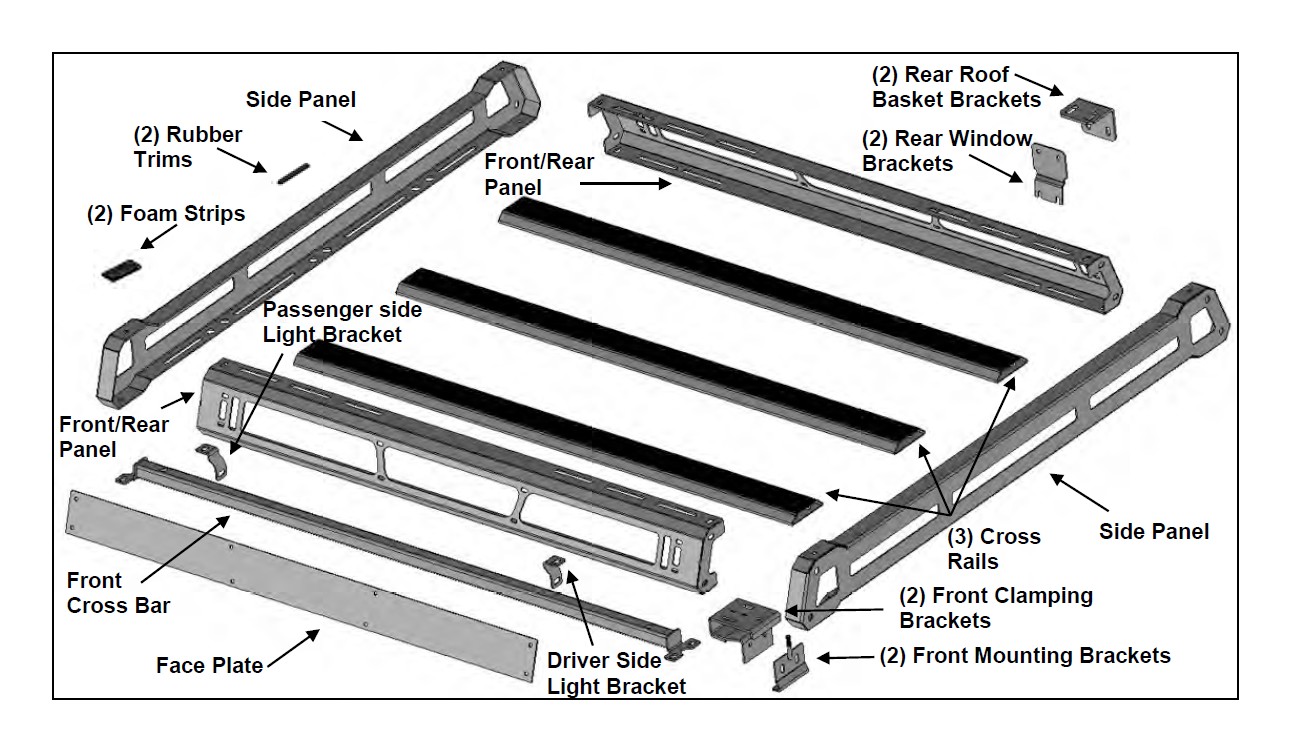
1. Place (1) Side Panel and (1) Front/Rear Panel on a stable clean flat surface. Slide the end of the Front/Rear Panel into the end of the Side Panel. Attach the Side Panel to the Front/Rear Panel using (3) 8mm x 25mm Button Head Bolts, (6) 8mm x 24mm Flat Washers, (3) 8mm Lock Washers and (3) 8mm Hex Nuts, (Figure 1). Do not tighten hardware. NOTE: Do not add hardware to the bottom of the Panels at this time. Repeat Step to attach the remaining Side Panel to the other end of the Front/Rear Panel.
2. Select the Front Cross Bar. Align the (2) holes on the Front Cross Bar with the (2) bottom holes at the ends of the Panels from Step 1, (Figure 1). NOTE: The mounting tabs at the ends of the Front Cross Bar must be facing down. Attach the Front Cross Bar to the Front Panel and Side Panels with (2) 8mm x 50mm Hex Bolt, (4) 8mm x 24mm Flat Washers, (2) 8mm Lock Washers and (2) 8mm Hex Nuts, (Figure 1). Leave hardware loose at this time.
3. Next, select the remaining Front/Rear Panel. At an angle, slide the Rear Panel into the ends of the Side Panels. Attach each end using (4) 8mm x 25mm Button Head Bolts, (8) 8mm x 24mm Flat Washers, (4) 8mm Lock Washers and (4) 8mm Hex Nuts, (Figure 2).
4. Select (1) Cross Rail. Locate the (3) pairs of holes on each Side Panel. Attach the Cross Rail to the Side Panels using (4) 8mm x 25mm Button Head Bolts, (4) 8mm Lock Washers and (4) 8mm x 24mm Flat washers, (Figure 3). Leave hardware loose at this time.
5. Repeat Step 4 to attach the remaining (2) Cross Rails to the Side Panels.
6. After assembling the Roof Basket, level and fully tighten the Side Panels to the Front/Rear Panel and the Front Cross Bar to the Panel hardware only at this time. Make sure the Roof Basket is square before tightening.
7. Select the Face Plate, (Optional). Attach the Face Plate to the Front Panel using (8) 6mm Button Head Combo Bolts, (8) 6mm Flat Washers and (8) 6mm Hex Nuts, (Figure 4). Fully tighten hardware.
8. LED Light Installation, (LED Light not included):
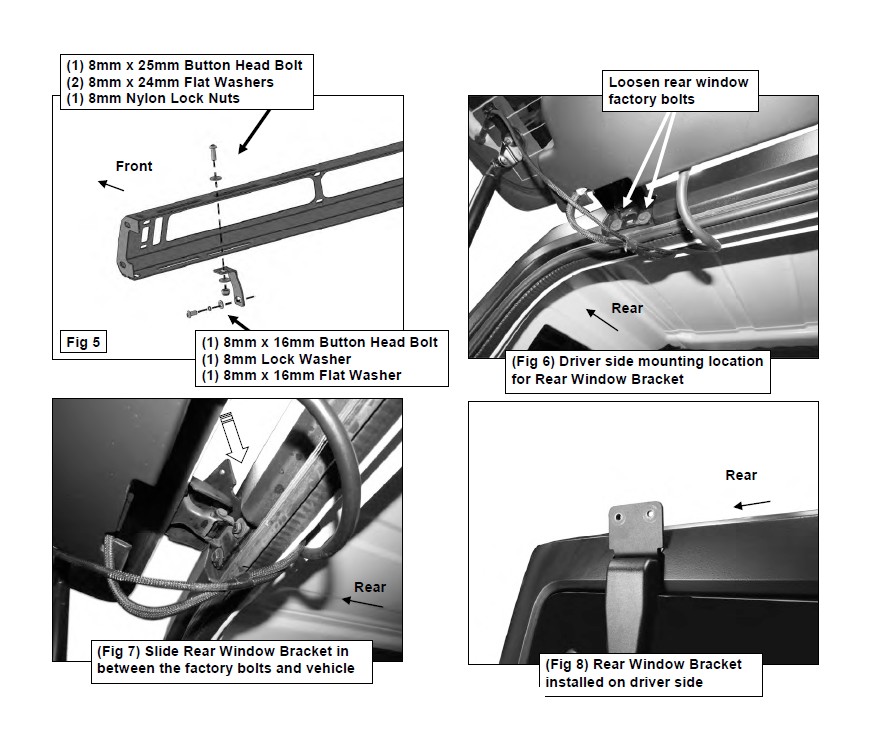
a. Select the driver side Light Bracket. Attach the Bracket to the Front Panel with (1) 8mm x 25mm Button Head Bolt, (2) 8mm x 24mm Flat Washers and (1) 8mm Nylon Lock Nut, (Figure 5).
b. Repeat Step 8a to install passenger side Light Bracket.
c. Attach the LED Light to the Brackets using (2) 8mm x 16mm Button Head Bolts, (2) 8mm Lock Washers and (2) 8mm x 16mm Flat Washers, (Figure 5).
d. Follow the light manufacturer’s instructions to properly attach and wire the LED light.
e. Level and adjust the LED Light to the Brackets and fully tighten hardware.
9. Open the rear window on the vehicle. Starting on the driver/left side of the rear window, loosen the (2) factory bolts, (Figure 6). Select (1) Rear Window Bracket. Slide the (2) open ended slots on the Bracket in between the (2) factory bolts and the vehicle, (Figures 7 & 8). Hand tighten factory bolts to secure Bracket in place.
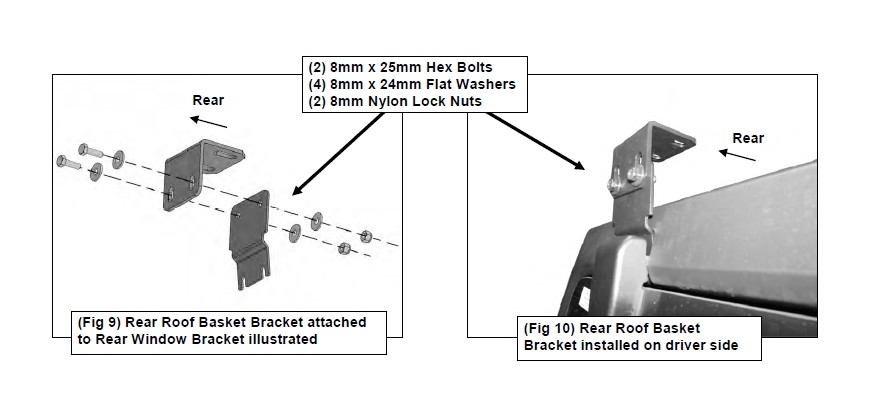
10. Select (1) Rear Roof Basket Bracket, (Figure 9). Attach the Bracket to the rear facing side of the Rear Window Bracket using (2) 8mm x 25mm Hex Bolts, (4) 8mm x 24mm Flat Washers and (2) 8mm Nylon Lock Nuts, (Figures 9 & 10). Snug but do not tighten hardware.
11. Repeat Steps 9 & 10 to attach the remaining Rear Window Bracket and Rear Roof Basket Bracket on the passenger/right side of the rear window.
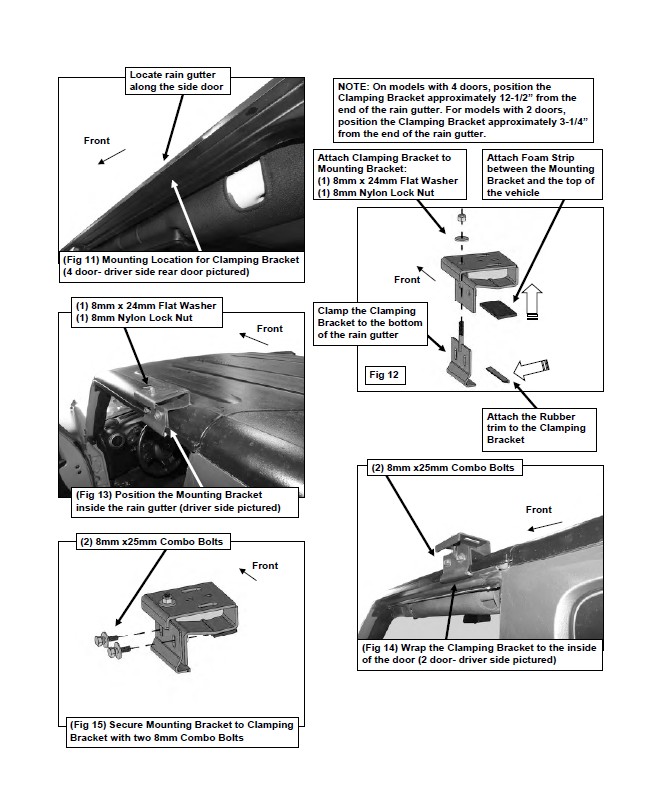
12. Open the driver/left side door. On models with 4 doors open the driver/left rear side door. Locate the rain gutter along the top of the door, (Figure 11). Attach (1) Rubber Trim to the bottom of (1) Clamping Bracket, (Figure 12). Next, select (1) Mounting Bracket. Apply (1) Foam Strip to the bottom of the Mounting Bracket to protect the roof from damage. Slide the Mounting Bracket over the welded bolt on the Clamping Bracket, (Figure 12). Secure the Mounting Bracket to the welded bolt with (1) 8mm x 24mm Flat Washer and (1) 8mm Nylon Lock Nut, (Figure 12). Leave hardware loose.
13. Wrap the Brackets around the rain gutter, (Figures 12-15). Make sure the Mounting Bracket fits snug inside the rain gutter. NOTE: On models with 4 doors, position the Clamping Bracket approximately 12-1/2” from the rear end of the rain gutter. For models with 2 doors, position the Clamping Bracket approximately 3-1/4” from the rear end of the rain gutter. Use (2) 8mm x 25mm Combo Bolts to secure the Clamping Bracket to the Mounting Bracket, (Figures 12-15). Do not tighten hardware at this time.
14. Repeat Steps 12 & 13 for passenger/right side installation of the Brackets.
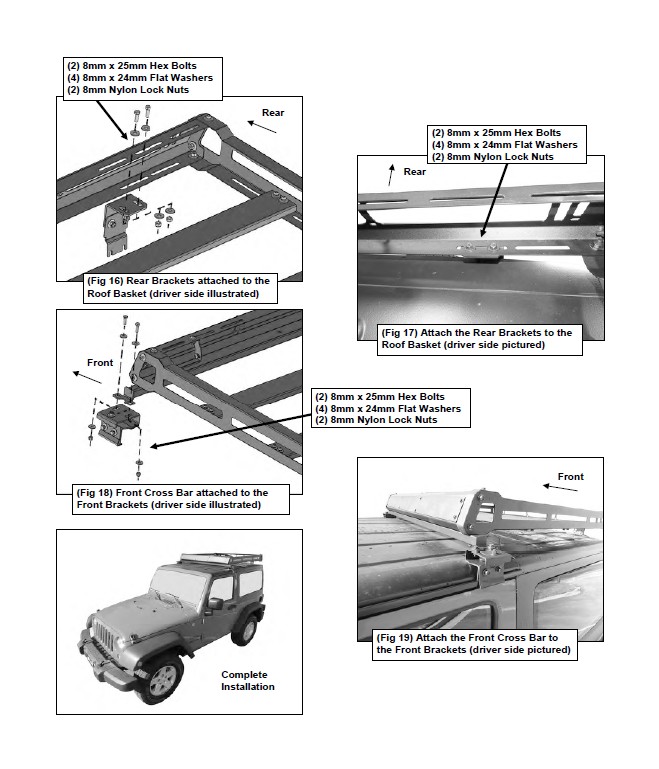
15. With assistance, place the assembled Roof Basket on top of the Brackets. Attach the Rear Brackets to the Roof Basket with (4) 8mm x 25mm Hex Bolts, (8) 8mm x 24mm Flat Washers and (4) 8mm Nylon Lock Nuts, (Figures 16 & 17). Leave hardware loose at this time.
16. Attach the Front Mounting Brackets to the mounting tabs on the Front Cross Bar using (4) 8mm x 25mm Hex Bolts, (8) 8mm x 24mm Flat Washers and (4) 8mm Nylon Lock Nuts, (Figures 18 & 19). Do not fully tighten hardware. NOTE: Adjust the Clamping Brackets forwards or back to line up with Brackets, if necessary.
17. Level and center the Roof Basket to the vehicle and tighten all hardware at this time.
18. Do periodic inspections to the installation to make sure that all hardware is secure and tight.
To protect your investment, wax this product after installing. Regular waxing is recommended to add a protective layer over the finish. Do not use any type of polish or wax that may contain abrasives that could damage the finish. Mild soap may be used to clean the Roof Basket.