Talk to a Wrangler Sales Tech
1-877-870-8556
M-F 8:30A-11P, Sat-Sun 8:30A-9P
Logo Image
$20K Sweeps! 10 Chances to Win! Enter Daily >

Amp Research PowerStep Running Boards (18-24 Jeep Wrangler JL 4-Door)

Item J132611-JL
Verify parts fit and get product recommendations.
Wrangler Sales Techs: Connect Now M-F 8:30A-11P, Sat-Sun 8:30A-9P
$0.00
On Sale

$1,399.99 (pair)

FREE Shipping Market Price $1,839.99 You Save 24% ($440.00) Up to 10% off for Military & First Responders! See Details

Will this fit your Vehicle?

Select a different vehicle Help?
Update or Change Vehicle
Ship to: Ashburn - 20149
Sorry, please enter a valid US or CA postal code
We're sorry, zip can't be updated at this time.
Recommended Install Shops
How It Works
Install Shops are available near Ashburn - 20149

Add Local Shop Installation

Total cost of service $499.00
    Create a list
    Add to New List

    Saved - View your saved items

    We're sorry. We couldn't save this product at this time.

    or use

      Product Videos

      Merideth: If you're looking for premium convenience when getting in and out of your 2018 or newer 4-door JL Wrangler, these AMP Research PowerStep Running Boards will be a great addition to your build. Now, these are a great pick for the JL owner looking for an all-in-one step that will change the game when it comes to accessibility, especially if you've added a lift or larger wheels and tires.Now, this is also gonna be just a great option if you don't want a step hanging down 24/7, whether that's for clearance purposes if you're taking your JL off-road, or just for overall aesthetics. These will feature a low-profile build which will tuck up into the Jeep's rocker area very nicely, offering a subtle look while protecting the side from any lighter hits or any kickup.Now, when the door opens, this step will flip down featuring a wheel-to-wheel 6-inch wide running board with a 3-inch lower stepping surface to help you easily get in and out of the Jeep. Now, the surface of the running board is going to feature a threaded design for some better traction and the brackets are going to feature LED lights so you can easily see this step at night.Now, these will have a durable build made of 6063 marine-grade aluminum, which is going to balance strength and weight incredibly well. This kit will also come with an integrated bracket system with precision stainless steel pivot pins for incredible stability, able to support up to 600 pounds. Now, on top of the steps, this is going to feature an anodized PTF E-coated military spec black finish, and that's gonna protect the aluminum underneath from any corrosion, but also just offer you that heavy-duty look that you may be looking for.This is also going to come with a full wiring harness here, a control module, and the motors for the steps, being a complete kit. As you can probably assume, these are gonna be set at a premium price point coming in at roughly $1,700. Now, this is going to save you a couple bucks compared to some more expensive choices because it is going to have more of a simplistic design for a power step while still offering you a lot of quality that you would want out of a power step.Now, I do personally like the more straightforward approach because it keeps it subtle, it keeps it sleek, and it's not going to add a lot of bulkiness to the side of the Jeep. I personally think if you've got the extra cash to spend and want a premium set of side steps for your JL, then this is going to be a great pick. Now, when it comes to install, this is gonna be a little bit more in-depth than your average side step as you can probably assume. And it does require a little bit of wiring even though you have a full laid-out harness for you.So, I'm gonna give it a three out of three wrenches on the difficulty meter. Now, if you have some experience, it should only take you about three hours to get the job done. Now, at this point, we can head over to the shop, though, and check out a detailed breakdown of the install and what it looks like step-by-step. So, that's gonna wrap it up for me. Let's go ahead and get into it.Man: Tools required for this install include an electric ratchet, a hand ratchet, a couple different size extensions, a 4-millimeter, 5-millimeter, and 3/16-millimeter Allen bit, a 10-millimeter and 13-millimeter socket, wire, strippers and crimpers, a pair of scissors or diagonal cutters, a 13-millimeter ratcheting wrench, and a 13-millimeter stubby wrench. What's up, guys? Today we're installing a set of power side steps on our Wrangler. So, let's get started.So, our first step is to mount our idler bracket. Now, this is gonna be the one that is flat on both sides. We're gonna raise this up. We have two threaded holes in here that we're gonna be putting our button head bolts through the pinch weld and into. And then on the backside of this bracket, we have another bracket for our lights. So, we're gonna put that there, sandwich it in between, and install our hardware. So, now we can mount our bracket.In addition to those two bolts going through the pinch weld, we also have a 13-millimeter bolt that's gonna go up into our threaded hole. And then once we have our top bolt threaded in, we can slide in our light bracket. And then install our two button head bolts with a flat washer on each. And then we can take a 5-millimeter Allen bit to tighten down our pinch weld bolt.Now, for our top bolt, I've got a small 13-millimeter wrench, so we can get in there and tighten that down. Now, for our front bracket, we're gonna have our gear here for our motor, motor's gonna be facing the front on both sides. So, this would be the passenger, it's gonna be the same set of hardware. So, we'll get that top bolt threaded in first. And then our light bracket for the front's gonna be a little bit different. This angle piece is gonna be facing backwards and down.We'll slide that in. And then we can install our button head bolt with a washer. And then same thing on the other side. And then we'll tighten down our two front bolts with that same 5-millimeter Allen bit. And then since we have more room on our front one, we can tighten down our top bolt with a 13-millimeter socket. [inaudible 00:07:16] on the other side. So, now we can mount our step.We have two of these little silver sliders that have two threaded holes that we're gonna be mounting our Allen head bolts into. Now, we're gonna line these up with the little cutouts in our brackets and then we can put these in from the bottom and tighten them down with a 3/16 Allen bit. So, now I've got our side step lined up pretty much where we're gonna want it to sit. I've got our brackets here lined up with those divots, so we can fold it down and then go underneath and install our hardware.So, now we can thread in those bolts from the bottom side. And then we'll use our 3/16 Allen bit to tighten these down. And then we'll do the same thing on our rear bracket and the same thing on the other side. Next, we can install our motor. We're gonna be installing our short hex head bolts into these two holes. So, we're gonna have to fold our step all the way up to get our gear to line up. And then we can thread in our two bolts. And then we can take a 13-millimeter ratcheting wrench to tighten these the rest of the way down.So, now we can tighten down this 13-millimeter bolt. We'll grab a 13-millimeter socket on our ratchet to tighten that down, and then we'll do that same thing for the rest of our mounting brackets. So, now I've got our wire harness laid out across the engine bay. We've got our positive and negative wires here coming right next to our battery. Then on the other side, we have our wires that we're gonna be running down to the floor.Now, we're gonna start with our passenger side. We're gonna shove these wires right down behind the engine cover and down to the floor. So, now, coming over to our driver's side, we have a nice big gap right down here, right next to our brake cylinder. So, we'll slide that right down through here to the floor, and then we can grab our two purple wires that are gonna be going through our firewall and into the cabin to hook up to our OBD-II plugin.We have a grommet right down here that we can slide those through. So, now we can start cleaning up our harness with some of our included zip ties. Now, you can run this wire however you'd like. So, we'll tighten down our zip tie and take a pair of scissors or diagonal cutters to cut off our excess. And then we can just work our way across. Next, we can mount our control box. So, we'll plug in our connections. They can only go in one way since we have a flat side on two prongs on this side and only one flat spot on this side.And next, we can make our battery terminal connections. But before we do that, we're gonna pop the fuse out of our inline fuse, and then we can pop this cover back on our positive. And we'll grab a 10-millimeter socket to remove one of these nuts. And we can connect our positive and reinstall our nut and tighten that back down with our 10-mil. And then on our negative, we'll remove this 10-millimeter nut. And then we can connect our negative and reinstall our nut and tighten that down with that same 10-millimeter socket.So, our next step is to hop in the interior and pop out our glove box. So, we'll release the handle to bring it down, and then there's a little tab at the top here that we can just fold back and pull it out. So, next, we have a wire that we're gonna have to run from our passenger side over to our driver's side behind our center console. So, we have a green connector and a black connector. The green is gonna go to our little connector panel behind our glove box, and the black is gonna go to the other side.So, I've taped our black connector to this tube to be able to fish it across easily. So, we'll go through underneath, push that through to the other side, and then we can run our green side up behind the glove box and into our panel. So, now we can fish our wire through to the other side. So, now that we have the other end of our wire running to the other side, we can bring our wire up behind where our glove box mounts and we're gonna be plugging our connector into the very first port on the white side.And now we can reinstall our glove box. So, we'll slide our tabs into those bottom holes and then just push it in. Next, we can wire up our OBD-II plugin. So, we'll grab those two purple wires that we fished through the firewall before. We have a solid purple wire and a purple wire with a black stripe. So, we're gonna be stripping back some lead on these and connecting them together using a butt connector. So, first, we'll do our solid purple wire.So, we can take a pair of wire strippers and strip back some lead on our wire, and then we'll twist that up and then slide one of our butt connectors over the wire, and then use a wire crimper to crimp that down. And then we'll do the same thing on our purple with black stripe. Twist up that lead and then crimp on our butt connector. Now, on our OBD-II plugin inside, we already have some lead, so we'll just twist those up. And then we'll go solid purple to solid purple and crimp that down. And then we connect our two purple wires with the black stripe.Now, once we have our wires connected together, we can take our remaining harness and we're gonna be plugging that into the connector that we ran from the glove box on the other side. And then we can plug this into our OBD-II port. So, now we just need to tuck our excess wire so it doesn't get in the way of our pedals. So, we can pop off this cover below the steering column by just popping out the clips. And then we can bunch up our excess wire and zip-tie it to this piece of metal.And we'll take our scissors or diagonal cutters to chop off the excess of our zip tie. And then we can replace our panel. So, now we can wire up our LED lights for our sidestep. So, we have power and ground. It's gonna meet up to the power and ground in our harness. So, we'll take a pair of wire strippers to strip back some lead on both of our wires, and then we can twist those up. And then we already have some lead cut back for us on our lights. So, we'll just twist those up.And then we can install our butt connectors. Slide this one over our positive, and then crimp that down with a wire crimper. And then we'll do that same thing on our negative. And then we can make the connections to our light. And then we can do that same thing for our other light on this side and our two lights on the other side. So, now we can plug our connector into our motor. So, we'll just slide that on and into place like that. And then we can grab our cover and slide that over.We're gonna slide this little rubber piece into the channel of our cover like that. And then we can grab our clips. We're gonna put this one in up here. So, now, on the outside, we can install our other clip. So, next, we can connect our lights to our brackets that we installed earlier. So, we'll peel back our double-sided tape backing and then stick down our light. And then we can do the same thing for our rear bracket and our other side.So, now we can zip-tie up all of our excess harness. So, we're gonna start in the back. We have a couple holes in our frame rail that we can zip tie into. I'll just get my zip tie started and then pull everything nice and tight and then crank down on my zip tie and take a pair of scissors or diagonal cutters and chop off the excess. Now, moving up front, we've got a couple holes right above our motor that we can zip tie into.So, I've got two zip ties together to give me the length that I need. And then one more time, with our pair of scissors or diagonal cutters, we can cut off the excess and then we'll do the same thing on the other side. So, now, once you have everything wired up, just go back and re-plug in that inline fuse and this install is complete.So, that'll wrap up this review and install of the AMP Research PowerStep Running Boards for your 2018 and newer 4-door Jeep Wrangler JL. Thank you for watching. And for all things Wrangler, keep it right here at extremeterrain.com.

      Product Information

      Features, Description, Reviews, Q&A, Specs & Installation
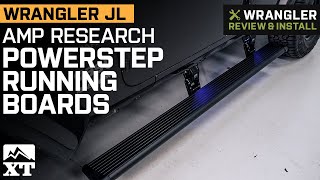
      Features & Specs

      • Electric-Powered Running Board
      • Lowers 12-inches
      • Extruded 6-inch Wide Aluminum Steps
      • Textured Black Powder Coated Finish
      • All-Weather Construction - Weather Tight Connectors
      • Integrated LED Lighting System
      • Load Capacity 600 lb. (Each Side)
      • Wiring Required
      • Driver and Passenger Side Included
      • Fits 2018-2024 4-Door Jeep Wrangler JL Models

      Description

      Electric Powered. AMP Research's PowerStep Running Boards are a great addition to your 2018-2024 4-Door JL. Designed to extend and lower 12-inches, these PowerStep Running Boards will provide you with a convenient step for easy entry into and out of your lifted Wrangler. The Running Boards then retract when not in use. This allows for more ground clearance and are more aerodynamic than traditional running boards. As an added bonus these Running Boards feature integrated LEDs for better visibility at night.

      Premium Construction. Proudly designed and made in the USA, these PowerStep Running Boards feature OE quality motors with high strength die-cast aluminum-alloy linkage arms which are completed in a military spec finish to ensure superior corrosion resistance. The Steps are crafted from extruded aluminum and are completed in a tough, black textured powder coat finish for an extra secure footing and long lasting durability. Complete with weather tight connectors, these Running Boards can take on any weather or climate.

      Warranty. Amp Research backs their Powerstep Running Boards with a 5 Year/60,000 Mile Warranty to ensure quality craftsmanship. Some limitations and exclusions may apply, please see manufacturer's warranty for complete details.

      Application. These Amp Research PowerStep Running Boards are designed to fit 2018-2024 4-Door Jeep Wrangler JL models. Please note that wiring is required for installation.

      Fitment:

      Details

      Amp Research 75132-01A

      CA Residents: WARNING: Cancer and Reproductive Harm - www.P65Warnings.ca.gov

      Installation & What's in the Box

      Installation Info

      What's in the Box

      • (2) Running Board Assemblies
      • (2) Motor Linkage Assemblies
      • (2) Idler Linkage Assemblies
      • (2) Motors
      • (2) Motor Covers
      • Controller
      • Wire Harness
      • Hardware
      • (2) Posi-Lock
      • LED Lamp
      • All Hardware
      4.7

      Customer Reviews (49)

        Questions & Answers

        10 More Questions

        Will It Fit My Wrangler

        • JL Rubicon 4 Door - 18, 19, 20, 21, 22, 23, 24
        • JL Wrangler 4 Door - 18, 19, 20, 21, 22, 23, 24