Talk to a Wrangler Sales Tech
1-877-870-8556
M-F 8:30A-11P, Sat-Sun 8:30A-9P
Logo Image
$20K Sweeps! 10 Chances to Win! Enter Daily >

Adams Driveshaft Extreme Duty Series Rear 1310 CV Driveshaft with Solid U-Joints (07-18 Jeep Wrangler JK 4-Door)

Item J125421
Verify parts fit and get product recommendations.
Wrangler Sales Techs: Connect Now M-F 8:30A-11P, Sat-Sun 8:30A-9P
$0.00
Our Price

$629.95 (kit)

FREE Shipping Market Price $699.99 You Save 10% ($70.04) Up to 10% off for Military & First Responders! See Details

Will this fit your Vehicle?

Select a different vehicle Help?
Update or Change Vehicle
Ship to: Ashburn - 20149
Sorry, please enter a valid US or CA postal code
We're sorry, zip can't be updated at this time.
    Create a list
    Add to New List

    Saved - View your saved items

    We're sorry. We couldn't save this product at this time.

    or use

      Video Review & Installation

      Hey, guys. Today I'm here with the Adams Driveshaft Extreme Duty 1310 Solid CV Rear Driveshaft fitting all 2007 to 2018 four-door JK Wranglers. So after you've lifted your Wrangler and created some hard angles with your driveline, as well as your suspension there are a couple of mods that I always recommend to take a look into to accommodate for those harder angles. One of those is gonna be your driveshaft in this option by Adams Driveshaft. It's gonna be a well built and very high-quality driveshaft and a good one for you to take a look into if you've lifted your Wrangler or even if you have a stock setup.So again this is gonna be for those JK owners that have lifted their Wrangler and the factory driveshaft is either wearing out or has worn out from that factory raise at the joint and they're looking for a stronger driveshaft overall with stronger CV joints. This is also going to be for the JK owner who has larger wheels and tires looking to accommodate for up to 37-inch tires for that heavier weight and that heavier rotational mass on their drive train.And like I mentioned before, this is even perfect for the stock JK owner that wants to replace a damaged or worn out factory setup with something that's gonna be a lot more solid and last a longer time. Now, this is gonna be at a really good price for all of that at roughly $500. Now other options on the page may just be a little bit more expensive since they are specific to the year as well as the transmission. Now when Jeep switched over from the 3.8 to the 3.6 liter motor, they did change the position of the transmission and the transfer case so some of those more specific driveshafts are just gonna be a little bit longer or shorter. Now with this, even though it is generic it is going to still be a very well-built driveshaft and Adams has been in the game for a long time. They are very well-known for their high-quality driveshafts and they even back that with a limited lifetime warranty to keep a peace of mind in your investment.So install is gonna be a two out of three wrenches on the difficulty meter. You're gonna need a couple of specialty tools and some basic hand tools. It's probably gonna take you about two hours worth of your time to get this new driveshaft bolted up. So speaking of that, let's jump into the install.The tools I used for this install were a ball-peen hammer, a three-eighths inch drive impact wrench, a 13-millimeter wrench, a quarter inch drive ratchet, a quarter-inch drive 3-inch extension, an 8-millimeter socket, an eleven-thirty-second-inch socket, a 32-millimeter socket, a half inch drive impact wrench and a couple of different center punches.So our first step in removing our rear driveshaft is just to remove the bolts that are holding our driveshaft onto our flange here. So I'm gonna take an 8-millimeter socket as well as a swivel and my impact wrench in order to unbolt all of these bolts.So now we need to disconnect our driveshaft from our flange or our yoke here. So there is a punch hole in the back. You can take a punch...I'm using a quarter-inch punch and we can take a ball-peen hammer and hammer the flange off. Now I would recommend to have a couple of the bolts threaded so your driveshaft does not fall and swing down.So after you've punched it out of your yoke, you can push it back and disconnect it. I had a pole jack here just to make sure that it wasn't going to swing down, but once it's out of the way, you can compress it. So what we're gonna do is just repeat that process on the transfer case side with our 8-millimeter socket. So now that we have all of our bolts out we need to separate this side from our flange here. So there is a divot in your flange or your yoke where you can put a punch in order to separate them.All right. So once that's separated from the yoke, we can go ahead and fully remove our driveshaft. So after we have our driveshaft off we do need to remove our yoke in order to replace it. So first, we have to take off our pinion nut. So I'm using a 32-millimeter socket. You can also use a one and five-sixteenth-inch socket. So go ahead and remove that nut.So after that's off we can go ahead and take a hammer and smack off our yoke. Now, we can move that to the axle side. So we can use that same 32-millimeter socket to remove our pinion nut. So before we go ahead and install our new driveshaft, I did wanna tell you guys a little bit about it in comparison to our factory setup. So this is gonna be a lot stronger. It's going to accommodate for those higher lift angles if you've lifted your JK, as well as accommodate up to 37-inch tires. So the actual build here is pretty solid. It's a seamless 2-inch by 0.12 DOM tubing material. It's gonna have a nice gloss black finish on it to protect it from the elements. But the real reason why this is a lot stronger than your factory setup is the actual CV joint or the constant velocity joint. So right out of the factory, the JK has the rzeppa joint which is a little bit different than a standard U joint setup. So basically what it is is a ball and socket style setup. You have multiple ball bearings in there as well as a boot on the outside to keep all of that grease in. So once you have lifted your Wrangler and created a harder angle with this, that's when these are prone to failure. So this boot around here can tare, it can wear it down and it can expose that grease letting that grease out which will not have the ball bearings lubricated as they should be creating a ton of heat buildup and that'll also just allow dirt and dust and any grit to get inside of there and harm those ball bearings as well. That's really where you're going to have a lot of failure with these is this rzeppa joint. But like I said, this is perfect for a stock application at those softer angles. So with this you're gonna have a standard U joint setup and it is gonna be able to accommodate for those harder angles. You have a double cardan setup here up at the transfer case and down at the bottom, you're gonna have a single standard U joint. Now the U joints themselves are gonna be very durable but with this setup, you're not prone to any failure over here with those harder angles, the harder output angles at the transfer case as well as the axle. So this overall is gonna be a very solid build so if you lift your Wrangler, if you're putting on larger tires, I would definitely take a look into a traditional U joint setup over the factory rzeppa joint. So enough about these two on the table. Let's go ahead and install our new one.So now we can install our new yoke. So they will be labeled transfer case and axle side. Just gonna tap that into place just being careful of our threads here. Make sure that's seated properly. Then we can switch over our gasket from our factory yoke. And then thread on our factory nut. After that's on there, we can take our socket and thread that on. And we can go ahead and tighten that down. And we'll be using the same 32-millimeter socket. Then we can move to the axle side and do the same thing. Tie that on. Seat that down in place. Carefully give it a little tap or two. Make sure that's seated. Now you will need to use an RTV on the axle side washer here. This driveshaft is not gonna live on our JK so we do not need to put RTV on it but I would highly recommend to do so. Then we can thread on our pinion nut. Tighten that down with our 32-millimeter socket. Now we can bolt up our driveshaft. So I'm gonna start at the transfer case side. Make sure that our U joint is lining up. So once you have it pretty much lined up, you can take your hardware that's provided by Adams Driveshaft and thread that in behind the yoke into the double cardan joint.So once two are threaded in you can take an eleven-thirty-second-inch socket and we can start to tighten these down. So I would also recommend to put some red Loctite these bolts. Adams does provide that as well.So after you have two in on one side, you can just flip the driveshaft to face the other way then you can get the other two bolts in. Again I would recommend to put Loctite on here, red specifically. Like I mentioned, this is not gonna live on this JK so I am not putting red Loctite on.After those are tightened down, we can move down to the axle side of our driveshaft. All right, so now we can bolt up our axle side part of our driveshaft. Now if it is a little bit too short all you have to do is pull it down and extend it to get it to sit in the yoke correctly and then we can grab our U bolt, slide that through the top, grab our second U bolt, slide that through the bottom. Then we can grab our hardware for the other side and bolt that in. So you're gonna have lock washers and nuts. Make sure there is one lock washer on every side of the U bolt and then we can tighten them down with those nuts.We also wanna make sure that we're tightening them down evenly so there's an even distribution of weight on each U bolt. Again, I would put red Loctite on your U bolts as well. So after we have all of our hardware in place, we can take a 13-millimeter wrench and go ahead and tighten everything down. Now, again, you do want to tighten down your U bolts evenly. So a couple turns on one side and then go to other side of that same U bolt. Tighten that down. And as you're tightening this down, it's actually going to pull that U joint into that yoke there.So after all of your hardware is torqued down to spec, then you're all set to go. That's gonna wrap up my review and install. Make sure you like and subscribe and for more videos like this always keep it right here at extremeterrain.com.

      Product Information

      Features, Description, Reviews, Q&A, Specs & Installation

      Features & Specs

      • CV Driveshaft
      • Includes CV Bolts 
      • D.O.M. Seamless Tubing Material
      • Twenty-Two Pounds in Weight
      • 2 Inch x 0.12 Inch D.O.M. Tubing
      • Fits Up to 37-Inch Tall Tires
      • Painted Gloss Black Finish
      • Sold as Kits
      • Heavy Duty Construction
      • Reduces Vibration
      • Long Installation
      • Limited Lifetime Warranty
      • Fits All 2007-2018 Jeep Wrangler JK 4-Door Models

      Description

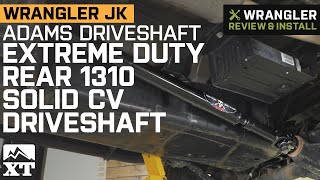
      Reduces Vibrations. The Adams Driveshaft Extreme Duty Rear 1310 Solid CV Driveshaft is constructed with a heavy-duty design. The CV driveshaft also reduces vibrations with larger tires. This product is sold as a kit by the manufacturer.

      Durable Construction. The CV driveshaft is made with durable and strong casting materials, such as D.O.M. seamless tubing and CV bolts. This product is 22 pounds in weight and fits up to 37-inch tall tires. The D.O.M. tubing is 2 inches x 0.12 inches in dimensions and the CV driveshaft has a painted gloss black finish.

      Long Installation. The CV driveshaft takes a long time to install and requires some mechanical expertise. You may need professional help, especially since the installation takes about 3 hours to complete.

      Limited Lifetime Warranty. The CV driveshaft includes a limited lifetime warranty. As such, the product is protected from material and workmanship damages after the day of purchase. Be sure to check out the company website to find out about any warranty limitations.

      Application. The Adams Driveshaft Extreme Duty Rear 1310 Solid CV Driveshaft fits all 2007-2018 Jeep Wrangler JK 4-Door models with no exceptions.

      Fitment:

      Details

      Adams Driveshaft ASDJK-1310R-S4D

      CA Residents: WARNING: Cancer and Reproductive Harm - www.P65Warnings.ca.gov

      Installation & What's in the Box

      Installation Info

      What's in the Box

      • (1) 2 1/2 Inch X .95 Wall Heavy Duty 1310 CV Driveshaft with Spicer Solid U-joints
      • (1) American Made 1310 Rear Transfer Case Output Shaft Yoke
      • (1) American Made 1310 Rear Dana 44 Pinion Yoke
      • (1) Set of 1310 U-bolts
      • (1) Set of Grade 10 CV Bolts
      5.0

      Customer Reviews (244)

        Questions & Answers

        10 More Questions

        Will It Fit My Wrangler

        • JK Rubicon 4 Door - 07, 08, 09, 10, 11, 12, 13, 14, 15, 16, 17, 18
        • JK Wrangler 4 Door - 07, 08, 09, 10, 11, 12, 13, 14, 15, 16, 17, 18

            Related Wrangler Categories