 FREE 1 to 3-Day Delivery on Orders $149+ Details

How to Install Smittybilt SRC Side Armor, Textured Black on your 1987-2006 Wrangler

Shop Parts in this Guide
NOTE: Carefully read entire instructions thoroughly before attempting to assemble and/or install this product. Smittybilt is in no way responsible for any damage to the vehicle or personal injury thatmay occur during the installation or use of this product. CAUTION: This product is designed primarily to enhance the appearance of the vehicle. Do NOT rely on it in any way to protect against injury or death in the event of an accident. “ALWAYS WEAR YOUR SEAT BELT “
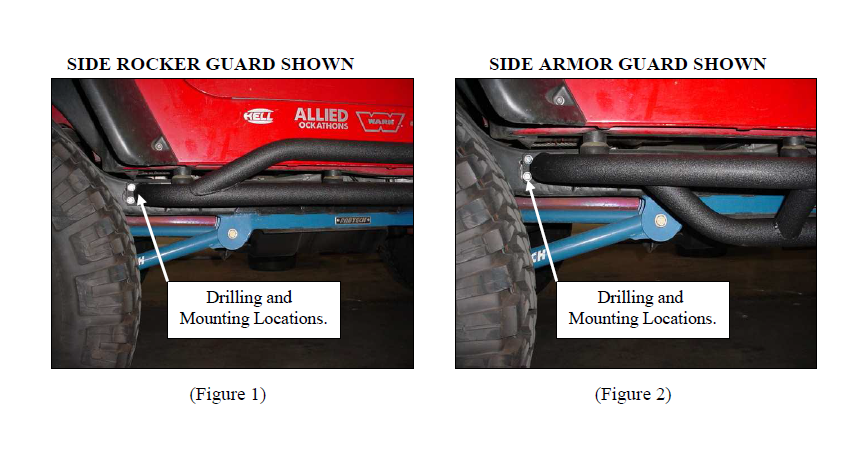
Step 1: Position the guard up to the frame. Maintain a ½” minimum gap between the bottom of the vehicle and the top of the guard. Adjust the guard from front to back until it is parallel to the side of the frame while also making sure it is parallel with the side of the vehicle. (Assistance is recommended while installing these guards)
Step 2: When you are satisfied with the placement of the guard, mark the side of the frame through the mounting holes located on the guards brackets. After you have marked all the holes place the guard to the side. Center punch the frame at the marked locations and drill a 5/16” hole in the frame. Caution: Before drilling be sure to check the backside for hazards or obstructions.
Step 3: Position the guard back against the frame and line up the holes in the brackets with the holes that you just drilled on the frame. Secure the guard to the frame using the supplied self tapping bolts. Tighten all bolts at this time. (Figure 1, 2)
Step 4: Repeat these steps to install the other side. Installation is now complete.
NOTE: To protect your investment, wax this product after installing. Regular waxing is recommended. Do not use any type of polish/wax that contains abrasives that could damage the finish.

