Installation Time
(approx) 6 Hours
Difficulty Level:
Mechanical expertise or professional installation required.
FREE 2 or 3-Day Delivery on Orders $119+ Details
$329.95 (kit)
FREE Shipping Market Price $385.99 You Save 15% ($56.04)Saved - View your saved items
We're sorry. We couldn't save this product at this time.
or use
Merideth: Hey guys, so today we're checking out this SkyJacker 2-Inch Suspension Lift Kit with Front Aluminum and Rear Metal Spacers, Fitting All 2021 and Newer Sasquatch Package, Badlands, First Edition, and Wildtrack models. Now, this kit will be a great addition to your Bronco, if you're looking for an affordable way to get some better capability for your truck. Whether that's more ground clearance or fitting a larger tire for better performance off-road. This will also be a great pick if you're looking to level out the factory rig creating a more aggressive stance and a more defined appearance to the Bronco.This kit will feature spacers for all four corners, achieving that two inches of lift all around. And that will elevate the Bronco bettering your break-over, approach and departure angles, allowing you to crawl over obstacles a little bit easier and fit up to a 37-inch tire comfortably inside the wheel well. This will also feature just the right amount of lift to prevent any CV axle over extension keeping a comfortable drivability.The front spacers will feature a two-piece design and are made out of a heat treated 6061 T6 aluminum material that are CAD machined for a perfect fit and optimal durability. Now, the rear spacers here are made out of a tough steel material and we'll have a nice black powder coat finish on top to resist any rusting on the spacer itself for a long lifespan.Now, I would like to mention that the front spacers will measure out truly to 1.25 inch but when combined with the suspension geometry as well as the spring compression and the spacer itself, that's what's going to achieve that 2-inch lift in the front. This will also come with all the hardware that you need to install this on your Bronco with no drilling or modifications required.When it comes to pricing, this will come in at roughly $400. And when shopping around for lift kits or leveling kits, usually the rule of thumb is that the more components that they come with, usually the more expensive they will be and vice versa. Now, this will include everything that you need for the height, but this is gonna be a no-frill kit. So, unlike some more expensive choices, this won't include springs, struts, or any of the correcting components, like a track bar relocation bracket. However, in this case, it's not 100% necessary. So, I think if you're trying to save a couple bucks while still getting the appearance and capability out of your Bronco that you want, then this is a great option.Now, this one's gonna be a three out of three wrenches on the difficulty meter and it's probably going to take you about six hours to get the job done with some basic hand tools and some specialty tools. Now, at this point, we can head over to the shop and check out a detailed breakdown of the install step by step. So, that's gonna wrap it up for me. Let's go ahead and get into it.Man: Tools required for this install include a couple of different size pry bars, an air hammer, an air gun, a couple of different size impact guns, a pass-through ratchet with an 18-millimeter socket, a 15-millimeter ratcheting wrench, a T40 Torx bit, a 6-millimeter Allen bit, a 5/16 socket, a swivel adapter, a 21, 24, and 27-millimeter socket, a 10, 15, a couple of different size 18s and 35-millimeter socket, an electric ratchet, caliper hangers, a ratchet, a 21-millimeter ratcheting wrench, a can of penetrating lubricant, ratchet strap, flathead screwdriver, a Phillips head screwdriver, 7-millimeter wrench as well as a spring compressor and a vise.What's up, guys? Today we're installing a lift kit on our Bronco, so let's get started. So, the first thing we're gonna wanna do is remove our skid plates, and these are held in by a bunch of 15-millimeter bolts so we'll grab a 15-millimeter socket on impact on to take these out. And now moving back to our next, we have two more 15-millimeter bolts, we can use that same 15-millimeter socket for. And now for our last one, we just have two more 15-millimeter bolts in the front and two more in the back.So, next, we can disconnect these three connectors on our power steering rack. So, we're gonna grab a flathead screwdriver to pop these red clips back and then we can press in on these tabs to remove them. And then on the top one, we have another red tab, this one's a little harder to get to. So, next, we can remove our tie rod end, it's a 21-millimeter nut that we can grab a 21-millimeter socket to remove and then we'll leave that on a couple of threads and tap the side of the knuckle with a hammer to break our ball joint loose. Now we can grab our hammer, and give a couple of taps here until we break our ball joint loose. Now, once we've broken our ball joint loose, we can remove our nut. Pull that out of the knuckle, and throw our nut back on so we don't lose it.So, next, we can come to the other side or remove the nut for our sway bar end link. This is also gonna be a 21-millimeter nut. But you can't get a power tool on here because the ball joint's just going to spin. So we'll get the 21-millimeter ratcheting wrench and a 6-millimeter Allen bit to remove our nut. And now once you pop this nut off, you're gonna wanna pop the nut for the sway bar end link on the other side as well, so that we can pry up and remove our end link.So, now once we have our sway bar end link disconnected on both sides, it's going to be a lot easier to pry up on our sway bar, to pop our end link out of our lower control arm. So, we'll grab a pry bar, just get it in here and pop our ball joint out of the way. Next, we can remove our two lower strut nuts, they're gonna be 18-millimeter nuts, so we'll grab an 18-millimeter socket to get those off.Next, we can go up to the top of our strut tower and loosen up our three 15-millimeter nuts. We'll grab a 15-millimeter ratcheting wrench to loosen these up.Next, we can remove the 10-millimeter bolt that's holding our brake line bracket into our knuckle. So, we'll grab a 10-millimeter socket to take that out. And then we can prop the bracket out of the way and thread our bolt back in so we don't lose it.Next, we can loosen up our axle nut. So, you're gonna need to grab a 35-millimeter socket on an impact gun to take that out. Next, we can remove our nut out of our upper control arm ball joint, this is gonna be an 18-millimeter nut, so we can grab an 18-millimeter socket with a swivel adapter to loosen this up. Now, just like our tie rod end, we're gonna leave it a couple of threads on so that we can bang the side of the knuckle to pop our ball joint free. Then we can just take a hammer and smack the side.So, now, once we have our upper ball joint broken free from our knuckle, we can get a pry bar in under one of the springs. That way it doesn't just explode on us once we take the nut off, and then we'll finish removing our nut. So, now we can thread our axle nut on, just a couple of threads. We have a nice little hole here that we can grab an air hammer and tap to get it out. We'll get that a few threads on and then grab our air hammer and we'll just give this some taps and push it backwards.So, now comes the fun part of getting our strut out of our lower control arm so you can grab a pry bar to get in between the stud and the bottom of the strut and pry up to get this out. Now, you might need a second set of hands to hold the strut once we remove the nuts up top. So, we'll get in there with a pry bar and start prying that outSo, now that we've got our studs out of our lower control arm, we can remove our nuts. Now, I've already got the back one out very carefully so we don't drop that into the abyss. So, now once we have our top nuts removed, you can grab yourself a buddy to grab onto the strut while you pray down on the lower control arm to get the clearance you need to get the studs outAnd now, once you got the strut out on this side, you can repeat that same process for getting the strut out on the other side. So, now we can bring our front struts over to the spring compressor, we're gonna get this all set up and start tightening down, we will make sure that you can press until the shock is a little loose and you can move it around.So, now that we have movement in our shock, we can start to undo or nut at the top, we're gonna use a pass-through socket, an 18-millimeter, and then grab a 5/16 inch bit, to hold on to our stud. Now, before you undo the strut, you might wanna make a mark here, here, and here, just so that we can line everything back up the way that it came out when we go to reinstall it. So, now we can wiggle our alignment pin out of place. And then we'll get our 18-millimeter pass-through socket and a 5/16 socket to remove this bolt. And then once you have that loosened up, you can grab the bottom, spin the nut the rest of the way out by hand.Next, we can bring our top hat over to the vise and we're going to be hammering out our studs because this kit does come with new ones. So, we can take a hammer, just give it a couple of good smacks and pop it out. And then we'll do that same thing for the rest of our studs. So, now we can take our preload spacer and slide our included bolts through, the flat sides are gonna lock into these channels and then we'll slide that on top of our isolator. And then after that, we can slide our top hat back on. And then we can get everything lined back up, slide our strip back in and get our nut back on top. So, now we can go back and tighten down our top nut. And then once we have our nut tightened, we can release pressure on our spring. And then we can remove our strut assembly.So, our next step is to hammer out our two studs at the bottom of our strut. So, to do this, we're gonna get it on top of a vise, we're gonna take a 24-millimeter socket that'll fit over the end of our stud and then 18-millimeter socket on our nut side. And then we can take a hammer and bang on the nut side until we break this loose. So, now I've got an extra set of hands holding the struts to hold in place and then we can start banging on our socket. And then we can do that same thing for our other stud.So, now we can put our strut back into our Bronco. First, we're going to add our top spacer onto our studs. And then we can slide this up in and get a couple of our nuts hand-tight. Now, we're going to be using the nuts that were included in our kit. Now we can drop our two studs through our holes and then we'll get our nuts started on the bottom side.Next, we can reconnect our upper ball joint. So, I'm gonna go pry bar to push this down into place, and then we'll get our nut on the bottom. And then we can tighten that down using our 18-millimeter socket. Next, we can tighten down our axle nut, just spin that on and then we can get a 35-millimeter socket to tighten it down.Next, we can reconnect our tie rod and reinstall our nut, And then we'll tighten that down with a 21-millimeter socket. Next, we can reconnect our brake line bracket and reinstall our 10-millimeter bolt. And then tighten that down with a 10-millimeter socket. Now, at this point, you're gonna wanna catch up on the other side, and then we can reinstall our sway bar end link on both sides. So, slide that down, reinstall our nut, and then we can tighten that down with a 21-millimeter ratcheting wrench and a 6-millimeter Allen bit.Next, we can come back to the bottom of our strut and tighten up our two 18-millimeter nuts to pull our studs back down into position. Now, lastly, we can go back to the top of our strut tower and tighten down our three 15-millimeter nuts. So, I'm using a 15-millimeter ratcheting wrench to tighten these down. Next, we can reconnect our three connectors on our power steering rack, just press those in, and then press those red tabs in to lock it into place.So, now that we're ready to get our skid plates back on, you can repeat the same process for the strut installation on the other side. So, now we can reinstall our skid plates. So, what I'm gonna do is take two of our 15-millimeter bolts and get those threaded in. And then we can slide that up in there and get our back two bolts in. And then we can grab our 15-millimeter socket to tighten everything down.Now we can install our next skid plate. I'm just gonna get these bolts hand-tight for now until we get our front one on since that's the bolts going through the skid plate as well. Now we can install a front skid plate. So I'm gonna thread these bolts a couple of threads into their holes and then we can slide our skid plate into those bolts and then install our front bolts. And then once again we'll grab our 15-millimeter socket to tighten these down. And then we can go back to our rear bolts on our middle skid plate and tighten those down with that same 15-millimeter socket.So, now moving on to the rear, we have to remove a few of our screw clips to give us access to our upper strut nuts. So, we'll take a Phillips head screwdriver to get these out. So, first, we're gonna remove the two that are right above our frame. So, you might need to hold down the outer edge to get it to screw out. So, we'll take a Phillips head screwdriver, you wanna use light pressure here so you don't just push it right back in. And now coming towards the front side of our passenger side rear wheel well we can remove our two screws as well as two more clips going up from the bottom. And now we'll just get our two lower bolts that are also Phillips head screws.And then right above the rear side of a rock slider we have one more of our bolts, so we can get a 7-millimeter wrench in there to loosen this one up since we don't have enough clearance for a screwdriver. So, next, we're gonna have to remove one of the bolts in our track bar. I'm gonna do this lower one, I got a couple of pole jacks supporting our axle. So, we can get a 24-millimeter socket to run this bolt outSo, now, before we start removing our strut, we're going to remove one more plastic nut up here just so that we can fold back our fender liner a little more so that you can see more clearly what's going on. So, this you can just twist off with your hand. And then once you have that off, you pull back on your fender liner and get that out of the way. Next, we can loosen up our three upper strut nuts. I'll take a 15-millimeter ratcheting wrench to do so. So, now we can work on getting our lower strut bolt out.Now, we have a 27-millimeter bolt, and on our nut side, we have a tab that's gonna lock against this piece here, so we don't have to worry about getting a wrench on that side. So, we'll grab our 27-millimeter socket and take this out. So, now we can go back up top to our nuts that we loosen and fully remove those and remove our strut. And then once we have our strut out on this side, we can do that same thing on the other side.So, now we can begin to install our spacer onto our rear coil over. First, we're gonna have to knock this alignment pin out of place. So, you can take whatever tool you have just to give it a whack and then you can wiggle it out. Now, with that removed we can slide our spacer on and reinstall our factory nuts. So, now we can slide our spacer onto our studs. Now, we don't exactly have a ton of room to get our nuts on, so we're gonna have to throw them on one at a time and work our way around.And then we don't really have enough room for a ratcheting wrench, so we're gonna have to do this the old-fashioned way, cranked down with a wrench. we're using a 15-millimeter wrench to tighten these down. And then right before you get it tight, we'll move on to the next one so we can tighten down our spacer evenly. And once you get to your last one, you can start cranking down. And then once you're done with this one, we can do the same thing for the other one and get the struts back into the Bronco.So, now we're ready to reinstall our strut. So, we're gonna get it up through our upper strut mount and then we can start installing our new nuts that are included in our kit. Now, once we have our strut loosely mounted into place on this side, we can do the same thing on the other side. And then we can start to drop down our axle until we line up our lower strut mount with our hole. So, now we can start to lower our pole jacks evenly on both sides. Now you're gonna wanna make sure you keep an eye on your brake lines and all of your other lines that are going to the axle to make sure you're not putting any pressure on them. And if you are, you can remove the bolts that hold them in place.So, now we can line up our bolt and slide it through the hole. And then we can start to thread that into our knot on the other side. And now at this point we can get caught up on the other side and tighten down our bolt. So, now once we have our lower strut bolts in on both sides, we can take our 27-millimeter socket to tighten them down. And then we can do that same thing on the other side.So, now we can hop back up top and tighten down our three 15-millimeter nuts using a 15-millimeter ratcheting wrench. And then we can do that same thing on the other side. So, now we can reinstall our fender liner. Now, I've bent it back into place. Now, first, we're gonna take our plastic nut and get it back onto our stud. And then we can reinstall our two screw clips that are right above our frame. And now we can just continue working our way around our fender liner, reinstalling our clips, and our screws.And now we can tighten down our screws. For the ones in our fender, we're gonna be using a Phillips head screwdriver, and then for the one behind our rock slider, we'll get that 7-millimeter wrench. And then once we have our fender liner reinstalled on this side, we can do that same thing on the other side. So, next, we can reinstall our bolt into our track bar. Now, it's not quite lined up. So to get it to line up, I've got a ratchet strap, I'm gonna hook one side to the other side of our track bar and then our other we can slide in here and then we're gonna start to ratchet to bring these closer together so that we can get our bolt through. So, now we managed to get our bolt through the hole, we got the nut on the other side. Now we can remove our ratchet strap and tighten this down with a 24-millimeter socket.So, that will wrap up this review and install the Skyjacker 2-Inch Lift Kit with Front Aluminum and Rear Metal Spacers for your 2021 and newer Bronco with Sasquatch Package, Badlands, First Edition, and Wildtrack. Thank you for watching. And for all things Bronco, keep it right here at extremeterrain.com
Subscribe to our YouTube Channel
Features, Description, Reviews, Q&A, Specs & Installation
Brand | SkyJacker |
Lift Height | 2.00 Inch |
Lift Kit Type | Spacer Lift |
Lift Kit Includes Shocks | Shocks Not Included |
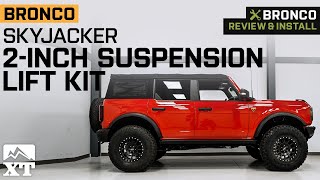
Overhauled Off-Road Abilities. Employ the 2-inch suspension lift kit with front aluminum and rear metal spacers from SkyJacker to take full advantage of your Bronco's new suspension system. Keep your OEM calibrated performance struts and raise the posture using strut spacers to take advantage of the Bronco's amazing travel capabilities. The CV axles may run within the restrictions of the upper and lower standard control arms thanks to their seamless integration and flawless functionality.
Supreme Stance. Your Bronco's suspension elevation may be increased, allowing you to use bigger, more rugged tire and wheel options. Your general stance and capacity to traverse more terrain are improved thanks to the added ground clearance of up to 37-inch tires. Greater approach angles, center break-over contours, and rear exit angles are all made possible by increased ground clearance.
Stringent Steel Production. Lift pressure is distributed more equally thanks to the SkyJacker 2-Inch Suspension Lift Kit's6061-T6 heat-treated aluminum front spacers which are CAD-machined to stringent engineering requirements. The primary part to raise the ground clearance is the modest front preload spacer. The second component is the smaller top mount strut spacer. The short top mount spacer inhibits the stock upper control arm and strut from being stuck together.
Warranty. This product comes with a limited product manufacturer warranty that covers any manufacturer defects or damages prior to installation. Some limitations may apply to this warranty.Installation. This product requires professional installation and would take roughly 6 hours to mount.
Application. The SkyJacker 2-Inch Suspension Lift Kit with Front Aluminum and Rear Metal Spacers fits all 2021-2023 Ford Bronco models with Sasquatch Package, Badlands, First Edition, Wildtrack.
Fitment:
SkyJacker SKYFB2120MSPB
CA Residents: WARNING: Cancer and Reproductive Harm - www.P65Warnings.ca.gov
Installation Info
Installation Time
(approx) 6 Hours
Difficulty Level:
Mechanical expertise or professional installation required.
What's in the Box
10 More Questions