FREE 1 to 3-Day Delivery on Orders $149+ Details

How to Install Rugged Ridge Hood Lift Kit on your 2007-2013 Wrangler

Shop Parts in this Guide
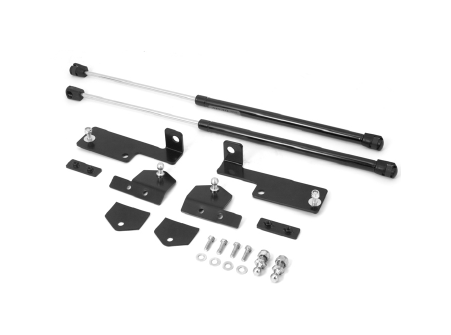
| SR NO. | Contents: | QTY |
|---|---|---|
| 1 | Lower Mounting Bracket | 2 |
| 2 | Upper Mounting Bracket | 2 |
| 3 | Nut Plate | 2 |
| 4 | Threaded Ball Stud | 2 |
| 5 | Nyloc Nut | 2 |
| 6 | M6 x 18 Bolt | 2 |
| 7 | M6 Nyloc Nut | 2 |
| 8 | M6 Washer | 4 |
| 9 | M5 x 16 Bolt | 4 |
| 10 | M5 Washer | 4 |
| 11 | Struts | 2 |
| 12 | Rubber Gaskets | 2 |
1. Place the hood in the open position using factory hood prop. Remove the 10mm fender bolt closest to the firewall (Figure 1). Loosely attach the lower mounting bracket using the fender bolt (Figure 2).

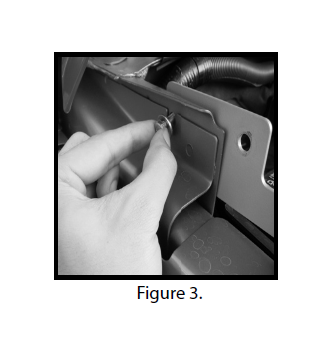
2. Insert supplied M6 bolt and M6 washer through preexisting hole in the sheet metal behind the fender bolt (Figure 3). Rotate bracket up and push bolt through the lower mounting bracket. Place another M6 washer over bolt and thread on the M6 nut. Fully tighten both the fender bolt and the M6 bolt, washer, and nut assembly.
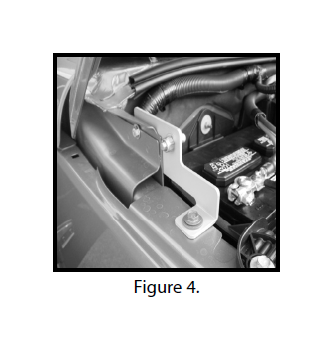
3. Mount the threaded ball stud to the lower mounting bracket with the ball facing the engine compartment. Thread on the nyloc nut and tighten completely using a 13mm socket and boxed wrench (Figure 4).
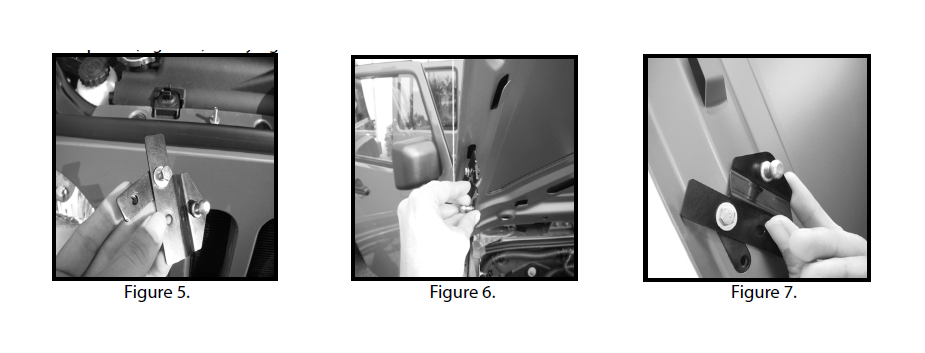
4. Remove the backing tape from the rubber gasket. Attach the gasket to the back of the upper mounting bracket. Loosley install a M5 bolt and washer in the top hole of the upper mounting bracket, threading through the nutplate (Figure 5). Insert and rotate nutplate portion of the assembly into the factory hole in the hood (Figure 6) until the nutplate is inside the inner hood panel and the upper mounting bracket is outside of the inner hood panel (Figure 7). Fully tighten the M5 bolts with a 8mm socket.
5. Repeat steps 1 through 4 for the driver side of the vehicle.
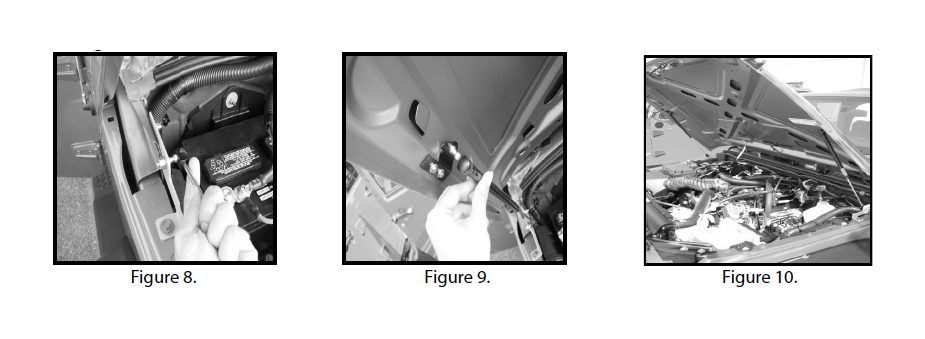
6. Press on the hood struts on both the passenger and driver side lower mounting bracket ball studs (Figure 8). While supporting the hood, remove the factory hood prop, lift the hood, and press the other end of the strut onto the passenger upper mounting bracket ball stud (Figure 9).
CAUTION! One strut will not fully support the weight of the hood. Hood support must be maintained until the other strut has been mounted. Failure to support hood can result in injury.
While still maintaining support on the hood, press the driver side strut onto the upper mounting bracket ball stud (Figure 10).