Talk to a Bronco Sales Tech
1-877-870-8556
M-F 8:30A-11P, Sat-Sun 8:30A-9P
Logo Image
$20K Sweeps! 10 Chances to Win! Enter Daily >

Rough Country High Clearance Front Bumper (21-24 Bronco, Excluding Raptor)

Item FB18278
Verify parts fit and get product recommendations.
Bronco Sales Techs: Connect Now M-F 8:30A-11P, Sat-Sun 8:30A-9P
$0.00
Our Price

$449.95 (each)

FREE Shipping Market Price $517.99 You Save 13% ($68.04) Up to 10% off for Military & First Responders! See Details

Will this fit your Vehicle?

Select a different vehicle Help?
Update or Change Vehicle
Ship to: Ashburn - 20149
Sorry, please enter a valid US or CA postal code
We're sorry, zip can't be updated at this time.
Recommended Install Shops
How It Works
Install Shops are available near Ashburn - 20149

Add Local Shop Installation

Total cost of service $299.00
    Create a list
    Add to New List

    Saved - View your saved items

    We're sorry. We couldn't save this product at this time.

    or use

      Product Videos

      Merideth: Hey, guys. So, today we're checking out the Rough Country High Clearance Front Bumper, fitting all 2021 and newer Broncos. Now, this will be a great addition to your Bronco if you're looking to increase your off-road capabilities, with a front bumper that's going to provide you the clearance, protection and utility that you need for the street and the trail. Now, this is gonna be a game changer if you want a bumper that you can customize to your own personal preference, creating custom appeal, in addition to the aggressive styling here.This will feature a modular design, offering the ability to build off of the bumper and create it your own, with multiple mounting locations for fog and pod lights, as well as a 20-inch light bar, and compatibility with RC's low-mount winch plate and skid plates. This will also have a cutout in the center, to allow adaptive cruise control abilities, but does come with a block-off plate for non-sensor models. Now, the ends will also have a high, sweeping angle, and the full setup here will have a compact design, to allow better approach angles overall, getting you better clearance in off-road situations.This will have an 11-gauge steel skin here, with a 17-gauge steel mounting point for optimal durability, to protect the front end of the truck. Now, this will also have a nice textured black powder coat finish on top, to prevent any rusting or corrosion on the steel underneath, but also to match with any other heavy-duty accessories that you already have on your Bronco. Not to mention, this will work with the factory skid plates and factory frame-mounted tow rings, so you don't have to sacrifice any of those OE features with this front bumper.This will be right in the middle when it comes to price, at roughly $600. Now, this will be a fully inclusive bumper, offering multiple configurations, with the modular design and the ability to customize it to your own personal preference. Others in the category may not offer as many light mounting options as this, or will include a different design overall, with a tubular construction or the addition of a bull bar, and so on. So, I think if you're looking for a generally affordable bumper that will allow you to set up your rig the way that you want it, then this is gonna be a great pick.Install will be a two out of three wrenches on the difficulty meter, taking you about four hours to get this mounted up and configured properly, with some basic hand tools. At this point, we can head over to the shop and check out a detailed breakdown of the install. So that's gonna wrap it up for me. Let's go ahead and jump into it.Man: Tools used for this install, 3/8 electric impact gun, 13, 15, and 17-millimeter sockets, 3/8 ratchet, 13-millimeter wrench.Hey, guys. I'm gonna show you how to uninstall and install our front bumper here on our '21 Bronco. So, let's get started. So, the first thing we're gonna do to remove our bumper here is take off our splash guard here. Now, as you can see, our vehicle's up on a lift. If you don't have a lift, you wanna make sure if you jack it up, put it on jack stands and get it secure. So, what I'm gonna do is take my 15-millimeter. We got one here, one there. There's one under there, there, there, and there. I'm gonna start removing these with my 15-millimeter and my 3/8 gun, and then we'll drop this down.So, now we got all our 15-millimeters out. Just gonna push forward, and remove our shield. So, now that we got our shield off here, what we're gonna do is reach up inside here, and there's a wire connector that plugs in to our lights here that are in our bumper. So, we're gonna have to reach up in here, disconnect that, pull that down, then we'll be able to start taking our bumper apart to remove it, and it'll come off in one piece. So now, up inside here, there is a wire connector, right up inside here. And I'm going to try to get up in here and push on this connector right here. And when you push on the connector, I should be able to pull the connector apart like that, and pull this down. And we'll just put this back in with the bumper here. So, now you're gonna get up in here, and there's a connector right up in here. I'll push down on the clip [inaudible 00:04:11] which is like a bit un-clip there, and then you just pull it down like that, and we'll put this with our bumper.So next, what we're gonna do now, we got our wiring connector done. We're gonna remove this piece here, and this piece here. And to do that, all you're gonna do is just pull on it, like that, pop it off, do same with the other one. Pop it off like that. That'll give us access to these three here, and we'll be able to remove them on both sides, and be able to remove our bumper. So, now we're gonna remove these three 15-millimeters right here. I'm gonna take my 15-millimeter and my 3/8 gun. Now we'll do the same on the opposite side. And what I'm gonna do is just hold the bumper like that, take the bolt out, be able to grab the bumper, and remove it.So, now we have our old bumper removed. I have the new bumper here on the table, with all the hardware that comes with it. Now, in this bumper here, since our bumper did not have parking sensors, we're not gonna have to put parking sensors in this bumper or rip our old bumper apart. So what I'm gonna do is show you how to assemble this bumper, put our parking sensor brackets in, and we're gonna be using plugs to do that, and we'll finish putting our shield in here, where our light bar would go if you had it. We don't have it. We're gonna have this piece here that goes in instead. We have to put our wings on, our brackets here, that go in the back, to hold it into place. So, we'll start on one side, and then work our way forward, and we'll get this bumper assembled.The first thing we're gonna do is take our extension here that goes on the bumper here, and this is where the parking sensor would go, on this piece. We're gonna take our parking sensor bracket. We're gonna put that in place. They give you a little nut. We're gonna slide that in, screw this on, just to hold this in place here into the wing here, as I call it. And I'll get that tight. And then, since we don't have parking sensors, we're just gonna take the insert, push it in place here, like that. That's pretty much what it's gonna look like.Next, we're going to take our bolts that are supplied in our kit, and we're gonna attach this to this piece here, and tighten it up. So, now I have it in place. I'm gonna take my 13-millimeter with my flat washers, and there's gonna be four of them here that we're gonna put in. We're gonna take a flat washer on the opposite side, and the nut that was supplied in the kit. Get this started. Once I get one started, it should sort of hold it in place, like that. Now we can start another one. Flat washer, a nut, pretty much like that. Then we'll install our other two, like that. Again, flat washer and a nut. And then we'll line our bracket up here, where it sits even with the other part of the bumper. I'm gonna take my 13-millimeter ratchet, with socket, and my 13-millimeter wrench, and we're gonna tighten these up.Now, we're just gonna wanna repeat this whole install procedure, and inserting the bumper sensor bracket here, and tighten your nuts up on the other side. So, now that we have our bumper extensions put on, our bumper sensor plugs in place here, we have everything tightened up, we're gonna work on our bracket piece right here. We're gonna take this studded, welded plate here. It's gonna go on the back side of this, and come up through, like that. And in the kit, they're gonna give you these pieces of plastic here, and you're pretty much just gonna slide them over like that. They give you three to do it. Hold it in place. That way, once we get it on our vehicle, we'll be able to hold this in place.Now you're gonna want to just repeat that same procedure on the opposite side. So, next, we're going to put in our insert here into our bumper. Gonna kind of get it sat in place, pretty much like that. We're going to take a 13-millimeter, with two flat washers here. We're gonna push it through here. In fact, you're gonna wanna go this way with it, like that, and then a flat washer and a nut. Gonna do the same on this side. I wanna make sure it's where it's supposed to be, just like that. I'm gonna take my ratchet with a 13-millimeter socket, my 13-millimeter wrench. We're gonna tighten these two up. Same on this side.Next, we're gonna put our two bumper sensor bracket, or connector holders here. We're gonna put these in place, put plugs in 'em, because our bumper don't have 'em. So, now we're gonna put this in this hole right here. Take our plastic nut that we got, put it on the back side of here. Snug it up. Now, if you had your bumper sensor, instead of putting this insert in, you would just push your bumper sensor through here, and it would come out to that tip. I'm gonna push that one in place, like that. Come on this side, do the same. Insert this through. Take our plastic nut, put this on the back side of it, tighten it up, like that. Take our cap, push it in place. And that is pretty much the assembly of our bumper. Now we're ready to install it onto our Bronco.So now, before we install our front bumper, I'm gonna take a 15-millimeter here, remove these two bolts here, remove our crash bars, because when we stick our bumper on, we're gonna see 'em. So, if you want, just take a 15-millimeter like I'm gonna do, you can remove your crash bars. If you wanna keep 'em on, it's up to you, but we're gonna take 'em off of here. And they just slide out like that. Now you're gonna wanna repeat the same procedure on the opposite side.So, now that we have our bumper assembled, over from our workbench here, I have it down on the ground, I'm gonna pick it up, put it on the vehicle. I'm gonna start a flat washer and nut on one side, and then start a flat washer and nut on the other side. Then we'll lift our truck back up, start the others, and tighten them up. We got one started on that side. I'm gonna come over here and do the same. Now I got two...or one started on that side, one started on this side. We'll lift the truck up, and we'll start our other ones. So, now what I'm gonna do is finish installing our washers and nuts, one here, one up here. And take our flat washer and nut that was supplied in our kit, and do another one, right here. Might be a little hard to see. I'm just gonna get 'em on like that.Then what I'm gonna do is take my 17-millimeter socket, with my 3/8 ratchet, tighten these up. Now that I have those tight, we'll tighten the outer one that I put on first, when we installed the bumper. So we got one more that we put on when we put the bumper on, right here. Then I'll take my 17-millimeter socket and ratchet, and tighten this one up. Now you're gonna wanna just repeat that same procedure on the opposite side. And now I'm on the other side, got my 17-millimeter socket again with ratchet. We're gonna tighten these two up. A little tricky to get in here to get this one. And now that I have those tight, I already tightened my outer one up, that'll wrap up this install.That wraps up this review and install of our Rough Country High Clearance Front Bumper for Broncos. Thanks for watching, and for all things Bronco, keep it right here at extremeterrain.com.

      Product Information

      Features, Description, Reviews, Q&A, Specs & Installation

      Features & Specs

      • With 11-Gauge Steel Skin
      • Features a Center Opening
      • Compatible with Skid Plates
      • Exhibits a Flat Black Powder Coat
      • Has 7-Gauge Steel Mounting Points
      • Designed to Overlap Stock Grill Shell
      • Works with Frame-Mounted Tow Rings
      • Ready for 20 Inch Single Row Light Bar
      • Fits on all 2021-2024 Ford Bronco, Excluding Raptor Models

      Description

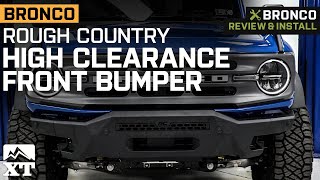
      Enhances Appearance and Performance. Take a look at the Rough Country Full Width Front Bumper. Your car's appearance will change thanks to this bumper, which will also shield your engine and lights from harm. This bumper is made to perfectly fit your Bronco and offer the highest level of ground clearance.

      Modular Features. Moreover, it overlaps the OEM grille shell for aesthetic purposes and light bar compatibility. You can even improve your visibility at night and add some beauty to your car because it fits Rough Country's 20 inches light bars, which allows you to put extra cube lighting on the side.

      Installation. The installation procedure is expected to take 3-4 hours to complete and only requires minimal splicing.

      Warranty. This bumper comes with a limited lifetime replacement manufacturer’s warranty.

      Application. The Rough Country High Clearance Front Bumper fits on all 2021-2024 Ford Broncos.

      Fitment:

      • 2021 Ford Bronco
      • 2022 Ford Bronco
      • 2023 Ford Bronco
      • 2024 Ford Bronco
      Details

      Rough Country 51077

      CA Residents: WARNING: Cancer and Reproductive Harm - www.P65Warnings.ca.gov

      Installation & What's in the Box

      Installation Info

      What's in the Box

      • (1) High Clearance Front Bumper
      • Installation Bumper
      1.5

      Customer Reviews (2)

        Brand Image

        Reviews of Rough Country Exterior products have an average rating of 4.6 out of 5

          Questions & Answers

          10 More Questions

          Will It Fit My Bronco

          • Badlands 2 Door - 21, 22, 23, 24
          • Badlands 4 Door - 21, 22, 23, 24
          • Base 2 Door - 21, 22, 23, 24
          • Base 4 Door - 21, 22, 23, 24
          • Big Bend 2 Door - 21, 22, 23, 24
          • Big Bend 4 Door - 21, 22, 23, 24
          • Black Diamond 2 Door - 21, 22, 23, 24
          • Black Diamond 4 Door - 21, 22, 23, 24
          • Everglades 4 Door - 23, 24
          • First Edition 2 Door - 21
          • First Edition 4 Door - 21
          • Heritage Edition 2 Door - 23
          • Heritage Limited Edition 2 Door - 23
          • Outer Banks 2 Door - 21, 22, 23, 24
          • Outer Banks 4 Door - 21, 22, 23, 24
          • Raptor 4 Door - 22, 23
          • Wildtrak 2 Door - 21, 22, 23, 24
          • Wildtrak 4 Door - 21, 22, 23, 24