Installation Time
(approx) 1 Hour
Difficulty Level:
Light to Moderate mechanical skill required.
FREE 2 or 3-Day Delivery on 10,000+ Items. Details
$119.99 (pair)
FREE Shipping Market Price $139.99 You Save 14% ($20.00)Saved - View your saved items
We're sorry. We couldn't save this product at this time.
or use
Merideth: If you're in search of a stylish way to up the lighting performance on your 2007 to 2018 JK Wrangler, these LED DRL projector headlights with the black housing and the clear lens will be a great set to choose. Now, we all know that these factory headlights aren't necessarily the best when it comes to visibility at night. And these will be a great pick if you're currently struggling with that and want some better lighting performance, especially if you live in a more remote area. Now, these will also be very unique in the styling with mini-projector lenses in multiple LEDs, as well as a small LED strip up at the top and down at the bottom for your daytime running light, making your rig stand out compared to the traditional headlight.Now, getting into the construction, as you can see, this will have a black housing, especially when the light is all for a stealthy appearance and a clear lens to optimize your lighting performance compared to a smoke lens. These will also be built tough with a sealed aluminum heat sink housing design, a tough shockproof lens, and they're gonna be IP67 dust and waterproof rated.Now, on the inside, you can see what we call the matrix bugeye projector lighting that will consist of 13 LEDs with a bright white 6,000K color temperature for a very modernized look. Again, you'll also see that smaller light bar up at the top and down at the bottom for your daytime running light, making you more noticeable on the street for safety as well as styling. Speaking of safety, these will also meet all DOT, SAE, and FMSS standards, which will give you some peace of mind when adding these to your build. When it comes to price, these will come in at roughly $125, which is relatively affordable for a set of headlights.Now comparing it to other options on the page, I really like the fact that this will have the multiple LED setup compared to others that will have a common, larger projector lens. Not to mention this will come with the subtle DRL and the blacked-out housing, which offers a premium and stealthy look in my opinion compared to the traditional halo or chrome housing, which will offer a solid look to the frontend of the JK.Getting into the install, this will require a tiny bit of wiring for the DRL, but it's mostly plug and play, so I'm gonna give this a light two out of three wrenches on the difficulty meter, taking you about an hour to get the job done with some basic hand tools. Now, those tools will include a flathead screwdriver or a pop clip removal tool, a ratchet and extension, and a T15 torx socket. You're also gonna need some electrical tape and some wire pliers. Now, speaking of the install, one of our customers here has installed this on their JK and is going to show you a detailed breakdown of the install process right now. So, that's enough for me. Let's get into it.Man: Hi, guys. So, today we're gonna be installing the seven-inch round LED headlights. So, we're gonna get our flathead screwdriver and this grille. I didn't mention before, but those headlights are going in a 2013 Jeep Wrangler. Okay. So, to start off with, there's these clips around here on the grille. Yeah, six clips. So, we're gonna start by removing those, pulling those out. This should come out fairly easy. Just ply on them a little bit and pull them out. There are also some prime tools if you don't wanna use a flathead screwdriver. Pull them out like this. This should come out fairly easy. So, there's six of them, two one on each side and four right here through the middle. And this one left the thing in there. Carefully press, not ruining the grille.Now we're gonna set these on the table, make sure we don't lose them. And now we're gonna remove the grille. A little closer up here. This grille has a little...some clips in here. And this is to align it wherever you put it back on. So, we're gonna pry on it carefully. The pressure on equally sides, on both equally sides. I'm gonna push it back a little bit like this. And these DRLs, these daytime running lights, we're gonna unconnect them. So, under here, you can get a close-up under here, they have a little clip. Pull that clip back. Push on this pin and pull. So, this is how they work. They have that little clip, the one I was talking about. So, now next side, we're gonna pull that little clip back. Push and pull.Okay. Now that it's fully removed, we're gonna take it off here and set it on the table. And I'm gonna grab my T10 torx and start removing the headlight ring. So, this ring right here holds the headlight together. So, this thing has four little torx bolts, screwed, actually. Be careful when removing. It has four, two up here and two down here on the sides. Get up close up there. Show them where they're at. Okay. And you can see they're starting to come off. They just hold the headlight bulb toge...the headlight together in there so it doesn't come out. And then my last one is right here. This should come out fairly pretty easy. I don't wanna drop it here. Now, we have this. We're gonna put these on the table right here. And we go back here and pull it out and take the ring. It has this ring around it. We're gonna pull this ring out. Pull this ring out. I'll just set it there. I leave my clutch. And in the back of the headlight, add a pin too clip. So, we're gonna push that clip back, push it back. And then after we push it back, push it back in the bottom right here and pull out. I almost... Be careful because they're easy to drop because they're round. They're pretty...Okay. Now that that one is out, let's look at this other one. So, this is the one, the replacement one. As you can tell, there's a big, big difference. It looks way better with the black housing and all the LEDs and DRLs and everything. And it comes with the disconnection in the back to connect it here. So, we're gonna set it down here and connect it here while it's outside. So, you're gonna push it in right here. And then underneath one of these headlights, there should be some connectors for the DRLs. So, these are the DRL connectors. We'll use these right now after we connect this. So, now that we connected this, we're gonna go over here. Connect it here in the same way that the other old one came out. This one just connects and then clicks and then you push that pin back. So, it locks in place. So, now that we have this here, I'm gonna set it right here and start connecting for the daytime running light to this.So, you got your little connector here that they gave you in the box and your wire. Untangle it. [inaudible 00:08:34] your screwdriver over here. Open it up a little bit. Open it up a little bit. And this thing is gonna go in the DRL. So, right here, this connector, we took the fog light, the DRL daytime running lights. According to the manual, this white one is the one for the DRLs, because this one is for the turn signal, DRLs, and ground.So, we're gonna put this in there and I'm gonna push it all the way back until it's in the last, last, last one. Very last one. And then, as you see it, it'll push the connector right there. So, get a little... You're gonna feel it when it gets where it has to be. And this wire's gonna go there. You can peel off this wire a little bit more. I think I have more connection there. And put it in there. And grab these. Push it down like that and close it. What this does is it grabs some...it makes like a little incision in this wire and it has a little electro...a little plate, this little silver plate that runs through the top. And then when you put this one in there, it connects it here, so now they're connected. You tapped into that wire.So, now this one we're gonna go and put it through here, through the back of the fender, this opening right here. We won't need too long. We can at the end tape it together a little bit. So, now, after we have that thing done, we're gonna put it in here, connect it in here. And after I usually do these, I got some black electrical tape. Grab some black electrical tape and wrap it around it so it doesn't fall out or cause a short or something like that. I'll grab my black electrical tape and wrap it around, it doesn't come off or anything like that.Okay. After we're finished with that, we're gonna tuck these wires in here and start putting it all back together. So, we're gonna center these headlights backwards. We're gonna center with the lights up here. This screw and this little screw here about in the middle. It just fits in. So, you just find it has a guide and it fits in. And then you grab your ring while holding it. You put the ring where it goes to. Then I'm gonna get my torx right here. Keep in my torx screws and start. I'll start putting it back together.So, I'm not gonna tie them on. I'm just gonna leave them a little loose, not tight, tight so I can move the ring if it needs to move to alignment correctly. These two bottom ones. Be careful not dropping these because they're gonna be hard to find. Make sure you also put them in straight because they go in a little creepy, and then just gonna be not too tight and loose. So, that one and this one right here. Okay. Now that the headlight is all strained up and aligned and the ring too, we're gonna put down and tighten these. Not too much because I don't wanna strip them because the housing right here where they go in it's plastic, so if you go too hard, you're gonna strip them. And the bottom one let's tighten them all. Okay. So, now let's manage this wiring right here. So, we're gonna... We'll do it at the end. We'll do it at the end.Okay. So, now we go down to the other side. We do the same thing. Repeat the same steps. Here on my fender. We took them off right here. This also has four like the other one, two in the bottom here, two in the top corner. So, hold this headlight here and remove this one too. You can now put them here. So, now I'm gonna take this ring out too and pull it out. So, we're gonna do the same as the other one. Push that red clip back. You might need a screwdriver to pry on it if it's hard. And then you're gonna push down right here in the back behind the red. Push and then pull. Be careful because they're round and they're pretty slippery.So, now we're gonna install this one. And also the same as the other one. Way better with the daytime running lights, DRLs and the LEDs. Okay. So, we're gonna do the same. I'm gonna keep it here in the box and not scratch it. Connect it here. And this will be used for later like we did on the other side. I'm gonna grab it. And the first thing I'm gonna do is connect it here. You can hear it pop a little bit and then press the red clip down this way, so it's locked here, because if it's down this way, it's unlocked. So, you want it locked all the way in, clip, and then put it down this way. So, now we're gonna install, do the same as the other one with the daytime running lights and grab this, your screwdriver. And what I like to do with these a little bit is open them so they can give me a little space to put the wire in there. And I also like to strip this wire a little bit because it's a little too short. It doesn't need much more stripping than it already is, than it already comes like. You're gonna need these.Okay. So, we come here. And this same one, this same connection from the bottom ones on the grille, you're gonna tap into this middle one. It's a white one too. Or we can check this too.So, we're gonna get ourselves... I have one of these testers to see if it's a ground, negative, or positive. So, I'm gonna... And then this is... Connect it to my battery. This one to the positive and this one to the negative. Let's try if it's working. When it's green, it's negative and when it's red, it's positive. So, now we're gonna check. I'm gonna leave it here. I'm gonna go and turn the other side. [inaudible 00:19:18] DLR. As you can tell, that one works pretty good. So, now we're gonna go to this one and then the connector. It should be this middle one, but we're gonna check. Yep. That one's... That's a ground, positive. And this one's a turn signal, I think. Let's check. One second. Yep. That's my turn signal. I've seen the flash. Okay. So, we're gonna tap into this one, the daytime running lights, the middle one. I'm gonna go here. Turn off my lights.Okay. So, now that we made sure it's this middle one too, we're gonna grab this little blue thing. We're gonna put it in there all the way until the core where it sits. You're gonna feel it sit in its own place. If it's not working, the screwdriver pry will open until you feel it. Now, it gets inside where it has to be. You can push in like that, a screwdriver a little bit too. Okay. Now we're gonna grab our little red wire we dropped here. I'm gonna put it here inside too like this so that they can get connection from there. I'll grab here with one hand while I grab the pliers and push it down like this all the way. You're gonna feel that pinch in and bite. We have to redo that. We're gonna close it here, this little cap so they don't fall out.Okay. We're gonna put this behind here and through the back over here and by the side of the fender and I'll turn this way. At the end, we can manage the wire here. Grab some tape around it, some electrical tape. So, now we're gonna connect this here like we did on the other side. All the way in and put this little cap over. And like I said when I was installing the previous one, I like to wrap black electrical tape around them just to keep it out from falling or anything like that. So, I'm gonna grab my black electrical tape. I dropped it. Let's do this again. So, I'll grab my black electrical tape here and wrap it around this one so it doesn't fall off or anything like that.Keep it connected together. Okay. Now we're good with that. Now we grab our headlight, push these. Make sure these are all connected right. Push the connectors back in there and make sure that the letters at the top fit in the top and then it's gonna sit out flat. It has some... It has a little guide. You're gonna feel it. You're gonna feel it when it sits in there right. After you do that, you're gonna grab your ring. And it has a little cut at the bottom, and you're gonna put that with that cut straight down the middle. And then these ears at the top are gonna find their own spot.Grab the little torx. I'm not gonna tighten it like I said before, tighten it all the way. Let's pull out. So, keep it there connected. I'm just gonna not tighten it too much and so just to hold it together. And then at the end, if the ring center is all good, I like to do the top one and the bottom one so it's not falling down. It's a pretty tight space right here to put this one in. So, we can do this bottom one down here. Make sure to also put the bolts, the little screw straight. And if not, you're gonna ruin the threads on that and it's not gonna tighten. Now this one down here. [inaudible 00:25:26]Okay. Now we're gonna start tightening them, not a lot, because this black housing right here where they go it's plastic, and if you go too hard, you're gonna mess up the threads on it. We're just gonna go lightly. There. Okay. So, now before we pop the grille back together and everything, I'll now connect this. Set it on my table. I'm gonna turn on the lights and we'll see if it works.So, those are the daylight DRLs, the daytime running lights. These are the ones that pinched in through here into the other ones. Now, I'm gonna go with the lows, low beam. Adjust the center bar right here, the center [inaudible 00:26:36]. And then the high beam. The high beam, all of them turn on, so it looks like it works.So, now we're gonna start. First, before we put on the grille back on together, we're gonna manage these wires right here. So, I'm gonna bunch them up right here, bunch them up right here and tape them. Grab the tip of electrical tape. Grab them together. Tape them to hold them together just so they're not all over the place loose. So, manage the wires. Now, manage these wires and put them up here so they don't fall out and dangle. We'll do that on the other side too. So, we're going to connect it all together here, and just to keep them not from rolling around everywhere. Okay. Now we're gonna take all our tools away from here. Grab our grille. And right here in our grille, so this is the center point. This is the center point. It has a hole right there. That's the guide. So, we put it in there, and then push it all together.Now we're gonna... And don't forget to connect these little daytime running lights. So, we're gonna connect it in. And they're gonna pop and you're gonna push the red pin in. And then you're gonna do the same on the other side, same on this other side, and grab this wire right here. Push them in. It popped. And then push the clip so they don't fall out.Okay. Now we're gonna grab these push pins and install it back together. I'm gonna put them in there, pop them. Put them in and pop them. You might have to pull these out a little bit, but put them in there. Pop them right here and this back one too. And they'll pop in. And that's it for our install today. So, let's see how they look now. Daytime running lights, then the low beam, and the high beam. The high beam right there.Merideth: So, that's gonna wrap it up for my review and the install of the LED DRL projector headlights with the black housing and the clear lens fitting all 2007 to 2018 JK Wranglers. For more videos and products just like this, remember to always keep it right here at extremeterrain.com.
Subscribe to our YouTube Channel
Features, Description, Reviews, Q&A, Specs & Installation
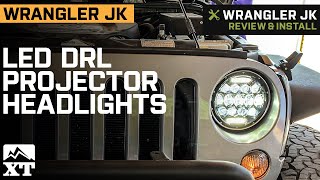
Headlight Type | Projector |
Headlight Housing Color | Black |
Headlight Lens Color | Clear |
Headlight Style | Aftermarket Style |
Illumination and Safety. Increase your safety while driving at night by installing these LED DRL Projector Headlights with Black Housing and Clear Lens. These headlights feature matrix bug-eye lights design to cast focused nighttime brightness on the road ahead.
Bright LED Bulbs. Each headlight has 13 LEDs that emit a color temperature of 6000K for bright white illumination. Moreover, these headlights include LED daytime running lights (DRL) functionality, adding value to your investment.
Tough, Premium Construction. These headlights are manufactured with a clear lens and a black aluminum housing that’s completely sealed to provide water, dust, and shockproof protection. What’s more, the housing has a heat sink design for improved heat dissipation.
Easy Installation. These headlights are easy to install as they reuse the factory location. No extra decoder is needed for this task.
DOT, SAE, and FMSS Approval. These headlights have passed the strictest automotive standards. They have met or exceeded the standards set by the U.S. Department of Transportation (DOT), the Society of Automotive Engineers (SAE), and the Federal Motor Safety Standards (FMSS).
Application. These LED DRL Projector Headlights in Black Housing with a Clear Lens fit the 2007-2018 Jeep Wrangler JK models.
Fitment:
CA Residents: WARNING: Cancer and Reproductive Harm - www.P65Warnings.ca.gov
Installation Info
Installation Time
(approx) 1 Hour
Difficulty Level:
Light to Moderate mechanical skill required.
What's in the Box
10 More Questions