Installation Time
(approx) 10 Minutes
Difficulty Level:
Simple installation for anyone.
FREE 2 or 3-Day Delivery on Orders $119+ Details
$1,299.99 (each)
FREE Shipping + $25.00 Oversized Item Fee Market Price $1,494.99 You Save 13% ($195.00)Saved - View your saved items
We're sorry. We couldn't save this product at this time.
or use
Justin: Do you guys ever wish you could leave those freedom panels off your '09 to '18 JK year-round but not have to worry about things like bad weather or thieves stealing stuff from your ride? Well, now in essence, you can thanks to the ClearLidz Panoramic Freedom Style Top that we have here. Now, this made-in-the-USA ClearLidz option will deliver a tinted shatterproof polycarbonate build that will allow for plenty of light inside but at the same time still keep rain, wind, and harmful UV rays out all for right around that $1,200 to $1,300 price point.All right, guys. So full disclosure, this is one of those parts or mods that when I first saw it, I was like, "Man, this just makes so much sense." Now, the freedom panels are no doubt an awesome addition to the Jeep in general, but they are certainly a fair-weather modification, right? That really only gets enjoyed during prime weather conditions. And even still, the freedom panels can be a bit clunky to store once in a while and when removed, still ultimately allow unwanted things to enter the interior space and that's where the ClearLidz option comes into play. Now, when installed, the tinted clear Freedom Style Top is going to dramatically brighten up your interior even on the most cloudy of days while providing a clear and unrestricted panoramic view, and most importantly, will keep all of that unwanted stuff I just mentioned out of your interior. Now, it'll be able to accomplish this, thanks to the military-grade polycarbonate construction that is very similar to what manufacturers use in fighter jet cockpit canopy. So basically, you know these things up to handle some serious abuse. Now, that polycarbonate has UV inhibitors baked in along with that subtle tint job to help keep the interior cool on those hot sunny summer days, in fact, roughly 25 degrees cooler than ambient while also preventing the top from fading or yellowing over the years, thanks again to the UV inhibitors.Now, again, guys, the ClearLidz option has been made right here in the USA and include the single panel design along with the mounting hardware, if you will, basically the factory style clamps and two insulation blocks that will ride on the driver and passenger side top bar and basically act as a door and weather seal, keeping excess wind and water out with the panel in place. Now, on that note, guys, some owners in the customer review section have mentioned a slight increase in wind noise with this installed compared to those factory freedom panels but nothing outrageous in their eyes. And honestly, it makes sense, those factory panels do have a bit more insulation built-in. They are a bit thicker, so by nature, they will kind of do a better job at deadening some noise compared to this option. But as always, I'm going to encourage you to read up on some customer reviews, hear from actual JK owners who have pulled the trigger on the ClearLidz option, have it installed, and hear what they have to say.Now, the Freedom Style Top does install using the factory location of those clamps and can be done in a matter of minutes without the use of any tools just like the removal or install of your factory freedom panels. Now, because this thing is pretty light overall, I would say maybe 20 to 30 pounds tops, it should be able to be tackled by one person relatively easily. Now, I also wanna mention here, guys, that the ClearLidz panel can be used by itself. And what I mean by that is if you ever wanted to remove the rear portion of your hardtop and maybe just leave this portion on for some shade for the driver and the passenger, well, each totally can. That is an option. Last but not least here, guys, the panel is backed by a three-year limited warranty from ClearLidz just in case you should ever run into any issues. But now let's get into the install a bit more. And again, simple job, no tools required whatsoever. So therefore site's gonna call this pretty soft one out of three wrenches on the difficulty meter, maybe 10 minutes or so to complete from start to finish. But to give you a better idea of just how it will all come together, here is a detailed walkthrough provided by an XT customer now. Check it out.Man: So your first step in your installation, you're going to need to take out your freedom tops here in the front. Mine is the two-piece, which this is made for. So your first step is gonna be to unlatch all back latches. The easiest way to get to them all, take down your sun visors and turn them out. And if you can look up in here, you've got your latch here. Turn it out. One here in the middle, turn it out, one here on the driver's side, turn it out. And you've also got one here at the front above your rear-view mirror. Turn it out. Now, these are all unlatched. Next, we'll be removing the hand bolts in the rear roll bar which is gonna be located to the back of your headrest right here. There's gonna be a spot here. This is what holds your freedom panels in from the back. And we would just unscrew these and pull these out. And you've also got one on the opposite side of your light here, unscrew that. Pull that out. Your last step for removing these freedom panel tops is going to be releasing your clamps at the windshield. And you're gonna find one on the passenger side. Pull it back. It'll disengage from your little striker there. And one on the driver side. And we'll unlatch that. You can use an assistant to do this if you have a spare body, otherwise, you can put one hand under in the middle, hold it on the edge, push up, pull it out, and you can set it down here on the front and the rear. Just clear your clip here. Again, firm grip. Pick it up in the middle. And these weigh maybe 15 pounds, I suppose. And you can set these off to the side for the time being. Same thing on this side, hand in the middle, push straight up with that hand, bring it out. Clear your clip here so you don't drag it across any of your rubber. Again, firm grip, pick it up, pull it off.Now that we've done our removal with our freedom panels, our next step is gonna be installing the two foam spacers. The one is marked for the driver side and one marked for passenger side. Again, they are labeled driver side, DS, for this JK, and passenger side, passenger side for this JK. And we'll start with the passenger side first. So there is with the pictures. You can look at the pictures here and it'll give you the idea of how this is supposed to be set up by looking at the notches in it. I had installed these once before just to see fitment and everything like that. So you should go back on fairly easy. And you'll notice your notches, instead of going up as what it appears to be in the picture, these will be towards your driver's compartment and the lip here is going to sit right in your rubber channel. And that's why you wanna be careful taking those panels off. So you don't get rips in it like this where you could eventually have a water leak or wind noise when you're going down the road. You don't have to force it in you just wanna kind of set it there and you'll see it sets into this channel here. And that's just your rubber channel. And it'll set in there and that tab will follow over the backside.Again, same with the top front, you've got your rubber channel here and you've got some of the old cushioning or noise-reducing tape or whatever Jeep calls it. Sometimes it may stick to your original toppers. So when you install these, you wanna make sure they sit nice, they sit in there. It's not gonna be a tight fit. You can see that it wiggles around. But we can get that hammered out once we get both these installed and we set the clear lid on top. So we'll do the driver side next. Same principle. Look for your DS, driver side. Again, your ridge is at the top. If you wanna set it like this, the way it looks in the picture, and then just roll it in, find your channel at the rear, find your channel at the front, drop it down in there. And you can see this one's got a little extra padding in the front more so than the one on the passenger side did. That's okay. We can figure that out once we get the lid on and see how it fits. You don't have to press it down in now, just let it sit. And there's your side panels. So this is what your clear lid will sit over the top and it'll wrap around over the corner and when we put the T handles in or the X handles in that'll sit down on top of these.The way that I found to work best is just like your freedom tops have one hand in the middle when you go to place it on top of the Jeep, and you can do it from the driver side or the passenger side, whichever is more accessible to you while you're doing your install. When you lift it up, make sure it's not windy. You don't want that getting flipped by the wind and scuffing it up before you can get it on and enjoy it. But gently place it over those foam pads towards the rear and then you can adjust it from the opposite side by sliding into the Jeep itself and picking it up and setting it down. You don't wanna drag it across your top and scrape it. So we'll give that a try. Now we'll gently set that down. Try and keep your clips that are in the front and your anchor points here from catching on anything. That's why you don't wanna slide it, you don't wanna scratch up your top, and you definitely don't wanna get these bound up and potentially bend them to where they may not function properly.Now, as you can see, lifting it up and setting it down, you can use these bolts here as guides to your cutouts to about where this is going to sit and where you want it to sit before you start your installation by fastening it down. All your latches should be open prior to, otherwise you're gonna have to lift it back up and snap them back. But from this point, your lid is on and we can install the two hand bolts in the rear bar. And that would be the same as the bolts you removed from your roll bar but they are ones that the manufacturer sent with. So you will not reuse your OEM parts. They sent new hardware for this installation. And it's a little hard to see from maybe the camera angle, but you've got your anchor points here which will line up, if you can see that. And you should have enough space headroom to be able to look above slightly turned out, looking at it, and you can see this one. There we go. We just needed to go back just a little bit.This one's a little bit off as well. The one thing I did notice doing the first installation just to check this out was at this point when I took it out on the road, I did have a little bit of wind noise at the front on the passenger side and the front corner on the driver side. And it was what I assumed. It was probably just a small misalignment from when I originally set the top on. So what I'm gonna do now and recommend is once you get the top on, as you notice the seals and how they sit down in here, you wanna ensure that they're still in the channels aft and forward. And then if you have steps or if you wanna step onto or get a ladder, something like that, go ahead and get up above it and look down the line. There is another rubber piece here that's at the back of your freedom top. Sometimes these get some sap in them or dust and dirt just through your typical use that makes its way into those channels. So just ensure your top is sitting over that and it's not pinching any of that in between it. So once you set it down... Whoop. There we go. Once you set it down and you start to secure it, it'll suck that top down. So don't worry about it being loose at this point. Once we get the two anchors in the back, it'll start to suck it down, and we'll do the same on the front and make sure everything's lined up and we're not pinching anything.So, again, plenty of headroom in here and start with the back. That's lined up much better this time. Take it slow. If you can't get the threads to start off the bat, don't try and muscle it in there. If it feels like it's getting tight, you may have it cross-threaded. So just take it easy, work it in there, go slow. There's plenty of room in here for even a big paw like mine, and you don't have to run it all the way down. You can see how it's sucking it down here at that point. So you don't... There we go. And it should bottom out. And it's got a little bit of movement into it. I'm not going to adjust any of these. Again, find the threads, go slow. Make sure you're not cross-threading it. There's no extra hardware in the kit. Although if you did strip one of these out, I'd imagine you could... I've seen these at Home Depot, Lowe's. So if you had to, you could make a trip to your local hardware store and probably find these for four or five bucks a piece. That one has bottomed out and it's good.For next step, and it's step nine, install the four hand bolts in driver and passenger roll bars. Your note here is you may need to remove roll bar cover, or punch a hole in the cover to install these hand bolts. What I noticed on mine was that... And this is where you're going to be attaching it. There's the hard foam that's in here. Mine already has the cutout here and here where your hardware is going to go. So I just needed to kinda pull it back with my finger on the top and the bottom to get those to start. Now, the foam, you could take these off. It's as simple as finding the lead here in the front, just under this plastic piece here, and you can unzip it all the way back to this corner and then you have a clear view of it. Then you've got your hard foam that's up in there, and it's a three-quarter wraparound. So you should be able to pull it off. Some of them might be brittle, so some of them might break. What I ended up doing, instead of taking it out and having to piece them back together, was it's staying where it's at and to get these in and to get them in and turn them with my hand, I went ahead and shifted this around. I will go ahead and get this started and then... And again, you've got your notch here and at the top and you've got plenty of headroom here with this lid on to be able to see your mounting points here on the inside and you can see your threads. So, again, you can either have this off, or what I ended up doing was I just pulled this back. And you can hear it, listen for it. A little bit of breakage there, but we're all right. I've got a lot more room for my hand to clear it. This isn't going to fall out, it's zipped up and secured. Still gonna do its job. So right now I've got positive thread on it, and you just turn it in from there. Once you start to see it suck down... There we go. Then I'll leave it as is now and I'll put the second one in and I'll do that all the way around and then I'll check my fitment at the front and the sides to make sure these pads are still in the aft and forward grooves. I don't want anything getting pinched. I don't wanna have any unnecessary wind noise or anything like that. So this is kind of a temp install that I figured out from my first go-around. And then once I get all four of them in and check all my seals, then I'll go back around and tighten them down. And these ones, just like your back ones in the back roll bar, they will eventually bottom them out. Then that's the max limit you're gonna get to. So we'll go ahead and get these other two installed and I'll do that from the driver side because it's much easier.Check this before we set these ones in. It's in the aft channel, it's in the forward channel and it's sitting good. So we'll go ahead and put these fastener handles in. Again, same thing on this side, under this panel at the forward. You can find the zipper and unzip these and take these back so you can see exactly what you're working with. These also have the notches on them, and you can feel the keyway or visually see them from underneath here where my finger's at. You wanna get that real quick. That's gonna be your little keyway that you're gonna put this fastener up into. And, again, with these ones, I went with not having to take them out. So I just kind of broke the foam where it was already brittle, that way I could get my hand in there and turn these more easily. Okay. We'll go ahead and do the aft one, leave the front one loose just like we did the passenger side so we can check the front seals on it, make sure nothing's bound up or pinched. I'm just kind of pulling this back and lifting up at the same time with my thumb, my hand on top. Just kinda rolling it up outta my way to be able to get my hand up in here and turn this more easily.What I'll I do now is go ahead and check the aft here and check this river seal up at the top, make sure again that nothing's pinched or caught in there. You know, a little twig or something like that. And I also wanna check the front of the rubber to make sure that it's also clear, that there's no debris or anything like that. And now would be a good time before installation get a damp cloth and run it through here if there's a lot of dirt, dust, mud, build-up, things like that. If you park, you know, under a tree, debris, just get all that stuff cleaned out of there and you're gonna have a lot better seal with it.Okay. I'm gonna... Like how everything's looking. So we'll go ahead and tighten these down. Do the aft. And while you're screwing these down, you can check your pad above it to see if it's still got a little movement in it, if it's getting tight as the lid starts to suck down on it and that'll kind of give you an idea of maybe where you need to stop, make adjustments. Check your rubber and seals again, make sure nothing's getting pinched. This does move around just a little bit. This side is secure. Seal's good. We'll go ahead and tighten up the passenger side. Again, just gonna check the aft and the forward channels to make sure nothing moved out of place, and we tighten down that side. All right. That one's secure. I don't know if you can see it from the outside. Right about here is where that anchor point is at, if you can see it pulling the top down or not. I can see it from the inside. In my case, my hardware bottoms out and I can no longer turn it. So that's telling me it's secure at this point.Our next step is going to be close and secure the three windshield clamps. Excuse me. Unlike your sun rider tops, you probably noticed that there was only two, the one here above your passenger and on the opposite side that is above your driver. This one has a third one which I'm not...it's for your top latch that would be in the middle. So there's no real order or sequence to close these in. Always like to start from the middle. I don't know if it's an OCD thing, but then you'll see it suck it down. So if you had any doubt that this was gonna seal on the front, that's what these are gonna secure and that's why we check that seal at the front in the hopes that we keep out any wind noise. And you'll notice these clamps, don't be trying to force it too much forward. These clamps don't actually go up underneath that lip. They rest on...the rubber stop is going to rest just on the underside. It's not going to hook up under. Apparently, that one did. Call me a liar. All right. Those are up and secure.Justin: So if you are looking to get a brighter open-air style experience year-round no matter where you live, then be sure to check out the ClearLidz Panoramic Freedom Style Top right here at extremeterrain.com.
Subscribe to our YouTube Channel
Features, Description, Reviews, Q&A, Specs & Installation
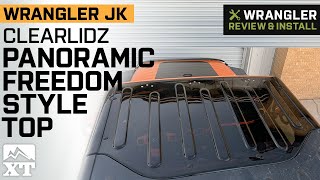
Better Outdoor View. For an excellent view of the outdoors, install this ClearLidz Panoramic Freedom Style Top. This top exhibits a transparent build, giving you a clear view of the clear blue sky and the amazing landscape. What’s more, it can help make your Jeep’s interior brighter as it lets more sunlight to pass through.
Premium Construction. To match your Jeep’s aggressive off-road drives, this transparent top is made of military-grade polycarbonate. This is the same material used in making jet fighter canopies, so you can be assured of its strength and quality. Furthermore, this top is designed to be UV-resistant, preventing its color from fading or yellowing.
Hassle-Free Installation. Setting up this freedom style top is quick and easy. Also, it doesn’t require any mechanical skills. It ships fully assembled and you can mount it by simply replacing your Jeep’s front top panel without using any special tools.
Supported by a 3-Year Limited Warranty. For your peace of mind, this freedom style top is supported by ClearLidz’ 3-year limited warranty. To file a warranty claim, you should be the original purchaser of the product and be able to present your official receipt. For the fast processing of your warranty claim, please comply with the set warranty terms and conditions.
Application. The ClearLidz Panoramic Freedom Style Top is engineered to fit 2009-2018 Jeep Wrangler JK models.
Fitment:
ClearLidz CL200
CA Residents: WARNING: Cancer and Reproductive Harm - www.P65Warnings.ca.gov
Installation Info
Installation Time
(approx) 10 Minutes
Difficulty Level:
Simple installation for anyone.
What's in the Box
10 More Questions