FREE 1 to 3-Day Delivery on Orders $149+ Details

How to Install an ARB Differential Cover on your 87-18 Jeep Wrangler YJ, TJ, JK & JL
Installation Time
2 hours
Tools Required
- Standard automotive sizes (metric and/or imperial) of sockets, wrenches, Allen keys, and drills
- A torque wrench
- A lubricant drain reservoir
- Either a replacement gasket, or gasket sealant (such as Loctite 587)
- A sufficient volume of differential oil to completely refill your housing. (see the ARB Air Locker Operating and Service Manual for recommended lubricants)

Shop Parts in this Guide
- ARB Dana 30 Differential Cover; Red (87-18 Jeep Wrangler YJ, TJ & JK)
- ARB Dana 44 Differential Cover; Red (76-18 Jeep CJ5, CJ7, Wrangler YJ, TJ & JK)
- ARB Dana 44 Differential Cover; Black (76-18 Jeep CJ5, CJ7, Wrangler YJ, TJ & JK)
- ARB Dana 30 Differential Cover; Black (76-18 Jeep CJ5, CJ7, Wrangler YJ, TJ & JK)
1 Introduction
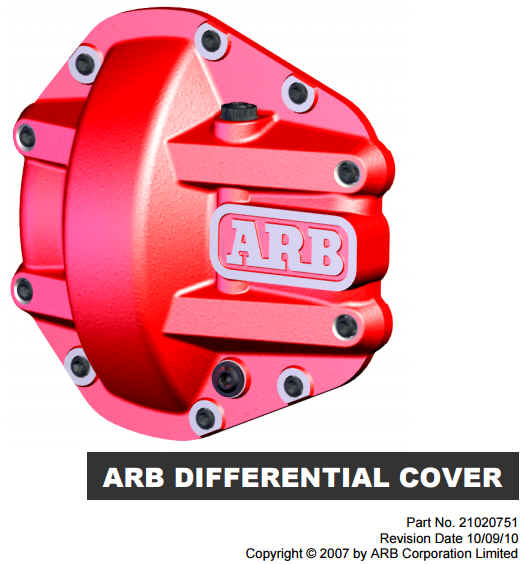
ARB DIFFERENTIAL COVERS
1.2 Model Range
• Available for most standard Dana 60, Dana 44, Dana 35, and Dana 30 axle assemblies.
| ARB Part # | APPLICATION(s) |
|---|---|
| 0750001 | Dana 60 and Land Rover Salisbury |
| 0750002 | Dana 30 |
| 0750003 | Dana 44 |
| 0750004 | Dana 35 and Dana 35C |
1.2 Features
• High tensile solid nodular iron structure (tougher and harder than solid carbon steel) protects the differential and ring & pinion set from the obstacle impact hazards of competition rock crawling, or extreme off road trails.
• Computer optimized cross brace design adds more than 1300 Nm/deg [960 ft-lb] of torsional rigidity to the entire axle assembly. This increased flexural strength in the housing helps keep the ring & pinion gars meshing on the flat faces of the teeth, which greatly increases ping & pinion life and overall maximum load strength.
• Carrier bearing life is prolonged, especially on high output vehicles, by the improved support given to the bearing alignment.
• Low-profile shape of the outside surface helps maximize the running gear clearance around the cover.
• Maximized approach / departure angled exterior surfaces help to minimize rock / obstacle hang-ups.
• High tensile cap screws (supplied with the kit) are recessed into the cover to protect them from contact with obstacles which might damage or loosen them.
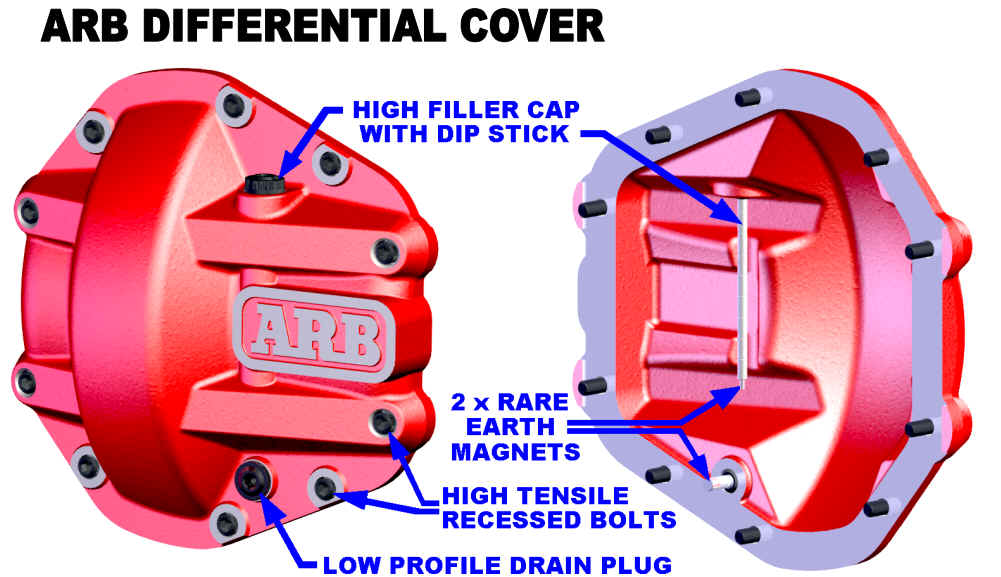
• Low profile drain plug design resists damage from obstacle contact.
NOTE: Most of the standard Dana Spicer Salisbury type axles do not come factory equipped with oil drain plugs of any kind, and therefore the cover must usually be pried away from the housing in order to expel the oil. This can be very messy, and if you only wanted to sample the oil for contamination it can be very wasteful.
• Unique dipstick / filler cap design allows differential oil level to be adjusted higher for customized high driveline angles (i.e., raised vehicles with partially rotated differential housings).
• Combination of the high filler point and dipstick allows the oil to be checked for water contamination (ie., grey foam) without having to drain the oil (i.e., without losing any oil on the trail).
• Top quality high power neodymium magnets (rare earth) are used in both the drain plug AND the dipstick to collect metallic wear particles as the vehicle moves.
• Magnet location in the end of the dipstick allows the oil to be checked for tell-tale signs of internal damage (e.g., metal debris from ring & pinion or carrier bearing damage) without having to drain the oil.
• Covers are colour powder coated, CNC machined, and then clear coated for a durable, professional, long lasting finish. All hardware is corrosion protected.
• 350% improvement in the looks of your vehicle from underneath!
1.3 Tool-Kit Recommendations
Below is a list of tools and supplies you may need to complete this installation. Requirements for your vehicle may vary. Please consult your vehicle service manual for additional recommendations.
☐ Standard automotive sizes (metric and/or imperial) of sockets, wrenches, Allen keys, and drills.
☐ A torque wrench.
☐ A lubricant drain reservoir.
☐ Either a replacement gasket, or gasket sealant (such as Loctite 587).
☐ A sufficient volume of differential oil to completely refill your housing. (see the ARB Air Locker Operating and Service Manual for recommended lubricants)
2.1 Differential Fluid Drain
HINT: This is a good time to check for metal particles in your oil, on your drain plug, or in the bottom of the housing which may indicate a worn bearing or differential component.
☐ Clean any loose dirt from around the differential cover to avoid contaminating the differential cavity.
☐ Position a fluid drain reservoir under the differential and loosen all differential cover plate retaining bolts.
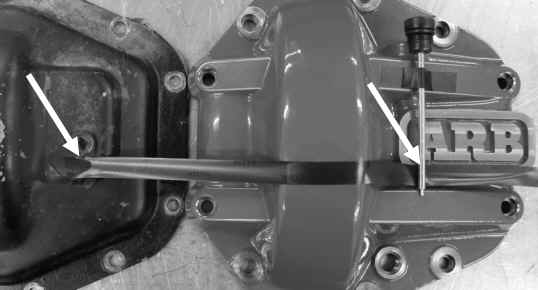
☐ Gently pry the cover plate away from the differential housing to completely drain all differential fluid.
☐ Once drained, remove the differential cover.
2.2 Determining Oil Level
The following is a guideline to determine the correct differential oil level in an axle with the standard driveline angle.
☐ Place the ARB Differential Cover on a bench next to the standard differential cover that you have removed from the vehicle.
☐ Using a straight edge (electrical tape does a great job), make a line from the bottom of the standard cover's filler hole to the corresponding point on the ARB Differential Cover.
☐ Hold the Dipstick/Filler Cap on the outside of the ARB Differential Cover so that it is sitting in the position it would be if it was just placed in the filler hole. From this you can determine how far up the dipstick the oil level should be. As can be seen in the following picture, for this differential we would fill it up to half way between the first and second notch.
2.3 Installing the new Differential Cover
IMPORTANT:
These covers have been designed for use with the most commonly available versions of the axle assemblies listed on the model range. Some modifications, such as grinding the differential cover or re-routing the brake lines, may be required for fitment to some applications.
☐ Clean all oil residue off the differential housing.
☐ Place the ARB Differential Cover in position on the differential housing to ensure adequate clearance to surrounding components.
NOTE: Checking for clearance between diff cover and all internal parts is crucial before tightening the cover bolts. Failure to do this may cause damage to your differential.
NOTE: Due to inconsistent tapping depths on the factory axle housings, it may be necessary to tap the threads deeper, or slightly shorten some of the bolts. Check that the supplied bolts will clamp down on the diff cover properly.
☐ Apply gasket sealant, or a replacement gasket to the flange of the differential housing.
☐ Install the ARB Differential Cover onto the housing and screw in the bolts.
NOTE: Dana 60 differentials utilise 3/8" UNC Cap Screws which must be torqued to 61.6Nm [45.4ft-lb]. Dana 30, 35, and 44 differentials utilise 5/16" UNC Cap Screws which must be torqued to 34.5Nm [25.4ft-lb].
NOTE: Land Rover Salisbury models require the use of metric M10 Cap Screws (not included). Use torque settings to suite the grade of cap screw purchased.
☐ Tighten each bolt to the required torque.
☐ Install the drain plug and hand tighten using an 8mm Allen Key.
☐ Using the dipstick to check the oil level, fill the differential with the appropriate oil to the required level, ensuring not to overfill.
☐ Install the filler plug/dipstick and hand tighten with an 8mm Allen Key.
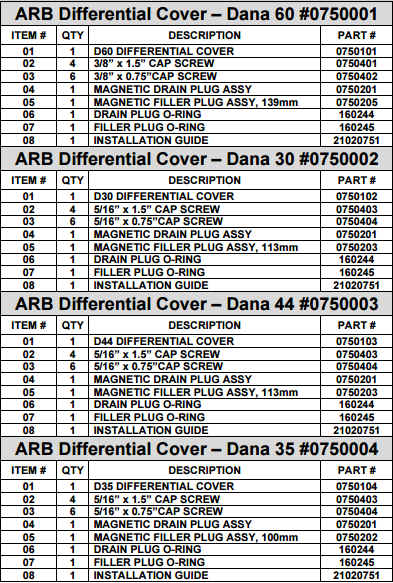
Parts List