 FREE 1 to 3-Day Delivery on Orders $149+ Details

How to Install Westin HDX Drop Steps - Textured Black on your Jeep Wrangler
Installation Time
15 minutes
Tools Required
- Ratchet
- Torque Wrench
- 10MM Socket
- 13MM Socket
- Socket Ext.
- Allen Wrench

Shop Parts in this Guide
Step 1: Starting on the driver side, locate each mounting location. The 4 door Jeep will have three mounting locations on each side and the 2 door Jeep will have two mounting locations.

Step 2: Follow steps 2 - 4 for 4 door Jeeps: Starting at the front mount location, locate (1) Front Mount Bracket (Item 4) and (1) Front Support Bracket (Item 5). Loosely secure brackets, using: (2) long M8 hex head cap screw, (1) M8 extruded unut, (2) M8 split lock washer, (1) M8 hex nut, (3) M8 flat washer, (2) M6 hex nut, (2) M6 button head cap screw, (2) M6 split lock washer, and (4) M6 flat washers. See Figure 1. Note: M8 extruded u-nut is only used if a threaded hole is not present (circled on Figure 1).

Step 3: For the center mounting location, locate (1) Center Mount Bracket (Item 2) and (1) Center Support Bracket (Item 3). Loosely secure brackets, using: (2) long M8 hex head cap screw, (1) M8 extruded u-nut, (2) M8 split lock washer, (1) M8 hex nut, (3) M8 flat washer, (2) M6 hex nut, (2) M6 button head cap screw, (2) M6 split lock washer, and (4) M6 flat washers. Note: M8 extruded u-nut is only used if a threaded hole is not present (circled), See Figure 2.
Step 4: For the rear mounting location, locate (1) Rear Mount Bracket (Item 6) and (1) Rear Support Bracket (Item 7). Loosely secure brackets, using: (2) long M8 hex head cap screw, (1) M8 extruded u-nut, (2) M8 split lock washer, (1) M8 hex nut, (3) M8 flat washer, (2) M6 hex nut, (2) M6 button head cap screw, (2) M6 split lock washer, and (4) M6 flat washers. Refer to Figure 1, Similar installation as front mounting bracket.

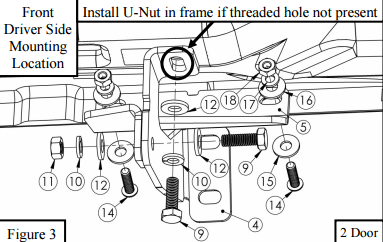
Step 5: Follow steps 5 - 6 for 2 door Jeeps: Starting at the front mount location, locate (1) Front Mount Bracket (Item 4) and (1) Front Support Bracket (Item 5). Loosely secure brackets, using: (2) long M8 hex head cap screw, (1) M8 extruded unut, (2) M8 split lock washer, (1) M8 hex nut, (3) M8 flat washer, (2) M6 hex nut, (2) M6 button head cap screw, (2) M6 split lock washer, and (4) M6 flat washers. See Figure 3. Note: M8 extruded u-nut is only used if a threaded hole is not present (circled on Figure 3).
Step 6: For the rear mounting location, locate (1) Rear Mount Bracket (Item 6) and (1) Rear Support Bracket (Item 7). Loosely secure brackets, using: (2) long M8 hex head cap screw, (1) M8 extruded u-nut, (2) M8 split lock washer, (1) M8 hex nut, (3) M8 flat washer, (2) M6 hex nut, (2) M6 button head cap screw, (2) M6 split lock washer, and (4) M6 flat washers. See Figure 4. Note: M8 extruded u-nut is only used if a threaded hole is not present (circled on Figure 4).

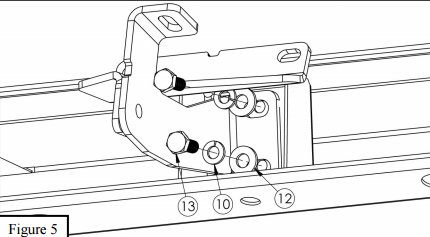
Step 7: Locate (1) Step Bar Assembly and loosely secure it onto the previously installed brackets using the provided M8 hardware. See Figure 5.
Step 8: Repeat steps 2 - 4 and 7 for passenger side on 4 door Jeeps and steps 5 - 7 for 2 door Jeeps. See Figures 6 and 7 for bracket orientation.
Step 9: Align step bar and brackets to desired positioning then torque and tighten all: M8 hardware to 20 ft-lbs and M6 to 12 ft-lbs.
