 FREE 1 to 3-Day Delivery on Orders $149+ Details

How to Install a Tuffy Security Deck Enclosure in your 1987-2006 Wrangler YJ & TJ
Installation Time
2 hours
Tools Required
- All applications: Ratchet, 7/16” socket or wrench, Phillips head screwdriver, T-50 Torx, T-40 Torx, 1/8” Allen wrench, 7/32” Allen wrench and a utility knife.
- Additional tool requirements for TJ 1997-2002: ½” Socket
- Additional tool requirements for YJ: ½” Socket, T-30 Torx, (Optional: Drill & 3/8” bit)

Shop Parts in this Guide
SHIPMENT CONTENTS
HARDWARE PACKAGE
INSTALLATION
PLEASE READ ALL SAFETY WARNINGS AND INSTRUCTIONS THOROUGHLY BEFORE STARTING INSTALL
· NOTE: THIS DECK ENCLOSURE ASSEMBLY IS DESIGNED FOR USE IN VEHICLES WITH THE OEM FLOOR CARPET IN PLACE. ADJUSTMENTS TO SOME MOUNTING POINTS AND/OR THE USE OF SPACERS (NOT INCLUDED) MAY BE REQUIRED FOR PROPER ALIGNMENT IF NON-OEM CARPET OR NO CARPET IS USED.
· For safety do not place any items on top of the enclosure that are not adequately secured to the vehicle to prevent movement in the event of an accident or abrupt speed changes.
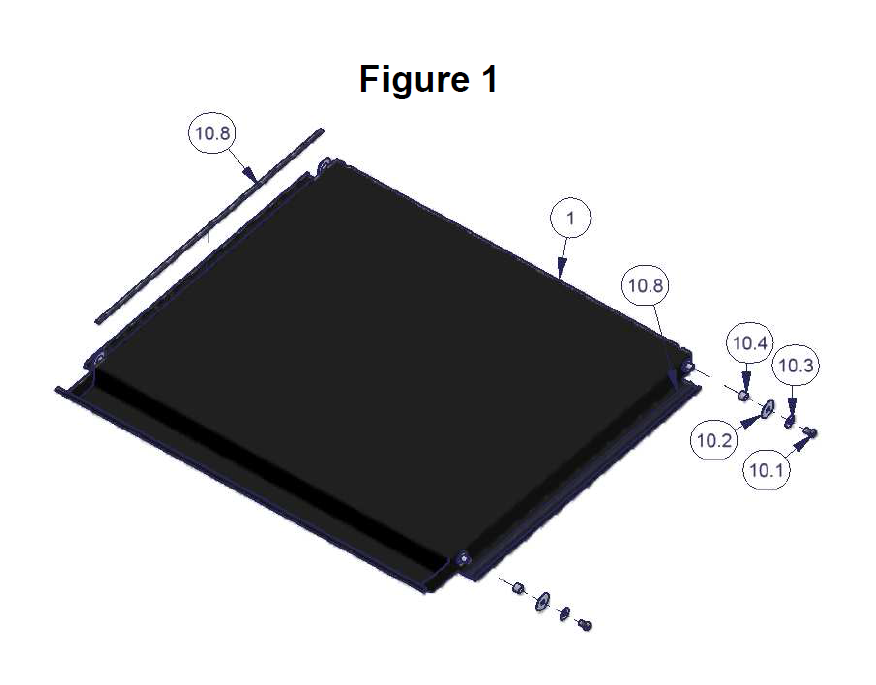
1. Remove the bolted-on protective metal brace from the front edge of the lid. Save these bolts #10.1 they will be reused.
2. Install the lid hardware on all (4) welded studs by sliding #10.4 rubber spacers on first then #10.2 fender washer, 10.3 washer and #10.1 Bolt. (See Figure 1)
3. Cut and install the #10.8 rubber seal on #1 Lid in the center of the flange as illustrated. (See Figure 1)
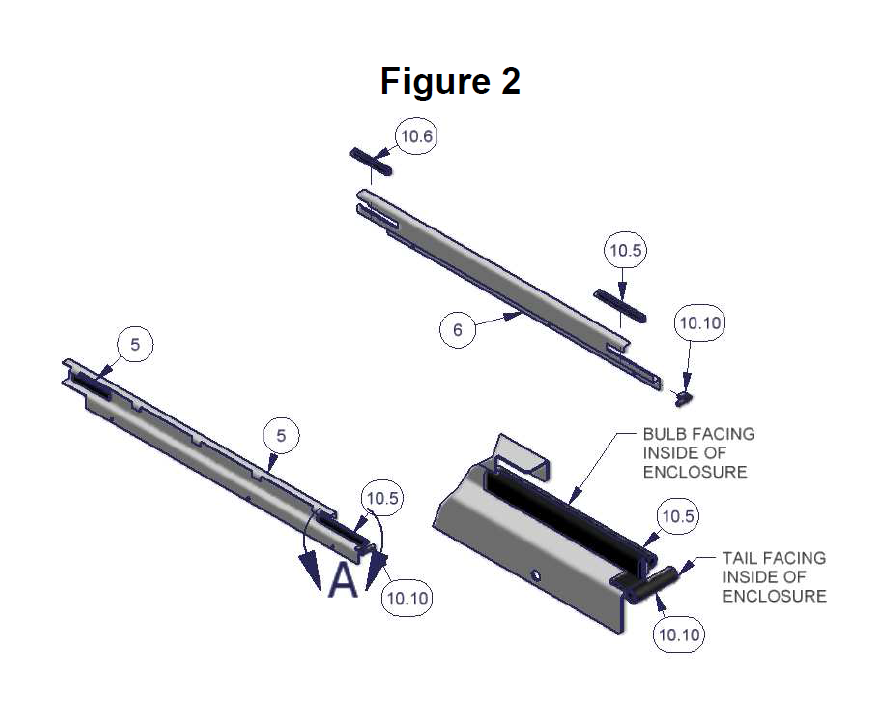
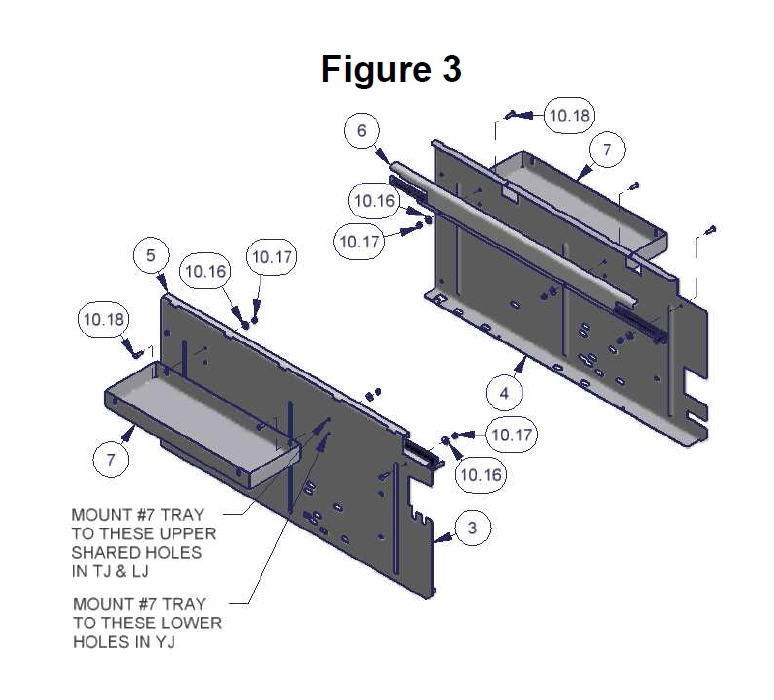
4. Install the pre-cut trim seal #10.5 and #10.6 on both side brackets #5 and #6 as illustrated with the bulb facing the inside of the enclosure assembly. (See Figure 2)
5. Install the pre-cut trim seal #10.10 on both side brackets #5 and #6 with the bulb overlap protruding toward the inside of the enclosure assembly. (See Figure 2)
6. Install both the left and right side brackets #5 & #6 to both the side panels #3 & #4 using the #10.18 screws, 10.16 washers & 10.17 nuts. In TJs & LJs the trays #7 are also attached with this same hardware. (In YJs the trays are mounted to the lower holes with the extra #10.18 screws, #10.16 washers & #10.17 nuts included) (See Figure 3)
Follow the specific instructions below for the vehicle where the enclosure will be mounted
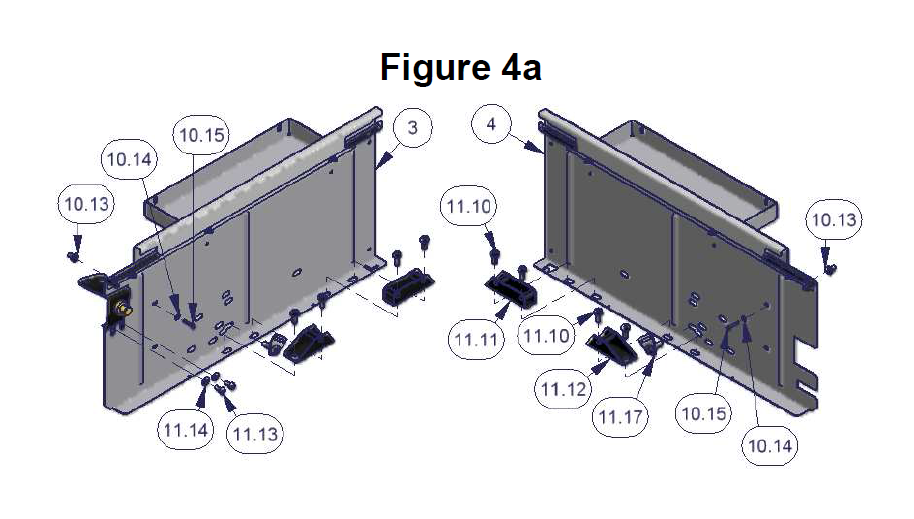
7. Remove the factory rear seat bolts #11.10 and brackets #11.11 & 11.12 attached to the floor. Save the bolts #11.10 they will be reused. (See Figure 4a)
8. Remove the factory rear seat belts #11.17. Tip: These can be zip tied to roll bar for storage. (See Figure 4a)
9. Remove the factory bolts #11.13 & #11.14 washers which secure the rear door striker to the vehicle tub. These will be reused. (See Figure 4a)
10. Locate the holes in the tub on the right and left (Optional) side corresponding with holes in both side panels where screw #10.15 is illustrated. There is a rubber plug in the tub which will need to be removed and the carpet will need to be cut where the screw will pass through. (See Figure 4a)
11. Insert the rubber well nuts #10.13 in the right and left (optional) sides behind the carpet. (See Figure 4a) Tip: it is easiest to only start all the mounting hardware a few turns then come back and tighten them down.
12. Place the right #4 & left #3 panel in the vehicle and fasten them to the well nuts #10.13 previously inserted into the tub using #10.14 washers and #10.15 screws. (See Figure 4a)
13. Reinstall at least (4) of the original seat bracket mounting bolts #11.10 into there original location to secure the right and left panels to the floor of the vehicle tub. (See Figure 4a)
14. Reinstall the original bolts #11.13 and original #11.14 washers to secure the rear door striker assembly and the left panel #3 to the vehicle tub. (See Figure 4a)
15. Skip below to step 37.
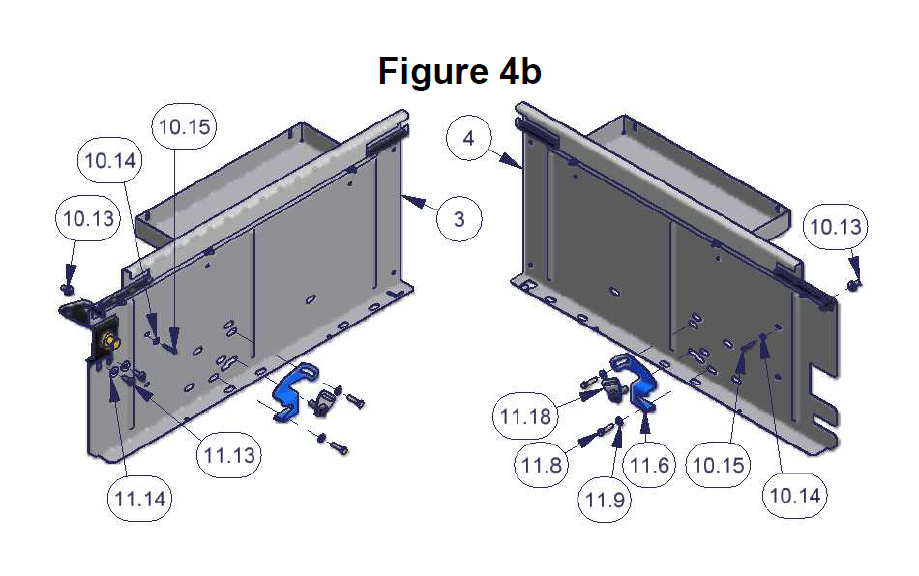
16. Remove the factory rear seat catch bolts #11.8, #11.9 Washers and brackets #11.6 attached to the vehicle tub wall. Save the bolts #11.8 & washers #11.9, they will be reused. (See Figure 4b)
17. Remove the factory rear seat belts #11.18. Tip: These can be zip tied to roll bar for storage. (See Figure 4b)
18. Remove the factory bolts #11.13 and #11.14 washers which secure the rear door striker to the vehicle tub. These will be reused. (See Figure 4b)
19. Locate the holes in the tub on the right and left (Optional) side corresponding with holes in both side panels where screw #10.15 is illustrated. There is a rubber plug in the tub which will need to be removed and the carpet will need to be cut where the screw will pass through. (See Figure 4b)
20. Insert the rubber well nuts #10.13 in the right and left (optional) sides behind the carpet. (See Figure 4b) Tip: it is easiest to only start all the mounting hardware a few turns then come back and tighten them down.
21. Place the right #4 & left #3 panel in the vehicle and fasten them to the well nuts #10.13 previously inserted into the tub using #10.14 washers and #10.15 screws. (See Figure 4b)
22. Reinstall the original seat bracket mounting bolts #11.8 with the original #11.9 washers into there original location to secure the right and left panels to the wall of the vehicle tub. (See Figure 4b)
23. Reinstall the original bolts #11.13 and original #11.14 washers to secure the rear door striker assembly and the left panel #3 to the vehicle tub. (See Figure 4b)
24. Skip below to step 37.
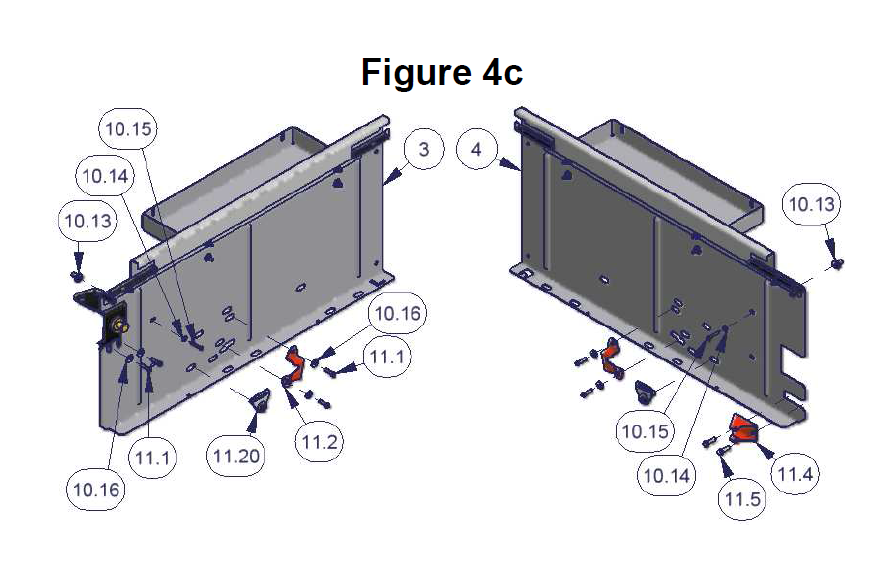
25. Remove the factory rear seat catch bolts #11.1 and brackets #11.2 attached to the vehicle tub wall. Save the bolts #11.1 they will be reused. (See Figure 4c)
26. Remove the factory rear seat belts #11.20. (See Figure 4c)
27. Remove the factory bolts #11.1 which secure the rear door striker to the vehicle tub. (See Figure 4c)
28. Remove the factory bolts 11.5 and bracket #11.4 on the right side. Save this hardware you will reuse it. (See Figure 4c)
29. Optional drilling recommended. Locate the holes in the #4 right and #3 left side panels where screw #10.15 is illustrated. Place the side panels #3 & #4 in the vehicle lining up the other holes illustrated and mark the spot behind both of the holes where screw #10.15 is illustrated. Drill these out to 3/8”. It is recommended to use silicone sealant or touch up paint in these holes to prevent rusting. (See Figure 4c)
30. Cut the carpet where these holes were drilled. (See Figure 4c)
31. Insert the rubber well nuts #10.13 in both of the drilled holes behind the carpet. (See Figure 4c) Tip: it is easiest to only start all the mounting hardware a few turns then come back and tighten them down.
32. Place the right #4 & left #3 panel in the vehicle and fasten them to the well nuts #10.13 previously inserted into the tub using #10.14 washers and #10.15 screws. (See Figure 4c)
33. Reinstall the original seat bracket mounting bolts #11.1 with the included #10.16 washers into there original location to secure the right and left panels to the wall of the vehicle tub. (See Figure 4c)
34. Reinstall the original bolts #11.1 using the included #10.16 washers to secure the rear door striker assembly and the left panel #3 to the vehicle tub. (See Figure 4c)
35. Reinstall the original bolts #11.5 and bracket #11.4 to secure the right side panel #4 to the tub. (See Figure 4c)
36. Skip below to step 37.
37. Make sure all hardware has been tightened.
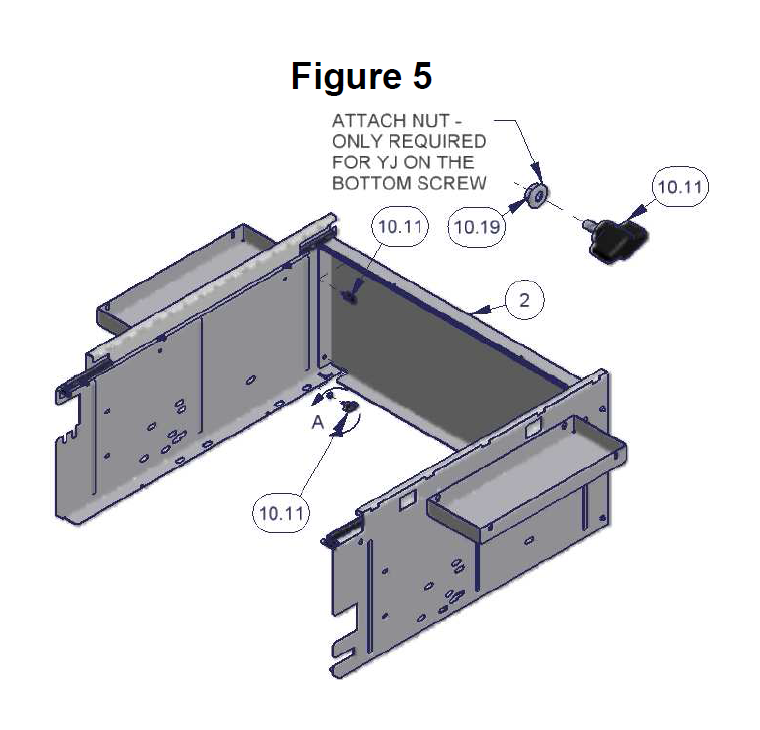
38. Fasten the #2 Rear Panel to the front of #3 left and #4 right side panels using the (4) #10.11 knob screws. (In the Jeep Wrangler YJ models the (2) included hex washer nuts #10.19 will need to be inserted on (2) of the #10.11 knob screws which will be used on the lower mounting holes for additional clearance on the backside). (See Figure 5)
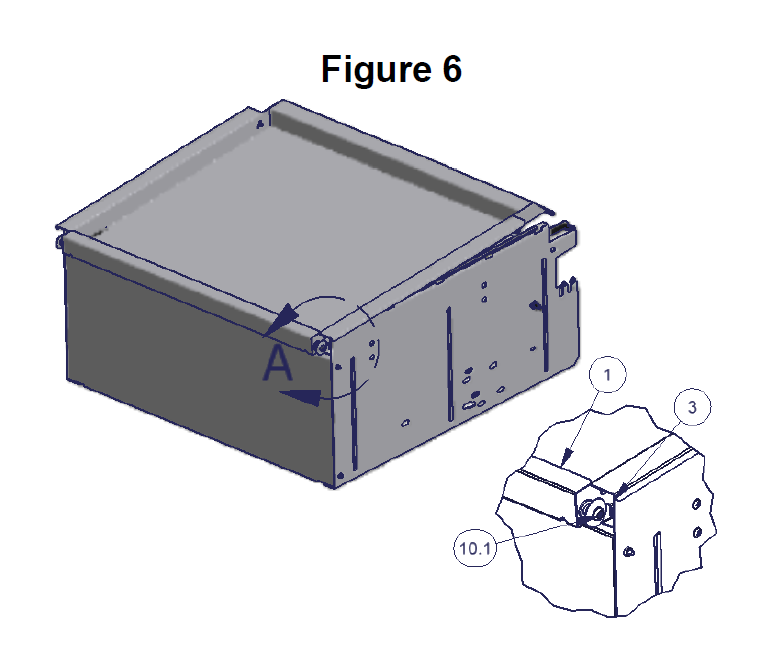
39. Install the lid #1 by placing it on the enclosure assembly so the welded studs with bolts #10.1 are overlapping the enclosure toward the front of the vehicle. The end of the lid #1 with the Tuffy logo should face the rear of the vehicle. Then pull the lid assembly toward the rear of the vehicle till it stops while guiding the welded studs into the slots on the side panels #3 and #4. (See Figure 6)
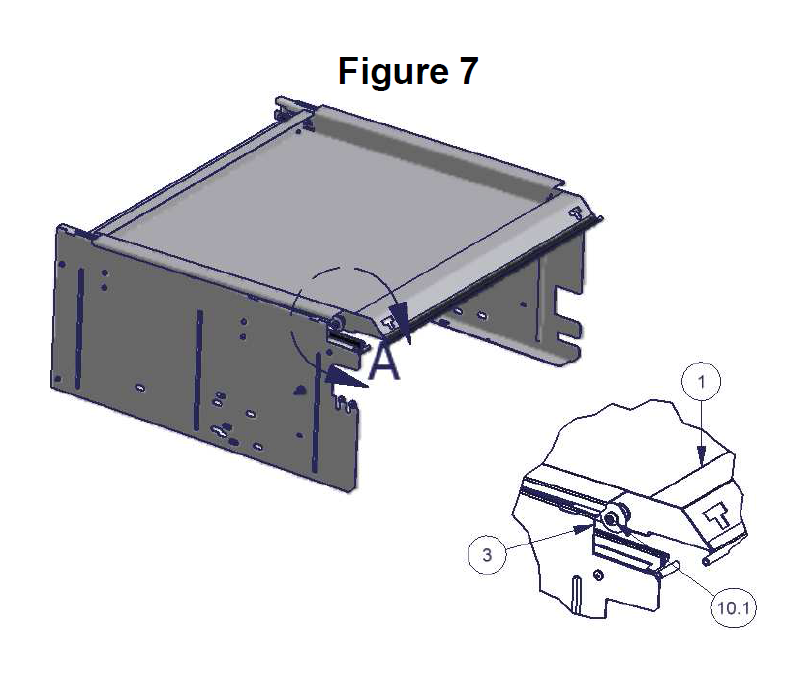
40. Close the lid #1. The welded studs on the lid #1 with bolts #10.1 located toward the rear of the vehicle should now overlap the end of the side panels. Push the lid toward the front of the vehicle till it stops while guiding the welded studs into the slots on the side panels #3 and #4. When the rear vehicle door is shut it prevents the lid from being pulled toward the rear releasing it from the slots. When the rear vehicle door is locked so is the Tuffy enclosure. (See Figure 7)
41. Check the seal between the vehicle rear door and the lid. Close the top rear window and check the clearance with the lid. Loosen the mounting hardware and maneuver the enclosure so there is a good seal and clearance between the top rear window if necessary.
