 FREE 1 to 3-Day Delivery on Orders $149+ Details

How to Install Tuffy Security Console Insert on your 1997-2006 Wrangler
Tools Required
- (1) 1/2" wrench or ratchet
- socket
- and extension
- (1) 1/2" wrench
- (1) 9/16" wrench or ratchet
- socket
- and extension
- (1) 9/16" Wrench
- Flat head screwdriver
- Phillips head screwdriver
- 1/4" drill bit
- 3/8" drill bit
- Electric drill
- Silicone sealant (not necess

Shop Parts in this Guide
Shipping Package
(1) Camlock
(1) Large nut for camlock
(2) ¼-20 x ½” Phillips pan screws
(2) ¼-20 x ¾” Phillips pan screws
(2) ¼-20 x 1 ½ Phillips pan screws
(1) 3/8 x 1 ½ Bolt
(1) 3/8 Nylock nut
(4) 3/8” Washers
(5) Escutcheon rings 1 5/64” OD
(2) 5/16 x 1 ¼” Bolts
(2) 5/16 Nylock nuts
(4) 5/16” Washers
(1) Lock Bracket
(1) Neoprene seal
Installation
REMOVE THE ORIGINAL CONSOLE
1. Removing one or both front seats is not necessary but it will make installation easier.
2. Remove the (6) self-tapping screws from the factory console. Two are located inside the console, two more are located on the right hand side along the bottom. One is in the front cup holder, and the last one is under the gearshift boot. Save these screws because you will reuse part of them.
3. If you have an Air Bag Disable switch in your factory console do not unplug the wires. Remove the entire switch assembly by pushing it out from behind then maneuvering it back through the opening it came out of, you will reuse it.
4. Shift the 4WD lever to 4Lo and remove the factory console.
DRILL OUT MOUNTING HOLES
WARNING! Make sure that there is nothing under the vehicle that will be damaged by the drill bit when drilling.
5. Drill out the two original mounting holes located directly under the storage compartment of the original console on the floor of the vehicle, to 3/8” diameter.
DISASSEMBLE ORIGINAL CONSOLE
6. Remove the (4) rivets on the top rim of the original console. To do this you will need to drill them out using a ¼” drill bit. Be careful not to slip off the rivet when drilling; the spinning bit can easily damage the original console.
7. After all the rivets are drilled out remove the old inside compartment and discard.
8. Remove the screws holding the lid hinge to the console.
9. Remove the screws holding the underside liner and lock from the lid, keep these screws but discard the liner, seal,
and the lock.
ASSEMBLE THE CONSOLE WITH THE STEEL TUFFY INSERT
10. Screw the new steel lid liner to the original lid using the original screws.
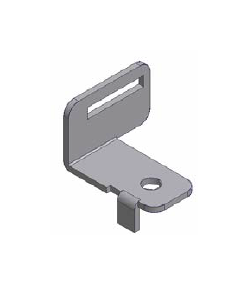
11. Insert the (5) escutcheon rings onto the Camlock and place into the original lock hole through the new metal lid liner and fasten with the large nut, the cam will have to be removed for installation. (See Figure 1)

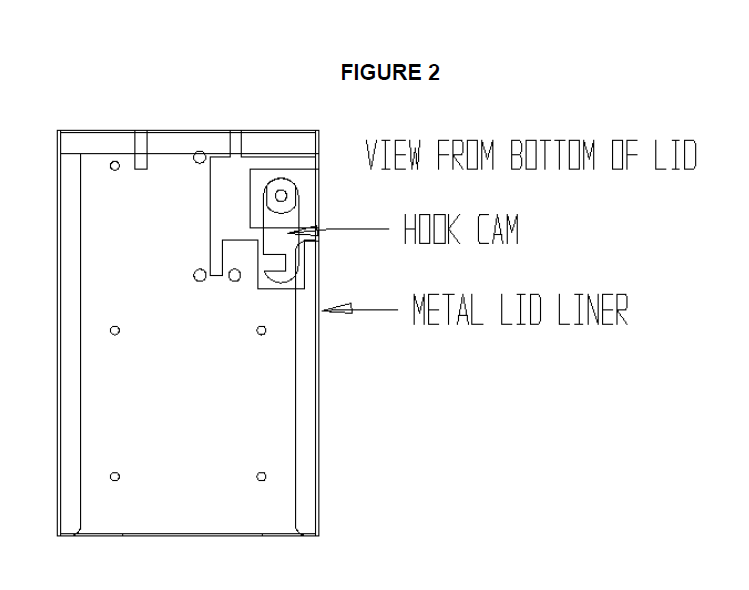
12. Turn the lock key so that it is in the unlocked position (The keyhole slot will be horizontal or right to left). Fasten the hook cam back to the camlock. Make sure the hook is facing the proper direction. (See Figure 2)
13. Apply rubber seal around the rim of the steel lid.
14. Insert the new steel box into the plastic console and fasten it through the (4) old rivet holes with (2) ¼-20 x ¾” screws in front and (2) ¼-20 x 1 ½” screws in the back. It may be easier to install the screws after enlarging the rivet holes with a 5/16” drill bit. Do not overtighten screws.
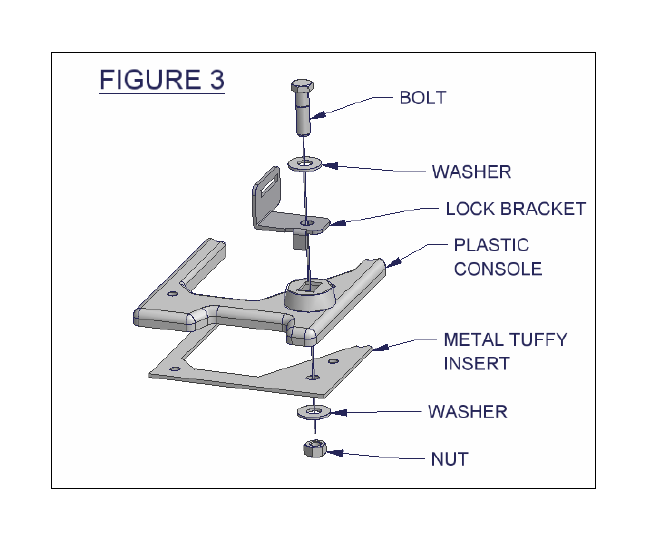
15. Install the lock bracket to the box using (1) 3/8-16 x 1 ½” bolt, nut, and (2) washers. Position lock bracket correctly. Do not overtighten. (See Figure 3)
16. Mount the lid to the new metal box using (2) ¼-20 x ½” screws and washers.
TROUBLESHOOTING LOCK ALIGNMENT PROBLEMS (Be sure the rubber seal is applied in step 13)
• If the lid is out of alignment with the Lock bracket, note which direction the lid needs to be adjusted to align properly, then lightly force the lid in the correct direction. Do this in small increments until the lid closes properly.
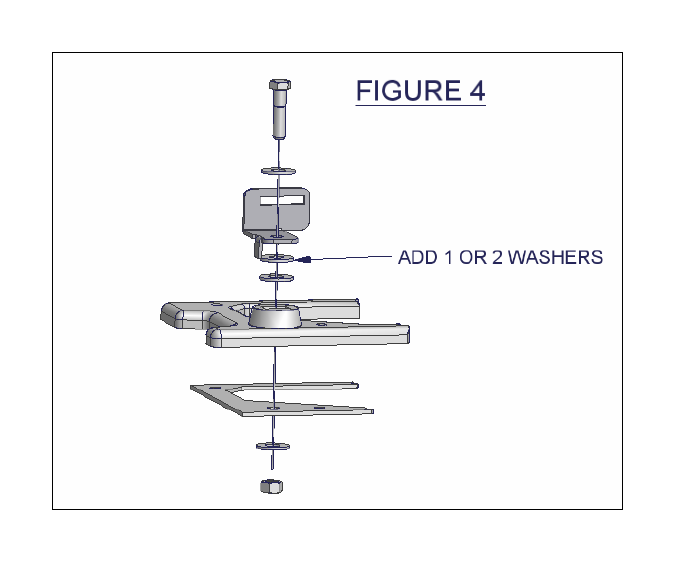
• If the lid is too tight or does not lock, place (1) or (2) of the extra 3/8” washers between the lock bracket and the plastic console. (See Figure 4) This will raise the bracket up. If the problem persists (1) or (2) escutcheon rings may have to be removed from behind the lock. This will lower the lock.
• If the key cannot be removed when the box is locked. The lock may not be centered in the mounting hole. With the key removed in the unlocked position, while looking at the lock-cam from under the lid, lightly push the cam counterclockwise until it stops. This will slightly rotate the camlock in the mounting hole.
REINSTALL ASSEMBLED CONSOLE
18. Reinstall the console by guiding it over the gearshift lever, 4WD lever, and emergency brake, inserting each into its proper slot. Be careful not to tear your seats, rip the gearshift boot, or scratch the dash.
19. If you have an Air Bag Disable Switch reinstall it with the original mounting hardware. Make sure it is still plugged in correctly.
20. Line up the holes making sure that the right side of the console is on the outside of the emergency brake bracket.
21. Start to fasten the console down by using the provided, (2) 5/16 x 1 ¼” bolts, (2) 5/16 nylock nuts and (4) 5/16” washers in the two original mounting holes you drilled out earlier. Insert the bolts from underneath the vehicle. To prevent rust we recommend applying silicone sealant to the bolts before inserting them into the drilled holes.
22. Fasten the rest of the console to the vehicle using the original mounting bolts. You may want to put silicone sealant on the rest of the mounting screws to prevent rust.
23. Check the operation of the lock and all the levers including the emergency brake. Make sure the brake does not hit the console when engaged.

