 FREE 1 to 3-Day Delivery on Orders $149+ Details

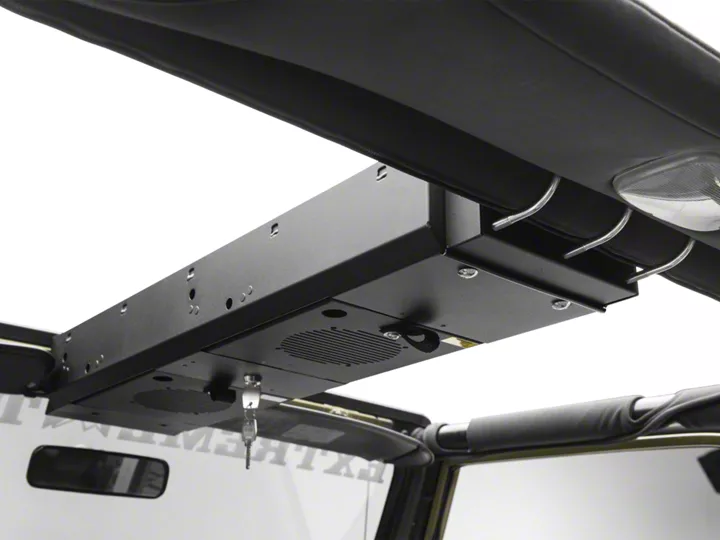
How to Install a Tuffy 2 Compartment Overhead Security Console on your 1987-2002 Wrangler YJ & TJ
Installation Time
1 hours
Tools Required
- Ratchet ( ¼” Drive)
- 3/16” Allen wrench
- T-20 torx wrench
- 7/16” socket
- ½” socket
- ¼” drive ratchet extensions (12-16” of extension depending on vehicle)
- 1/8” Flat slotted screwdriver
- 3/8” wrench or ratchet
Shop Parts in this Guide
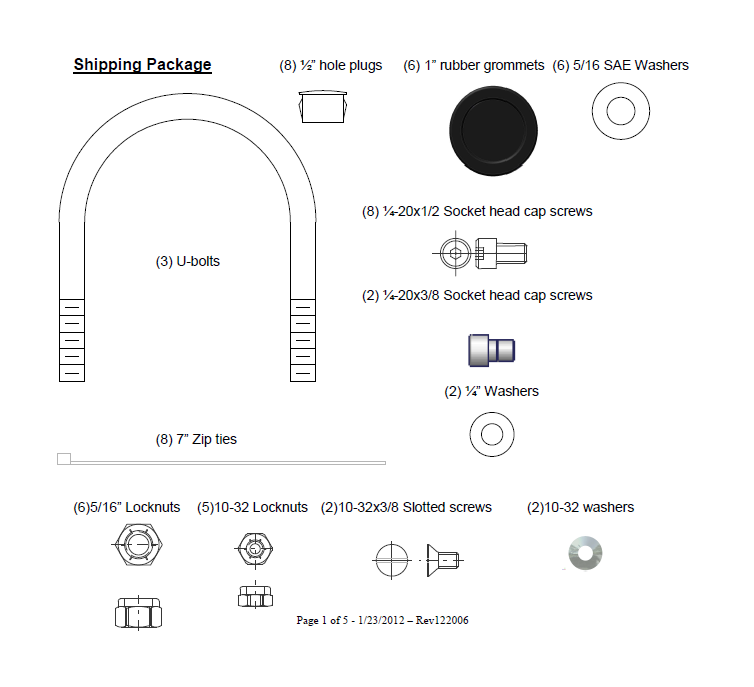
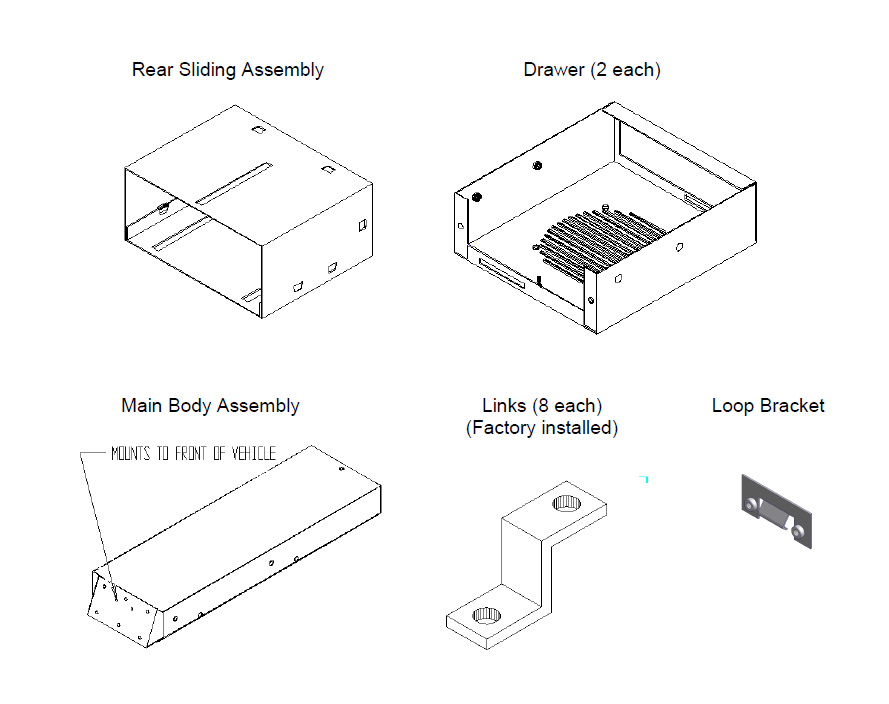
Parts Reference List (included parts)
Mounting Directions
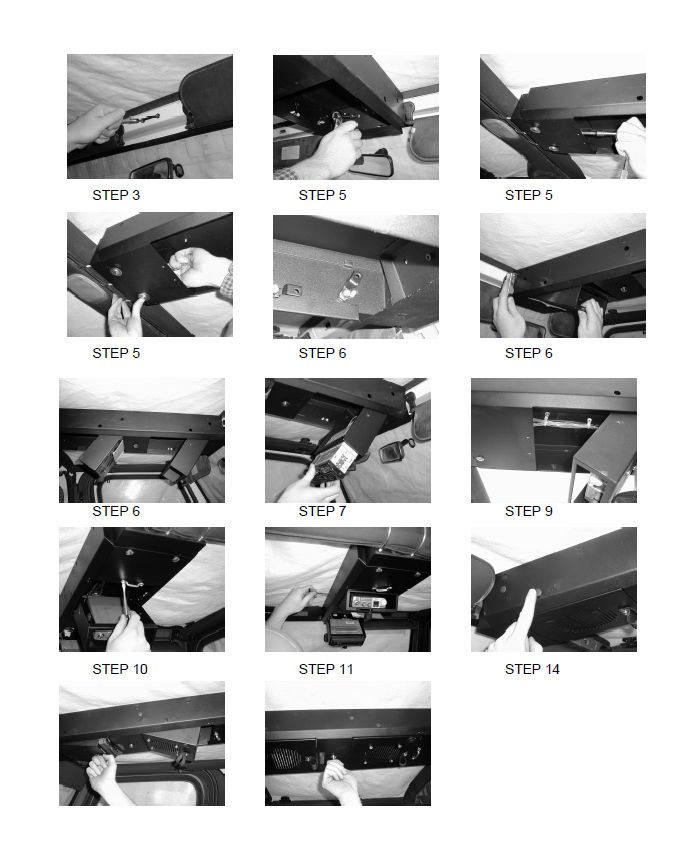
Refer to the pictures on the next page to help illustrate instructions.
1. Decide where you want to run your stereo and/or CB wires; either to the front of the console by running wires on the edge of the windshield, or to the rear of the console by running wires along the rollbar.
2. Extend the wires to the mounting location (A CB antenna extension wire can be purchased at any Radio Shack or similar electrical shop). Cut out the center of the rubber grommets you will be feeding wires through and install all (4) grommets in the four one inch holes on the front and rear of the console.
3. Remove the footman loop from the top center of the windshield of your Jeep using a T-20 torx wrench (If the footman loop on your Jeep is riveted on and cannot be removed or it has a full cage ignore this step).
4. Important- Read through the next couple of steps and have all of the following items ready and
near-by before you continue.
> Torx wrench and (2) bolts you removed.
> Main and sliding assemblies.
> The three U-bolts supplied along with 5/16-18 locknuts and 5/16 SAE washers.
5. It is recommended that two people complete the following steps:
> Hold the main body assembly in place and bolt it to the windshield using the original (2) torx bolts previously removed.
NOTE: If you were unable to remove the footman loop attached to your windshield slide
the Loop Bracket provided behind the footman loop from the top and attach it the main
body assembly with (2) ¼-20x3/8” socket head cap screws and (2) ¼” washers, this will
sandwich the footman loop between the Loop Bracket and the main body.
NOTE: If your Jeep has a full cage you will need to purchase three 2” pipe x 5/16” U-bolts and use them to bolt the front of the main assembly to the cage in a similar fashion to the rear mounting system.
> Use the (3) U-bolts, 5/16 washers, and locknuts provided to fasten the rear sliding
assembly (now slid partially inside main body) to the rollbar.
> Tighten the torx bolts in the front and U-bolts in the rear, and then tighten the carriage bolts holding the rear sliding assembly to the main body assembly
> Check to make sure the console feels secure.
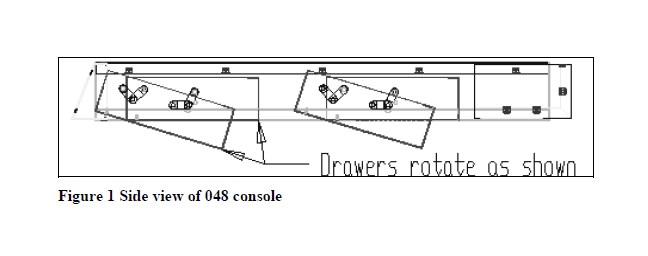
6. Mount the drawers into the openings in the main body assembly. Be sure that the links inside the console are “resting” so that the holes line up with the holes in the body. It is important to place a piece of cardboard under the drawer to prevent scratching during installation. If the drawer is pushed up into the opening in the main body assembly in the approximate orientation of the open drawer in Figure 1, the holes in the body, link, and drawer will line up and (4)¼-20x1/2” socket head cap screws can be installed using the 3/16” Allen wrench. Note, only fasten each drawer with the two links toward the front of the vehicle, DO NOT fasten the links toward the rear of the vehicle.
7. Mount stereo, CB, and/or speaker in drawer(s). Be sure to secure wires to side holes on the rear side of the drawer with (1)zip tie per drawer(provided) to ensure wires will not snag onto anything.
8. Attach the stereo to the drawer using the stereo support strap and (1) 10-32 flat washer and (1) 10-32 locknut.
9. Attach supply wires to stereo and/or CB wires. Route the wires by attaching them to the studs on the top of the console with (3) zip ties provided and (3) 10-32 locknuts. Use the remaining (3) zip ties to bundle wires together. Warning! Wires must be routed so that they do not interfere with the opening of the drawer or the operation of the cam. Be sure wires will not be pinched. Leave enough slack in the wires so that the drawers will be able to move freely. Refer to Figure 1 and note how the drawers move relative to the body.
10. Install the footman loop, you removed from the front windshield, into the nuts that have been pressed into the main body assembly just behind the rear drawer opening. Use the (2)10-32x3/8 flat slotted screws and the screwdriver for installation. This footman loop will act as an anchor point for installing and securing a “Bikini” top. (If you were unable to remove the footman loop from the windshield and require it for a “Bikini” top footman loops can be purchased at most hardware stores.)
11. Notice that the ½” holes in the side of the main body will line up with the holes in the links when the drawer is in the open position and the links are resting against the studs in the console body, see Figure 1. Use (4) ¼-20x1/2 socket head cap screws provided to fasten the link to the drawer. Tighten the screw all the way and then back it off 3/8 to 1/2 of a turn. Follow this procedure until the drawer is fastened and in place.Warning! The nuts inserted in the drawers are self-locking. The socket head cap screws will be difficult to screw in because of this feature. Do not cross thread screws.
12. Check again and make sure that wires are not interfering with any moving parts.
13. Work the drawer in and out a few times. If the drawer does not rotate try backing off the socket head cap screws a little more.
14. Insert (8) ½” hole plugs in holes on main body.
15. Warning! Do not leave drawers open while vehicle is in transit, open drawers may be hazardous in the event of an accident or roll-over.
16. Lock it up!
